Diamond tile brings instant geometric interest to a space, turning an ordinary floor or backsplash into a focal point with its crisp angles and dynamic lines. Whether you choose true diamond-shaped tiles or simply set square tiles on the diagonal, the effect is the same: a room that feels more designed, more energetic, and often larger than it really is.
This versatile look spans every style from vintage to ultramodern. Understanding the shapes, materials, and layouts available helps you use diamond tile in a way that elevates your home rather than overwhelming it.
What Counts as Diamond Tile
The term covers a couple of related ideas. True diamond or rhombus-shaped tiles come pre-cut into elongated four-sided shapes that fit together into honeycomb or harlequin patterns. Separately, any square tile rotated 45 degrees and installed point-up reads as a diamond, which is the classic diagonal layout.
Both approaches deliver that distinctive geometric energy. Pre-shaped diamond tiles, including elongated and harlequin styles, give you a built-in pattern, while diagonal-set squares let you use standard tiles you already love in a more striking arrangement. Knowing the difference helps you shop and plan accurately.
Popular Shapes and Patterns
Diamond tile is not one look but a family of them. A few favorites stand out.
- Harlequin: Alternating two colors of diamonds, often black and white, for a bold checkerboard-on-the-diagonal effect.
- Elongated diamond: Slim, stretched rhombus shapes that create a sleek, contemporary lattice.
- Diagonal square: Standard squares turned 45 degrees, the simplest way to get the look.
- Diamond mosaic: Small diamond tiles on mesh sheets, ideal for backsplashes and accent walls.
- 3D and beveled diamonds: Faceted tiles that catch light and add depth, popular on feature walls.
Material Options
Diamond tile comes in nearly every material, so you can match durability and budget to the room. Porcelain and ceramic are the most common and practical, offering durability, water resistance, and a huge range of colors and finishes. Glass diamond mosaics add shimmer and reflectivity, beautiful on backsplashes.
Natural stone like marble or slate in a diamond cut delivers luxury and organic variation, though it needs sealing. Metal and mirrored diamond tiles create striking accents. For floors, choose a durable, slip-appropriate porcelain or stone; save delicate glass and metal for walls and low-traffic accents.
Where to Use Diamond Tile
The pattern works almost anywhere, but it shines in certain spots. On floors, a diagonal or harlequin layout adds drama to entryways, bathrooms, and kitchens, and the diagonal lines can make a narrow room feel wider. On walls, diamond mosaics make eye-catching kitchen backsplashes and bathroom accent walls.
Use it as a full floor for maximum impact, or as a defined accent, such as a diamond-patterned border, a shower niche, or a single feature wall, when you want a touch of geometry without committing the whole room. In small spaces, a diagonal layout is a designer trick for adding perceived size.
Installation Considerations
Diamond layouts demand more precision than a simple straight grid, so planning is everything. The angled cuts at walls and edges produce more waste, so order extra material, typically 15% to 20% over your square footage rather than the usual 10%.
Setting tiles on the diagonal requires careful layout lines snapped at 45 degrees from a center point so the pattern stays balanced and symmetrical. Edge cuts must be exact, which means more time with a wet saw. Because the difficulty is higher, many homeowners hire a professional for diamond and harlequin floors, especially in rooms with lots of corners and obstacles. A laser level and patient dry layout pay off.
Grout and Color Strategy
Grout choice shapes the whole effect. A contrasting grout, such as dark grout with light tiles, emphasizes the geometry and makes every diamond pop, perfect for a harlequin statement floor. A matching grout softens the lines for a more seamless, subtle pattern.
With multi-color patterns like harlequin, keep the palette intentional; two strong contrasting colors read crisp and classic, while too many colors can look busy. For a calmer look, choose tonal diamonds in varying shades of one color. Always seal cementitious grout in wet areas and on floors to keep those many grout lines clean.
Cost Expectations
Treat figures as estimates that shift with material and region. Ceramic and porcelain diamond tiles often run $3 to $12 per sq ft for material, glass mosaics $10 to $30 or more, and natural stone $7 to $25 per sq ft. Specialty 3D and metal tiles cost more.
Installation labor runs higher than for a standard straight layout because of the precision and extra cuts, frequently $8 to $20 per sq ft installed depending on complexity. Add the higher waste factor into your material budget. Spent wisely, diamond tile delivers a custom, high-end look that makes a lasting impression for years to come.
Design Styles That Suit Diamond Tile
The diamond motif spans an impressive range of styles, which is part of its appeal. A black-and-white harlequin floor evokes classic French and Art Deco interiors, perfect for an entryway or a glamorous powder room. Elongated diamond tiles in soft, tonal colors read clean and contemporary, ideal for a modern kitchen backsplash.
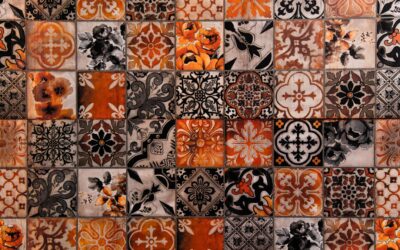
For a vintage or eclectic space, encaustic-look diamond tiles with intricate patterns add old-world charm. In a coastal or transitional home, pale stone or porcelain diamonds set on the diagonal feel light and airy. Because the shape itself carries so much visual energy, you can keep the color palette restrained and still end up with a floor or wall that feels thoroughly designed.
Tips for a Successful Project
A few practical habits make diamond tile projects go smoothly. Always do a full dry layout before setting anything, snapping accurate 45-degree reference lines from the room’s center so the pattern stays symmetrical and the cut pieces land evenly at the perimeter. Starting from a centerline rather than a wall keeps the diamonds balanced on both sides.
Order extra tile from a single lot to keep color consistent, and set aside the cleanest tiles for the most visible areas. Use tile spacers and leveling clips to keep the many points and joints aligned, since misalignment is glaring in a geometric pattern. If your tiles are large or the room is full of obstacles, the precision required makes professional installation a sound investment that protects the finished look.
Prefer to explore on your own?
See how new flooring looks in your actual room in seconds — free, no signup.
Try the free Floor Studio →