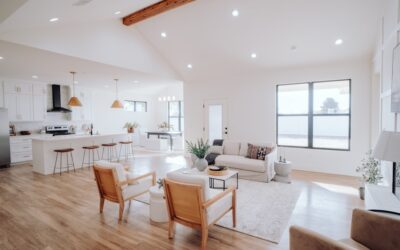
One of the few flooring decisions homeowners make on install day that they cannot easily undo is plank orientation. The wrong flooring direction can make a room feel cramped, highlight a sloped subfloor, or telegraph every imperfection in the framing below. Get it right and the floor reads larger, brighter, and more cohesive. There is no single universal rule, but there are four orientation principles that, combined, will tell you which direction the boards should run in any given room.
- Rule One: Run Parallel to the Longest Wall
- Rule Two: Follow the Primary Light Source
- Rule Three: Run Perpendicular to Floor Joists
- Rule Four: Follow the Sightline From the Entry
- Special Cases and Exceptions
- What About Multiple Rooms
- Plank Width and Direction Interaction
- Common Direction Mistakes I See Every Year
- The Decision Hierarchy
Rule One: Run Parallel to the Longest Wall
The most common guideline among professional installers is to run planks parallel to the longest wall in the room. This visually elongates the space and prevents a choppy look from too many cross-cut board ends.
In a 12 x 20-foot living room, the planks should run along the 20-foot dimension. In a narrow 5 x 12-foot hallway, they run along the 12-foot length. This rule alone solves about 70% of plank orientation questions in residential remodels.
Rule Two: Follow the Primary Light Source
When the longest wall rule does not give a clear answer (square rooms, irregular shapes), look at where natural light enters the space. Boards running parallel to the incoming light hide their seams and read as a continuous surface. Boards running perpendicular to the light cast tiny shadow lines at every seam, which can look choppy in raking sunlight.
Bedrooms with a single large window often default to plank direction aligned with the window wall. Open-concept living spaces with multiple windows usually follow the strongest morning or afternoon light source.
Rule Three: Run Perpendicular to Floor Joists
For nail-down hardwood over a wood subfloor, planks should run perpendicular to the floor joists below. This provides maximum structural integrity, distributes loads across more joists, and prevents sagging or squeaking between joist bays.
If you have to run parallel to joists for aesthetic reasons (longest wall happens to align with joist direction), add a layer of 1/2-inch plywood over the subfloor first to create cross-grain bracing. Skip this and the floor will telegraph every joist deflection within a few years.
Floating floors (LVP, laminate, click engineered) over slab or properly prepped wood subfloor are exempt from this rule. They rely on the locking system, not the subfloor, for structural integrity.
Rule Four: Follow the Sightline From the Entry
In open-concept homes, the orientation of flooring at the front door sets the tone for the entire main level. Plank direction that runs away from the front door (down the hallway, into the living room) draws the eye through the space and makes the home feel larger.
Real estate photographers love this orientation because it creates a strong visual line in listing photos. If you are renovating a flip or planning resale, prioritize this rule over the longest-wall rule when they conflict.
Special Cases and Exceptions
Hallways always run with their length, regardless of the rooms on either side. A hallway floor that crosses the hall direction immediately looks like a mistake.
Diagonal installs at 45 degrees are an option for square rooms or rooms with multiple competing sightlines. They add 10-20% in material waste and 25-30% in labor time. Use sparingly in dining rooms or foyers where a feature pattern is intended.
Herringbone and chevron patterns ignore the parallel-to-longest-wall rule entirely. These patterns work in formal entries, dining rooms, and primary bedrooms where the floor itself is meant to be a design feature.
What About Multiple Rooms
For continuous floors that flow through multiple rooms, choose one orientation for the entire connected space. Changing direction at every doorway creates a patchwork look and forces awkward transition strips at openings.
The exception is when rooms are clearly separated by walls or pony walls. A formal dining room with full walls on three sides can run perpendicular to the adjacent kitchen if the design calls for it. T-molding or feature strips can bridge the transition cleanly.
Plank Width and Direction Interaction
Wider planks (7-inch and up) emphasize the orientation more than narrow 2-1/4-inch strip flooring. A wide-plank floor running the wrong direction will look obviously wrong; narrow strip flooring is more forgiving.
If you are committed to a particular direction for structural or design reasons but the room is on the small side, choose a narrower plank to soften the orientation cue. A 3-inch board in a 10 x 10-foot room reads as a neutral surface; a 9-inch board in the same room dominates.
Common Direction Mistakes I See Every Year
- Running planks across a narrow hallway, creating a “ladder” effect that shortens the space
- Switching direction at the kitchen-to-living-room threshold in an open floor plan
- Installing wide planks perpendicular to floor joists without adding plywood overlay
- Ignoring the front door sightline in a contemporary open layout
- Running boards parallel to the shortest wall to “save material” — the visual cost exceeds the savings
Each of these is an avoidable do-over. Spend an hour with painter’s tape on the floor, mocking out plank lines before the boxes get opened. A free hour now saves a $4,000 tear-out later.
The Decision Hierarchy
- Run perpendicular to floor joists if installing solid hardwood (or add plywood overlay)
- Then run parallel to the longest wall
- Then align with the primary light source if the room is square
- Then prioritize the front-door sightline in open-concept layouts
- For continuous flow, pick one direction and stick with it across all connected rooms
Follow that hierarchy and the right flooring direction emerges for almost any room. When in doubt, lay loose boards in two competing orientations and live with each for an hour before committing. The right direction will be obvious by the end of the test.
Prefer to explore on your own?
See how new flooring looks in your actual room in seconds — free, no signup.
Try the free Floor Studio →