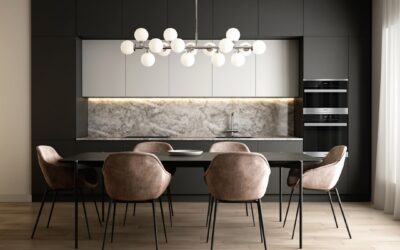
Nothing dates a kitchen faster, or ties it together better, than the lighting over the island. A well-chosen kitchen island light fixture does three jobs at once: it delivers task lighting where you actually prep food, it anchors the room as a design centerpiece, and it sets the whole space’s mood. Get the height, spacing, and scale right and the island becomes the heart of the home. Get them wrong and you end up with glare in your eyes, shadows on the counter, and fixtures that look either lost or overbearing above the slab.
- The Two Main Approaches: Pendants vs. Linear
- Getting the Hanging Height Right
- Spacing Multiple Pendants Correctly
- Sizing the Fixture to the Island
- Light Output and Bulbs
- Matching Style to Your Kitchen
- Installation Basics
- Layering Island Light With the Rest of the Kitchen
- Budgeting for Your Island Lighting
- Bringing It All Together
The Two Main Approaches: Pendants vs. Linear
Before shopping styles, decide on a format. You have two dominant choices:
- Multiple pendants — two or three individual hanging fixtures spaced across the island, the most popular and flexible look
- A single linear fixture — one elongated light or chandelier spanning the length, cleaner and more contemporary
Pendants suit most kitchens and let you dial in exact spacing, while a linear fixture gives a streamlined, high-end look and simplifies installation to a single electrical box. Narrow islands under 4 feet often look best with a single small pendant or a compact linear light; larger islands can carry two or three pendants comfortably.
Getting the Hanging Height Right
Height is the mistake homeowners make most often, and it is easy to fix if you know the rule. The bottom of the fixture should hang 30 to 36 inches above the countertop surface. That range keeps the light close enough to illuminate the work zone while staying above sightlines so you can see across the island and converse without a fixture in your face.
For rooms with tall ceilings above the standard 8 feet, add about 3 inches of height for every additional foot of ceiling to keep the proportions balanced. If anyone in your household is especially tall, err toward the higher end of the range so they are not ducking. Measure from the finished countertop, not the floor, since counter heights vary.
Spacing Multiple Pendants Correctly
When you use two or more pendants, even spacing is what makes the installation look intentional rather than accidental. Follow these guidelines:
- For two pendants, divide the island into thirds and center a pendant in each of the outer two-thirds, leaving the middle open.
- For three pendants, space them evenly with roughly 24 to 30 inches between centers.
- Keep the outermost pendants at least 6 inches in from the island’s ends so they do not crowd the edges.
- Align all pendants along the island’s centerline for a clean, symmetrical run.
A common island of 6 to 7 feet typically takes two or three pendants. A grand 9-to-10-foot island can carry three larger pendants or a single dramatic linear fixture.
Sizing the Fixture to the Island
Scale is the difference between a fixture that commands the room and one that looks like an afterthought. A useful rule for a linear fixture is that its length should span roughly one-half to two-thirds of the island’s length. For individual pendants, a diameter of 12 to 18 inches suits most residential islands, with larger 20-inch-plus pendants reserved for oversized islands and tall ceilings.
Do not undersize. The single most common error is hanging tiny 6-inch pendants over a big island, which leaves the fixtures looking marooned. When in doubt, go slightly larger; a fixture with presence reads as designed, while a too-small one reads as cheap.
Light Output and Bulbs
Your island is a workspace, so brightness matters. Aim for enough combined output to actually prep food, generally 300 to 400 lumens per square foot of island surface as task lighting, layered with your ceiling and under-cabinet lights. For color temperature, 2700K to 3000K gives a warm, inviting glow that flatters food and finishes, while 3500K to 4000K reads cleaner and more energy-forward if you prefer a crisp look.
LED bulbs are the default now, running cool and lasting 15,000 to 25,000 hours. Put the island lights on a dimmer, always; the ability to drop from bright task light for chopping down to a soft glow for dinner is one of the best upgrades you can make, and it costs about $25 for the dimmer switch.
Matching Style to Your Kitchen
The fixture should echo your kitchen’s design language. Some reliable pairings:
- Farmhouse and traditional — schoolhouse globes, lantern pendants, aged bronze or black
- Modern and contemporary — sleek linear bars, matte black or brass, minimal geometry
- Industrial — exposed-bulb cage pendants, raw metal, Edison-style filaments
- Transitional — seeded-glass pendants, brushed nickel or warm brass, gentle curves
- Coastal — woven rattan or rope pendants, whitewashed or natural tones
Coordinate the fixture’s metal finish with your cabinet hardware and faucet for a pulled-together look, though a deliberate contrast, like black pendants over a white-and-brass kitchen, can add welcome punch when done on purpose.
Installation Basics
Swapping a fixture over an existing electrical box is a manageable DIY job if you are comfortable around wiring. Kill the power at the breaker, confirm it is off with a voltage tester, and support the fixture while you connect the matching wires: black to black, white to white, and ground to ground. Multiple separate pendants, however, mean multiple boxes, which usually calls for an electrician if the wiring is not already in place.
Expect to pay a licensed electrician $150 to $350 to install or relocate island lighting, more if new boxes and wiring runs are needed. That is money well spent if you are adding fixtures where none existed.
Layering Island Light With the Rest of the Kitchen
Island lighting should never work alone. The best kitchens layer three types of light, and the island fixture is only one piece. Ambient light from recessed cans or a flush ceiling fixture fills the room evenly, task light from the island pendants and under-cabinet strips illuminates work zones, and accent light inside glass cabinets or under toe kicks adds depth. When these layers are on separate dimmer circuits, you can shift the whole kitchen from bright cooking mode to soft evening ambiance with a couple of switches.
A common mistake is relying on the island pendants for too much of the room’s total light. They are task fixtures aimed at the counter, so keep your recessed cans doing the heavy lifting for general illumination and let the island lights do their specific job. This layering also prevents the harsh, cave-like effect of a kitchen lit by a single bright source that throws deep shadows into the corners.
Avoiding Common Lighting Mistakes
A handful of errors show up in kitchen after kitchen, and all are easy to sidestep:
- Hanging too high — fixtures above 36 inches lose their task-lighting punch and look disconnected
- Undersizing the fixtures — tiny pendants over a big island look lost and cheap
- Skipping the dimmer — full brightness is rarely what you want in the evening
- Mismatched color temperatures — mixing warm and cool bulbs across the kitchen reads as a mistake
- Uneven spacing — pendants that are not evenly spaced or centered draw the eye for the wrong reason
Budgeting for Your Island Lighting
Costs span a wide range depending on the fixtures and whether you need electrical work. Individual pendants run anywhere from $40 for a basic option to $300 or more for designer pieces, while a quality linear fixture typically lands between $200 and $800. If wiring already exists, a confident DIYer can swap fixtures for the price of the lights alone plus a $25 dimmer.
Where budgets grow is new electrical work. Adding boxes for multiple pendants where none existed means hiring an electrician, usually $150 to $350, and running new circuits in a finished ceiling can push higher if drywall repair is involved. Plan the full scope before you fall in love with a three-pendant layout that your current single junction box cannot support without additional wiring.
Bringing It All Together
The right kitchen island light fixture comes down to a handful of measurements and one aesthetic decision. Hang it 30 to 36 inches above the counter, space multiple pendants evenly with the outer ones set in from the edges, size the fixture to roughly half the island’s length, and put it on a dimmer with warm LED bulbs. Nail those fundamentals and then choose a style that speaks to your kitchen’s character. Do that, and the island lighting will look professionally designed and, more importantly, work beautifully for both cooking and gathering.