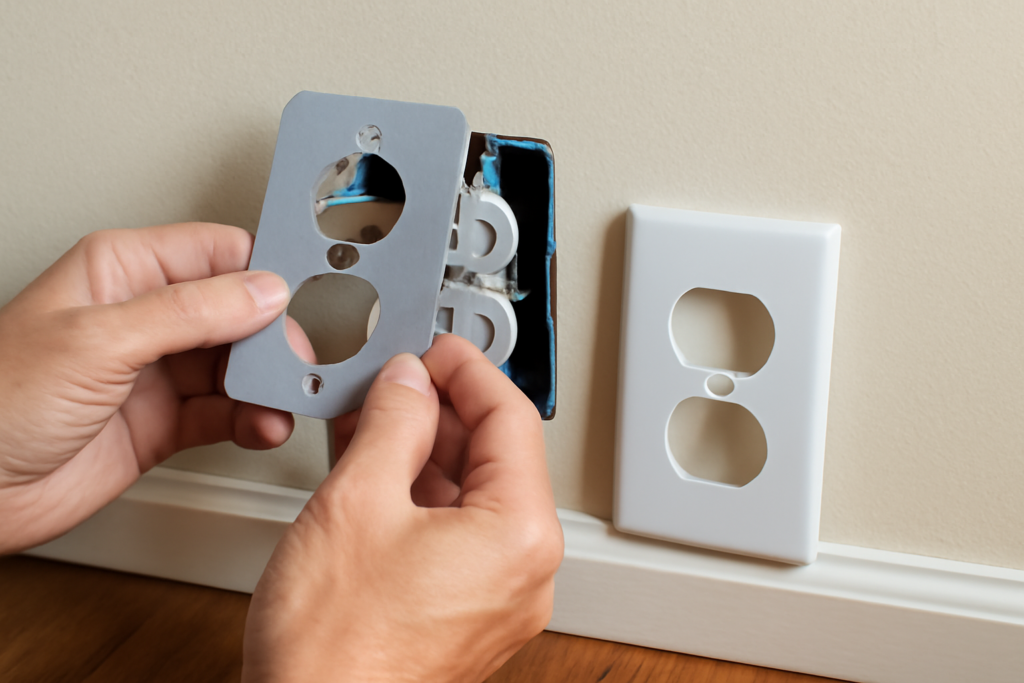
Hold the back of your hand an inch from an outlet on an exterior wall on a windy January day and you will feel it: a thin, steady draft pouring through a hole in your thermal envelope. Outlet insulation — foam gaskets behind the plates, plugs in unused receptacles, and sealant around the box — is the cheapest air-sealing work in the entire house, costing under $20 and one afternoon. Each outlet is small, but a typical home has 50 to 80 of these penetrations, and on exterior walls they connect your living room directly to the wind-washed cavity behind the drywall. Here is how to seal them properly, and what it honestly saves.
- Why Outlets Leak
- Fix 1: Foam Gaskets Behind the Plates (60 Seconds Each)
- Fix 2: Child-Safe Sealing Plugs for Unused Receptacles
- Fix 3: Seal the Box Perimeter and Penetrations
- Prioritize: Exterior Walls First
- Special Cases: GFCIs, Exterior Outlets, and Old Boxes
- What It Actually Saves
- Testing Your Work
- The Whole-House Context
Why Outlets Leak
An electrical box is a hole cut through the drywall into the stud cavity. The insulation behind it was almost certainly cut short, compressed, or left out entirely around the box, and the cable penetrations at the top and back of the box are open holes into the wall system. In older homes, those cavities connect to attics, rim joists, and crawlspaces. Cold outside air infiltrates the cavity, then flows through the gap between box and drywall, through the receptacle slots themselves, and out around the cover plate. During a blower-door test — the diagnostic where a fan depressurizes the house to 50 pascals — technicians routinely trace smoke-pencil streams pouring from outlets on exterior walls. Energy auditors lump these under “miscellaneous penetrations,” which together commonly account for 10-20 percent of a house’s measured leakage.
Fix 1: Foam Gaskets Behind the Plates (60 Seconds Each)
The foam gasket is the classic fix: a die-cut pad of soft foam that sits between the cover plate and the wall, sealing the plate-to-drywall gap and the box perimeter behind the plate.
- Kill the circuit at the breaker if you’ll touch anything beyond the screw — for a simple plate swap, careful work with the power on is common, but the breaker is the safe call.
- Remove the cover plate (one center screw on outlets, two on switches).
- Press the pre-cut gasket over the receptacle or switch; punch-out sections match standard, Decora, and switch configurations.
- Reinstall the plate snug — don’t crank it, or the plate cracks.
That is genuinely a 60-second job per outlet. Gaskets cost about $0.10-$0.30 each — a Frost King or Duck Brand 24-pack runs $3-$6, and contractor boxes of 100 cost $10-$15. Buy the slightly thicker, denser gaskets when you have a choice; the tissue-thin ones seal poorly around uneven drywall cuts.
Fix 2: Child-Safe Sealing Plugs for Unused Receptacles
Gaskets seal around the receptacle, but air still moves through the slots of the receptacle itself. For outlets that sit empty most of the year, push-in plastic safety plugs ($2-$4 for a 30-pack) block the slot leakage and double as child-proofing. On exterior walls this is worth doing wholesale; on interior walls it matters mainly for outlets connected to leaky cavities (under windows, back-to-back with garages). If your home was built after 2008, you likely have tamper-resistant receptacles — the shutters reduce but do not eliminate slot leakage, so plugs still help on the worst walls.
Fix 3: Seal the Box Perimeter and Penetrations
The bigger leak is usually the gap between the electrical box and the drywall, plus the cable holes in the box itself. Two approaches:
- Caulk the drywall gap. With the plate off, run a bead of paintable acrylic-latex caulk around the box-to-drywall joint, tool it with a finger, and reinstall. Gaps wider than 1/4 inch get minimal-expanding foam instead — never standard high-expansion foam inside a box area, and keep foam outside the box, not around the wiring terminals.
- Fire-rated sealant at cable entries. If you can reach the box in an unfinished basement or attic, seal where the NM cable enters with fire-block caulk or putty pads. This kills the leak at its source.
For serious retrofits, putty pads or airtight box covers (Lessco poly boxes in new construction; moldable putty pads like 3M MPP+ wrapped over the back of accessible boxes) turn the box itself into an air barrier — standard practice in Passive House work.
Prioritize: Exterior Walls First
Not all 70 outlets deserve equal attention. Work in this order:
- Outlets and switches on exterior walls — every one, gasket plus caulk plus plugs.
- Walls adjoining unconditioned space: garage walls, cantilevers, walls under attic kneewalls.
- Interior outlets that demonstrably draft (feel them on a windy day, or test with an incense stick).
- Everything else — gaskets only, as time allows.
Ceiling boxes for fixtures on the top floor leak worse than any wall outlet because stack effect drives air up through them into the attic — but those are sealed from the attic side with caulk or covers, a separate (and higher-payoff) job.
Special Cases: GFCIs, Exterior Outlets, and Old Boxes
A few outlet types need their own approach. GFCI receptacles take the same gaskets — buy packs that include the rectangular Decora-style punch-outs, since GFCIs use the wide face. Exterior outlets on the house’s outside walls leak in both directions; behind the weatherproof in-use cover, add the gasket, and seal the siding penetration around the box with exterior-rated sealant — these are among the leakiest single points on many homes. Metal boxes in older homes conduct cold as well as leaking air, so the caulk-the-perimeter step matters double, and cracked or undersized boxes you discover along the way should go on the electrician list. Knob-and-tube era outlets deserve caution: if you open a plate and find cloth-insulated wiring or no box at all, stop and get an electrical assessment before sealing anything — you may have found a bigger project, and burying K&T under insulation is a code violation. Finally, dimmers and smart switches run warm by design; gaskets are fine, but never pack foam into the box cavity around them.
What It Actually Saves
Honest numbers: sealing outlets alone will not transform a heating bill. Field studies and DOE guidance put gasket-and-plug savings in the range of 1-2 percent of heating and cooling costs for a typical leaky home — roughly $20-$50 a year at average energy prices, meaning the $20 material cost pays back in well under a year and everything after is free. The comfort effect is disproportionate: killing cold drafts at couch height along exterior walls is something you feel immediately. Air-sealing as a whole-house program — attic penetrations, rim joists, ducts, plus the small stuff — routinely saves 10-20 percent on conditioning costs, and outlets are the easiest line item on that list.
Testing Your Work
Verification is cheap and satisfying. On the next windy day (15+ mph), hold a lit incense stick or a smoke pencil ($15) an inch from each sealed outlet — the smoke should rise undisturbed instead of streaming sideways into the room. A $30-$60 infrared thermometer or a phone-attached thermal camera (Seek, FLIR One, ~$200) makes it visual: unsealed outlets on exterior walls show up as cold blue rectangles in winter, and a good gasket-and-caulk job visibly warms the reading toward wall temperature. If a sealed outlet still drafts hard, the leak is upstream — air is entering the stud cavity from the attic top plate or the rim joist below, and that cavity is worth flagging for the bigger air-sealing pass.
The Whole-House Context
Treat outlet sealing as the gateway job. If a blower-door test (often free or ~$300-$500 through utility audit programs, frequently rebated) shows high leakage, the big meat is in the attic plane: top plates, plumbing chases, recessed lights, and the attic hatch, followed by the basement rim joist with rigid foam and canned spray foam. Many utilities also rebate professional air sealing at $300-$1,500. Do the outlets yourself this weekend — 50 gaskets, a sleeve of plugs, a tube of caulk, about two hours — then let the audit tell you where the remaining 90 percent of the leakage lives. Small hole, small fix, but multiplied by every room in the house, it is the best $20 your thermal envelope will ever get.