For renters who dream of a stylish kitchen backsplash or a refreshed bathroom floor but cannot make permanent changes, removable peel and stick tile has become a genuine game-changer. These self-adhesive tiles deliver the look of real tile without grout, mortar, or special tools, and the best part is they peel away cleanly when you move out or want a new look. Understanding how they work, where they shine, and how to install and remove them properly is the key to a result that looks intentional rather than improvised.
What Removable Peel and Stick Tile Is
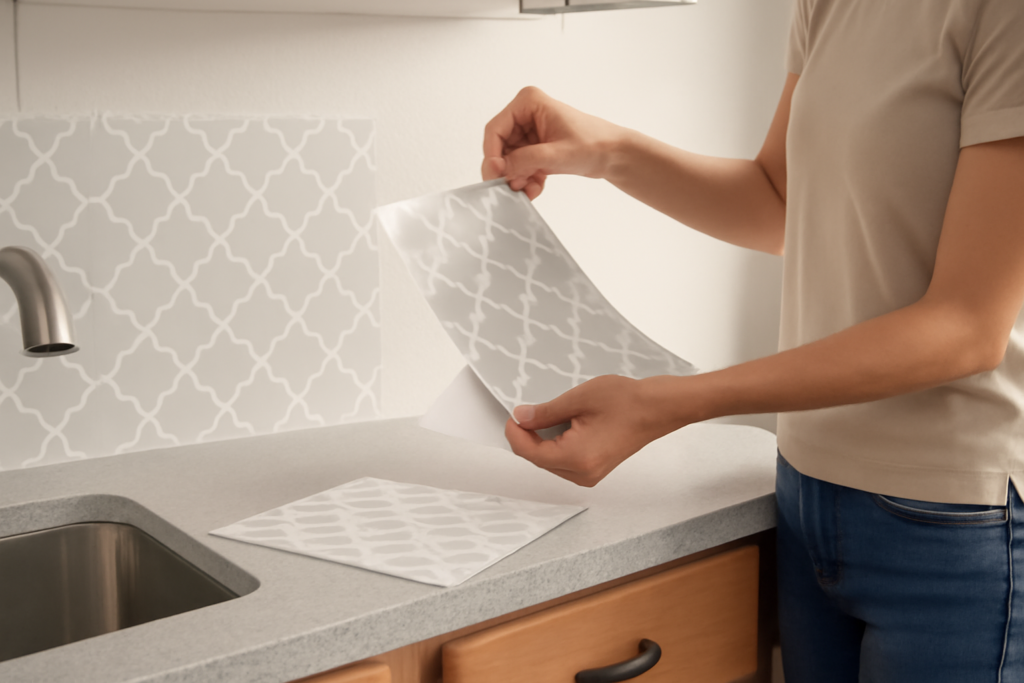
These tiles are thin, flexible squares or sheets with an adhesive backing protected by a paper liner. You simply peel off the liner and press the tile onto a clean, smooth surface. They come in two main forms: vinyl tiles that mimic ceramic, stone, or wood for floors and backsplashes, and gel or thicker dimensional tiles that add a raised, realistic texture for walls. Because they require no grout, mortar, or wet saw, they are among the most beginner-friendly home upgrades available.
Where to Use Them
Peel and stick tile works best in specific spots. It excels as a kitchen backsplash, where the vertical surface stays dry and the visual impact is high. Bathroom walls and accent areas are good candidates too, though high-moisture zones like inside a shower demand caution. On floors, vinyl peel and stick tiles handle light to moderate foot traffic in kitchens, laundry rooms, and entryways. Avoid using them in constantly wet areas or over textured, dirty, or peeling surfaces, where the adhesive cannot grip and water can creep underneath.
What It Costs
Affordability is a big part of the appeal. General US market pricing runs roughly:
- Basic vinyl peel and stick floor tiles: $0.50 to $2 per square foot
- Mid-range patterned tiles: $2 to $5 per square foot
- Premium gel or dimensional backsplash tiles: $5 to $12 per square foot
A typical kitchen backsplash project often costs under $200 in materials, and a small bathroom floor can be refreshed for a similar amount, a fraction of what real tile installation would run.
Installing Peel and Stick Tile
Success depends almost entirely on surface prep. Follow these steps for a clean result:
- Clean thoroughly: Wipe the surface with a degreaser, then rinse and let it dry completely. Adhesive will not bond to grease or dust.
- Confirm the surface is smooth: The tiles need a flat, non-porous surface. Textured walls and rough floors will cause peeling.
- Plan your layout: Dry-fit tiles and find your center line so the pattern looks balanced and cut tiles fall at the edges.
- Peel and press: Remove the backing, align carefully, and press firmly from the center outward to remove air pockets.
- Cut to fit: Use a sharp utility knife and a straightedge to trim tiles around edges and outlets.
Pressing firmly and rolling the tiles with a small roller or even a rolling pin strengthens the bond and prevents lifting edges.
How Long They Last
Peel and stick tile is a semi-permanent solution, not a forever one. With good prep and proper surfaces, backsplash applications can look great for several years, while floor tiles in moderate-traffic areas typically last a few years before edges may begin to lift or wear. Quality matters: thicker, higher-grade tiles outlast bargain options. Keeping the tiles clean and avoiding standing water under them extends their life considerably.
Removing Them Without Damage
The clean-removal promise is what makes these tiles so popular with renters, but technique matters. Heat is your friend: warm each tile with a hair dryer to soften the adhesive, then peel slowly from one corner at a low angle. Removing tiles cold often pulls off paint or leaves a sticky residue. For any leftover adhesive, a little rubbing alcohol, an adhesive remover, or warm soapy water usually lifts it. Test a small area first, especially on painted drywall, and work patiently to leave the surface intact.
Cleaning and Everyday Maintenance
One of the joys of peel and stick tile is how easy it is to keep clean. For backsplashes, a damp cloth with a little mild dish soap wipes away grease and splatters; avoid harsh abrasives that can scratch the printed surface. On floors, sweep or vacuum regularly to keep grit from grinding into the finish, then damp-mop with a gentle cleaner. Do not flood the floor with water, because excess moisture can seep into the seams and loosen the adhesive over time. Wipe up spills promptly, and place mats at entryways to trap dirt before it reaches the tile.
Choosing Quality That Lasts
Not all peel and stick tile is created equal, and spending a little more pays off. Thicker tiles with a stronger adhesive backing resist lifting and feel more substantial underfoot. Read reviews for mentions of edges curling or tiles sliding, common complaints with bargain products. Gel and dimensional tiles generally look the most convincing on walls because of their raised texture, while better vinyl floor tiles have a clearer, more realistic print and a tougher wear layer. Buying a single sample first lets you test the adhesion and judge the look in your actual lighting before committing to a full order.
Pros and Cons at a Glance
The advantages are clear: low cost, easy DIY installation, no special tools, renter-friendly removal, and a wide range of styles. The trade-offs are real too. Peel and stick tile is less durable than true ceramic, can lift in heat or moisture if poorly applied, will not add resale value, and demands a smooth, clean surface to adhere properly. For a temporary refresh on a budget, the pros usually outweigh the cons.
Final Thoughts
For an affordable, reversible upgrade, removable peel and stick tile is hard to beat, especially for renters and quick refreshes. Choose quality tiles, prep the surface meticulously, and press firmly for a result that looks far more expensive than it is. Keep it out of constantly wet areas, and when it is time for a change, warm and peel slowly to leave your walls and floors as good as you found them.
Prefer to explore on your own?
See how new flooring looks in your actual room in seconds — free, no signup.
Try the free Floor Studio →