
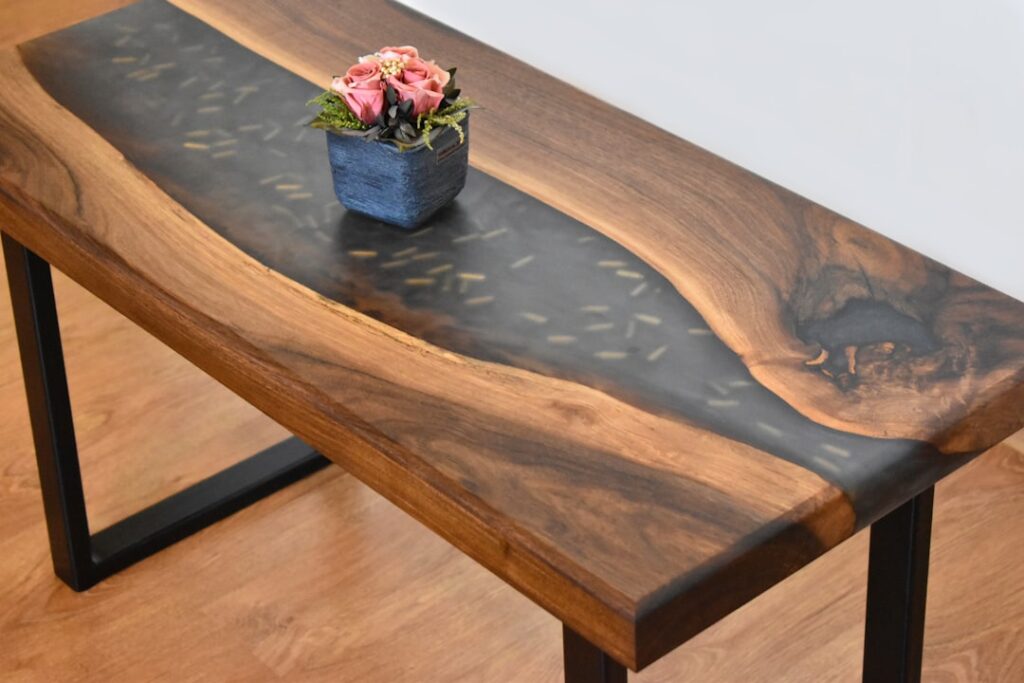
Few finishes turn an ordinary slab of wood into a showpiece the way a deep, glassy resin coat does. Tabletop epoxy is a two-part casting and coating resin engineered to self-level into a thick, crystal-clear surface that resists scratches, heat from a warm mug, and the occasional spilled drink. Whether you are sealing a live-edge dining table, a reclaimed bar top, or a river table loaded with pigment, the product behaves the same way: mix part A with part B, pour, and let chemistry do the work.
I have poured dozens of these surfaces over the years, and the difference between a flawless result and a cloudy, dimpled mess almost always comes down to preparation and patience. This guide walks you through what the material is, how to use it, and the mistakes that send first-timers back to the store for a second kit.
What Tabletop Epoxy Actually Is
At its core, this is a thermosetting plastic created when an epoxy resin reacts with a hardener. The two liquids start thin, generate heat as they cure, and lock into a rigid, transparent solid. Most countertop and bar formulas are sold as a “1:1 by volume” system, meaning you measure equal parts of each component. Deep-pour or casting versions often shift to a 2:1 ratio so they cure slower and release heat gradually, which prevents cracking in thick blocks.
Coating-grade resin is built for thin layers, typically 1/8 inch per pour. Casting resin is formulated for depth, handling pours from 1 inch up to 2 inches at a time depending on the brand. Mixing the two purposes is the single most common rookie error. Pour a deep block with a fast coating resin and the exotherm can spike past 200°F, yellowing the resin or even cracking it.
Where It Works Best
This finish shines on horizontal surfaces that benefit from a thick, protective shell. Common projects include:
- Bar tops and counters that take abuse from glasses and elbows
- Live-edge dining and coffee tables
- River tables where tinted resin fills a void between two wood slabs
- Embedded keepsakes, bottle caps, coins, or photos sealed under clear resin
- Cutting boards used for display rather than knife work
It is not ideal for flexible substrates, outdoor surfaces in direct sun without a UV-stable topcoat, or anything that flexes underfoot. Resin is hard but brittle, and movement in the substrate telegraphs straight through to cracks.
Tools and Materials You Need
Gather everything before you crack open the kit. Once the two parts meet, the clock starts and you cannot pause to hunt for a tool.
- Equal-volume measuring cups, clearly marked for A and B
- A clean mixing bucket and a flat stir stick or drill-mounted paddle
- A propane or butane torch, or a heat gun, to pop surface bubbles
- Nitrile gloves, safety glasses, and a respirator rated for organic vapors
- Painter’s tape and plastic sheeting to dam edges and protect the floor
- A level work surface, checked in both directions
How to Pour a Flawless Surface
Work in a dust-free space between 70°F and 80°F. Cold resin turns thick and traps bubbles; hot resin cures too fast.
- Seal the wood first with a thin “flood coat” or a coat of resin brushed into the grain. This prevents air trapped in the pores from outgassing into your final layer.
- Measure each part precisely. Off-ratio epoxy never fully cures and stays tacky forever, so do not eyeball it.
- Stir slowly for at least 3 minutes, scraping the sides and bottom of the bucket. Rushing whips in air.
- Pour in a steady ribbon and spread with a stick or notched spreader. Self-leveling resin will find its own surface within minutes.
- Pass the torch about 6 inches above the surface in quick sweeps. The heat breaks the surface tension and releases trapped air. Do not linger or you will scorch it.
- Cover with a box or tent to keep dust off, and repeat the torch pass after 10 and 20 minutes as fresh bubbles rise.
Cure Times and Safety
Most tabletop formulas are dust-free in a few hours, ready for a second coat in 4 to 10 hours, and safe to handle in 24. Full chemical cure, the point at which the surface reaches maximum hardness and chemical resistance, takes 72 hours and often a full 7 days. Resist the urge to set heavy objects on it early.
Treat the uncured resin and hardener as the hazardous chemicals they are. Always read the manufacturer’s data sheet, work with cross-ventilation or a fan moving air across the room, and wear a properly fitted respirator rather than a dust mask. Sanding cured resin creates fine particulate, so mask up for that too. Keep the material off your skin; sensitization from repeated contact is real and permanent.
Cost and What to Expect
Quality coating kits generally run $40 to $70 per gallon, and a gallon covers roughly 12 to 16 square feet at the standard 1/8-inch flood depth. Deep-pour casting resin costs more, often $90 to $150 per gallon, because each kit is engineered for slow, thick cures. Budget for at least two flood coats on most bar tops, plus pigments or dyes if you want color or a river effect.
Compared with hiring out a custom resin surface, doing it yourself saves a great deal, but the learning curve is real. Practice on a small sample board before committing to a six-foot dining table.
Coloring and Creative Effects
One reason this material is so popular is how easily it takes color. Mica powders create shimmering metallic swirls, liquid pigments and dyes produce solid or translucent tints, and alcohol inks bloom into organic, marbled patterns. For river tables, a translucent blue or green tint mimics flowing water between two live-edge slabs. Add color sparingly at first, since a little pigment goes a long way, and always mix it in thoroughly after combining parts A and B so the cure is not affected.
For depth effects, pour in layers, letting each set before adding the next, and embed objects between pours. Just remember that pigments and powders are an addition to a precisely measured resin batch, not a substitute for any of it, so measure your resin and hardener first, then introduce color.
Troubleshooting Common Problems
Cloudy or hazy resin usually means moisture contamination or pouring in cold conditions. Fisheyes and craters point to a contaminated surface, often silicone from furniture polish. Soft or sticky spots almost always trace back to an off-ratio mix or under-stirring. Yellowing over time is normal for non-UV-stable resin; choose a UV-resistant formula for surfaces near windows.
If you end up with imperfections, the fix is straightforward: sand the cured surface with progressively finer grits, wipe it clean, and pour another flood coat. Resin bonds beautifully to itself when the previous layer is scuffed and free of dust. With careful prep and a steady hand, your finished surface will look like poured glass and hold up for decades of everyday use.


