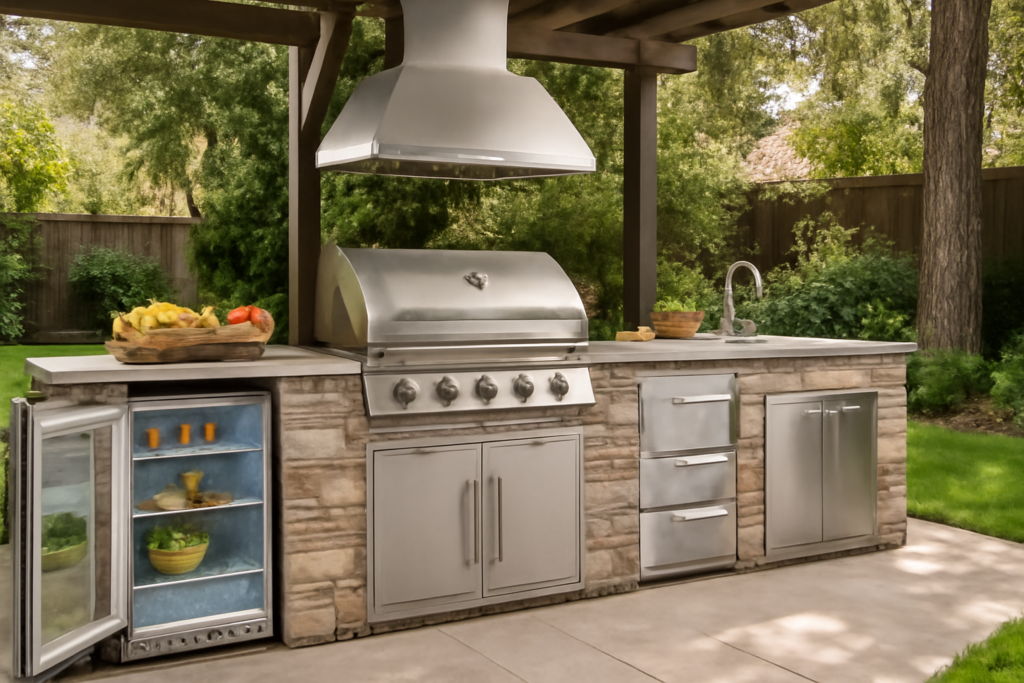
An outdoor kitchen turns a backyard from a place you visit into a place you live, and building one around commercial-style stainless components has become one of the most popular ways to do it. A Thor outdoor kitchen centers on heavy-gauge stainless steel appliances built to shrug off weather while delivering the kind of burner power backyard cooks want. Before you start pouring concrete or ordering a grill, though, it pays to understand the components, the layout math, and the utility work that separates a durable outdoor kitchen from a rusting regret.
This guide covers the appliances that make up an outdoor kitchen, how to plan the layout and counter heights, the gas and electrical work involved, and realistic costs so you can budget the project properly.
What Goes Into a Thor Outdoor Kitchen
The heart of the setup is a built-in gas grill, but a complete outdoor kitchen is a collection of coordinated stainless components designed to drop into a masonry or framed island.
- Built-in gas grill: The centerpiece, typically 32 to 48 inches wide with multiple burners
- Side burner: For sauces, sides, or a pot of water without leaving the grill
- Outdoor refrigerator: A stainless, weather-rated unit for cold drinks and prep ingredients
- Access doors and drawers: Stainless storage for tools, a propane tank, and dry goods
- Vent hood: Required if the grill sits under a roof or covered structure
Choosing appliances from one product line matters more than people expect, because matching stainless finishes, cutout dimensions, and door swings makes the finished island look built-in rather than assembled from mismatched parts. Confirm the exact cutout sizes on the spec sheet before framing anything.
Grill Power and Burner Basics
Grill performance comes down to burner output and cooking area. Built-in grills list total heat output in BTUs; a quality 4-burner unit puts out roughly 50,000 to 70,000 BTUs across the main burners. More important than raw BTUs is even heat distribution and a thick cooking grate that holds temperature and delivers good sear marks.
Look for stainless burners rather than cast iron for outdoor longevity, since stainless resists the corrosion that eats cheaper burners in a few seasons. A rear infrared burner adds a rotisserie option, and a dedicated searing zone hitting 700°F or more lets you get steakhouse crust. Match the grill width to how you cook: a 36-inch grill feeds a family, while a 48-inch model suits regular entertaining.
Layout and Counter Dimensions
A functional outdoor kitchen follows the same work-triangle logic as an indoor one, keeping the grill, prep space, and refrigeration within a few steps of each other. Standard counter height is 36 inches, matching indoor counters, and you want at least 18 to 24 inches of landing space on each side of the grill for platters and tools.
Plan the island depth around your deepest appliance, usually the grill, which needs about 24 to 30 inches. Leave adequate clearance behind the cook, at least 4 feet, so people can pass without brushing a hot grill. If you’re adding a bar overhang for seating, allow 15 inches of knee depth and 24 inches of width per stool. Sketch the whole layout to scale before ordering, because a grill cutout in the wrong spot is an expensive mistake to fix in masonry.
Gas, Electrical, and Utility Work
This is where an outdoor kitchen gets serious and often needs professionals. A built-in grill can run on a propane tank stored in the island or on a natural gas line run from the house. Natural gas is more convenient since you never refill a tank, but it requires a plumber to tap the home’s supply and run a buried line to the island, sized for the grill’s BTU demand.
Electrical is needed for the refrigerator, any lighting, and outlets, and outdoor circuits must be GFCI-protected and weather-rated per code. Many areas require permits for both the gas line and the electrical, plus an inspection. Budget for a licensed plumber and electrician here; a gas leak or an ungrounded outdoor circuit is not a corner to cut. Running utilities typically adds $1,000 to $4,000 depending on distance from the house and local labor rates.
Island Construction Options
The appliances drop into a base island, and you have a few ways to build it. A masonry island of block or brick with a stone or tile veneer is the most durable and traditional, but it’s heavy, permanent, and labor-intensive. A framed island using galvanized steel studs and cement backer board is lighter, faster to build, and easier to run utilities through before cladding it in stone or stucco.
Prefabricated island kits, sometimes sold to match a grill line, arrive as ready-to-assemble modules that dramatically speed the build. Whatever the method, cap it with a weatherproof countertop, granite, porcelain tile, or concrete, that resists heat, stains, and freeze-thaw cracking. Slope the counter slightly for drainage and seal any natural stone against the elements.
What an Outdoor Kitchen Costs
Costs scale with the number of appliances and the island construction. A basic setup with a built-in grill and a simple framed island lands around $3,000 to $6,000. A mid-range kitchen adding a refrigerator, side burner, storage doors, and a stone-clad island runs $8,000 to $15,000. A full outdoor kitchen with premium appliances, a covered structure, counter seating, and utility runs can climb past $20,000.
The appliances themselves are a big share: a quality built-in grill runs $1,500 to $4,000, an outdoor refrigerator $600 to $1,500, and access doors and drawers a few hundred each. Buying a coordinated appliance package often costs less than assembling pieces separately and guarantees the finishes and cutouts line up.
Adding a Cover, Roof, or Pergola
An overhead structure transforms how often you use an outdoor kitchen, turning it from a fair-weather setup into a space you’ll cook in through drizzle and midday sun. A pergola offers partial shade and a sense of enclosure, while a solid roof or a louvered pergola provides real protection from rain, letting you grill regardless of the forecast. The tradeoff is that any structure over a gas grill introduces a critical requirement: ventilation.
A grill under a solid roof or in an enclosed space must have a vent hood rated for outdoor use to carry away smoke, grease, and combustion byproducts, and the roof needs adequate clearance above the grill, typically at least several feet, to keep heat off the structure. Combustible materials must stay well back from the cooking zone. Never place a grill under a low, unventilated cover, since trapped heat and gases are both a fire hazard and a health risk. If you’re building a covered outdoor kitchen, involve a professional early so the ventilation, clearances, and fire-rated materials are designed in from the start rather than bolted on later.
Lighting and Power Planning
Cooking outdoors doesn’t stop when the sun goes down, so lighting deserves real thought rather than a single porch fixture as an afterthought. Plan task lighting directly over the grill and prep surfaces so you can actually see whether the chicken is done, and add softer ambient lighting for the seating and gathering areas to set the mood.
Low-voltage LED fixtures are the workhorse here, running cool, sipping power, and standing up to weather when rated for outdoor use. Under-counter LED strips light the work zone, while overhead string lights or post-mounted fixtures handle the dining space. All of this ties back to the electrical planning covered earlier: run enough weatherproof, GFCI-protected circuits to handle the refrigerator, lighting, and a few outlets for a blender or a phone charger. Bury conduit and place junction boxes before you clad the island, because retrofitting power into finished masonry is expensive and disruptive. Thinking through lighting and power up front means the whole kitchen works as well at 9 p.m. as it does at noon.
Protecting Your Investment
Outdoor appliances face weather that indoor ones never see, so protection extends their life. Use fitted covers on the grill and any exposed appliances when not in use, and choose 304-grade stainless steel over cheaper 430-grade where you can, since 304 resists rust far better in coastal and humid climates.
Wipe down stainless surfaces periodically and keep drainage clear so water never pools inside the island. Plan a Thor outdoor kitchen around durable components, correct clearances, and properly permitted utilities, and you’ll have a backyard cooking space that stands up to the elements and hosts good food for many summers to come.