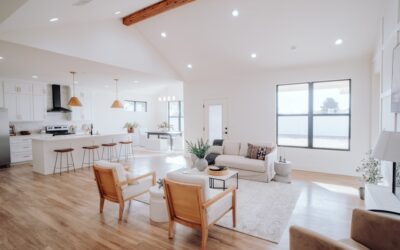
A wood ceiling transforms any room from ordinary to extraordinary, adding warmth, texture, and timeless character that few other materials can match. Whether you are renovating a farmhouse kitchen, updating a modern living room, or finishing a basement, wood ceilings deliver visual impact that draws the eye upward and makes every space feel more intentional.
In this comprehensive 2026 guide, we cover every wood ceiling style worth considering, break down real-world costs, walk through installation methods, and answer the most common questions homeowners ask before committing to overhead wood.
Why Choose a Wood Ceiling?
Ceilings are often called the fifth wall, yet most homeowners leave them flat white and forgettable. Installing a wood ceiling changes the entire atmosphere of a room. Natural grain patterns create visual depth, while the material itself absorbs sound better than drywall, reducing echo in open-concept layouts.
Wood ceilings also add measurable value to a home. Real estate professionals consistently note that finished wood overhead is a selling point buyers remember. Paired with the right hardwood flooring, a wood ceiling creates a cohesive design statement that feels both luxurious and grounded.
Beyond aesthetics, wood is a surprisingly practical ceiling material. It hides imperfections in older homes, works with a variety of lighting setups, and can be stained or painted to match evolving design preferences over the years.
Popular Types of Wood Ceilings
Not every wood ceiling looks the same. The style you choose depends on your budget, the architecture of your home, and the look you want to achieve. Here are the most popular options in 2026.
Tongue and Groove
Tongue and groove planks interlock tightly, creating a seamless surface with clean lines. This is the most popular wood ceiling style for bedrooms, living rooms, and covered porches. Boards typically range from 3 to 6 inches wide and can be installed in straight runs or diagonal patterns.
Shiplap
Shiplap boards overlap slightly, leaving a small shadow gap between each plank. The subtle reveal line adds texture without overwhelming the room. Shiplap ceilings pair exceptionally well with modern kitchen lighting and coastal or farmhouse interiors.
Beadboard
Beadboard features narrow planks with a decorative bead (small ridge) running along each joint. It delivers a classic cottage feel and works beautifully in bathrooms, mudrooms, and kitchen ceilings where a lighter, more detailed look is desired.
Coffered Wood Ceiling
Coffered ceilings use a grid of recessed panels framed by wood beams. This is a high-end option that adds architectural drama to dining rooms, home offices, and formal living spaces. Costs are higher, but the visual payoff is significant.
Exposed Beam Ceiling
Exposed beams, whether structural or decorative, create a bold rustic or industrial statement. Many homeowners combine real or faux beams with tongue-and-groove planking between them for a layered look.
Plywood Panel Ceiling
Budget-conscious renovators often turn to high-quality plywood panels. When properly cut, sanded, and finished, plywood delivers a modern, minimalist wood ceiling at a fraction of the cost of solid lumber.
Best Wood Species for Ceilings
| Wood Species | Look & Grain | Durability | Price Range (per sq ft) | Best For |
|---|---|---|---|---|
| Pine | Light, knotty grain | Moderate | $2 – $5 | Rustic, farmhouse, budget projects |
| Cedar | Warm reddish tones | High (moisture-resistant) | $4 – $8 | Bathrooms, porches, saunas |
| Oak | Prominent grain, classic | Very high | $6 – $12 | Formal rooms, matching oak floors |
| Poplar | Smooth, paintable | Moderate | $3 – $6 | Painted ceilings, modern interiors |
| Walnut | Rich dark brown | High | $8 – $15 | Luxury spaces, accent ceilings |
| Reclaimed Wood | Weathered, unique | Varies | $5 – $20 | Feature walls, character-driven designs |
For most homeowners, pine or cedar offers the best balance of appearance, workability, and cost. If you are matching your ceiling to laminate flooring below, lighter species like pine or poplar tend to coordinate well without making the room feel too heavy.
Wood Ceiling Cost Breakdown
Understanding costs upfront prevents surprises. Here is what you can expect to pay for a wood ceiling project in 2026, covering both materials and professional labor.
| Ceiling Type | Material Cost (per sq ft) | Labor Cost (per sq ft) | Total (per sq ft) | 200 sq ft Room Total |
|---|---|---|---|---|
| Tongue & Groove Pine | $2 – $5 | $3 – $5 | $5 – $10 | $1,000 – $2,000 |
| Shiplap | $2.50 – $6 | $3 – $5 | $5.50 – $11 | $1,100 – $2,200 |
| Beadboard | $1.50 – $4 | $2 – $4 | $3.50 – $8 | $700 – $1,600 |
| Coffered | $10 – $25 | $10 – $20 | $20 – $45 | $4,000 – $9,000 |
| Exposed Beams (faux) | $5 – $15 per linear ft | $4 – $10 per linear ft | $9 – $25 per linear ft | Varies by layout |
| Plywood Panels | $1 – $3 | $2 – $4 | $3 – $7 | $600 – $1,400 |
Additional costs may include primer and stain ($50 – $150), trim pieces ($1 – $3 per linear foot), and electrical work if you are relocating light fixtures. Always budget an extra 10 to 15 percent for material waste and cuts. For more on home improvement budgeting, check our cost guides.
Installation Methods
Installing a wood ceiling is a manageable DIY project for handy homeowners, though the overhead work is physically demanding. Here is a step-by-step overview of the most common approach using tongue-and-groove planks.
Step 1: Locate Ceiling Joists
Use a stud finder to mark all joist locations across the ceiling. Planks must be nailed or screwed into joists for a secure hold. Mark joist lines with a chalk snap line so they remain visible during installation.
Step 2: Install Furring Strips (If Needed)
If you are covering an existing drywall ceiling, attach 1×3 furring strips perpendicular to the direction your planks will run. Space them 16 inches on center. Furring strips create a flat, level nailing surface and allow for minor ceiling irregularities. Understanding different nail types will help you choose the right fasteners for this step.
Step 3: Acclimate the Wood
Stack the planks in the room where they will be installed for at least 48 to 72 hours. This allows the wood to adjust to the room’s humidity and temperature, reducing the risk of expansion or contraction after installation.
Step 4: Start From One Wall
Begin at one side of the room with the groove side facing the wall. Leave a quarter-inch expansion gap along all edges, which will be covered by trim. Nail through the tongue at a 45-degree angle using a pneumatic finish nailer for speed and clean results.
Step 5: Work Across the Ceiling
Fit each subsequent plank’s groove over the previous plank’s tongue and nail through the new tongue. Use a rubber mallet or tapping block to seat planks tightly. Stagger end joints by at least 12 inches for structural integrity and a professional appearance.
Step 6: Cut Around Fixtures
Measure and mark cutouts for light fixtures, ceiling fans, and vents before cutting. A jigsaw handles curves and openings well. If you are adding ceiling fans, ensure the electrical box is rated for fan weight before covering the surrounding area.
Step 7: Finish With Trim
Install crown molding or simple trim boards around the perimeter to cover expansion gaps and create a polished edge. Sand any rough spots lightly and apply your chosen stain, sealer, or paint.
Wood Ceiling Design Ideas by Room
Living Room
A full tongue-and-groove wood ceiling in a living room creates a cabin-like warmth. Pair it with recessed LED lighting and neutral wall colors to let the wood take center stage. Whitewashed pine is especially popular in 2026 for open-concept living areas.
Kitchen
Wood ceilings in kitchens work best when balanced with modern fixtures. Consider a lighter wood species to avoid making the space feel closed in. Pairing overhead wood with a kitchen bar creates a cohesive entertaining zone.
Bedroom
Dark-stained wood ceilings in bedrooms create a cozy, cocoon-like atmosphere. Run planks in the same direction as the longest wall to make the room appear larger.
Bathroom
Cedar is the go-to choice for bathroom ceilings due to its natural moisture resistance. Seal it properly and ensure adequate ventilation to prevent moisture issues over time.
Covered Porch or Patio
Exterior-rated wood ceilings on covered porches add curb appeal and outdoor comfort. Cedar and cypress hold up best in exposed environments. A wood porch ceiling pairs naturally with a well-designed backyard patio below.
Maintenance & Care Tips
Wood ceilings are low-maintenance compared to wood floors since they do not endure foot traffic, spills, or furniture scratches. However, some routine care keeps them looking their best for decades.
- Dust regularly using a microfiber duster or vacuum with a soft brush attachment to prevent buildup.
- Inspect for moisture annually, especially in kitchens and bathrooms. Look for darkening, warping, or soft spots.
- Refinish every 7 to 10 years if you used a clear coat or stain. Lightly sand and reapply to restore luster.
- Address leaks immediately. Roof or plumbing leaks above a wood ceiling can cause staining, mold, and structural damage.
- Keep humidity stable between 35 and 55 percent to minimize seasonal wood movement.
For keeping the rest of your home smelling clean while maintaining wood surfaces, explore our guide to the best air freshener for home use.
Pros & Cons of Wood Ceilings
| Pros | Cons |
|---|---|
| Adds warmth and character to any room | Higher cost than paint or drywall |
| Improves acoustics by absorbing sound | Lowers ceiling height slightly |
| Hides imperfections in old ceilings | Can darken a room if wood is too heavy |
| Increases home value | Installation is physically demanding overhead |
| Customizable with stain, paint, or natural finish | Vulnerable to moisture damage if not sealed |
| Long lifespan with minimal maintenance | May require electrical fixture adjustments |
Frequently Asked Questions
How much does it cost to install a wood ceiling?
Most wood ceiling projects cost between $3 and $15 per square foot for materials and labor combined. A standard 200-square-foot room typically runs $1,000 to $3,000 for tongue-and-groove or shiplap styles. Coffered ceilings can reach $9,000 or more for the same area.
Can you install a wood ceiling over drywall?
Yes. Attaching furring strips to the joists through the existing drywall creates a solid nailing surface for wood planks. This approach saves the mess and cost of tearing out drywall first.
What is the best wood for a bathroom ceiling?
Cedar is the top choice for bathroom ceilings because it naturally resists moisture, mildew, and insects. Apply a waterproof sealant for added protection and ensure your bathroom has proper ventilation.
Do wood ceilings make a room look smaller?
Dark wood on a low ceiling can make a room feel smaller. To avoid this effect, choose lighter wood species, whitewash or paint the planks a pale color, and use recessed lighting. In rooms with high or vaulted ceilings, even dark wood looks expansive.
How long does a wood ceiling last?
A properly installed and sealed wood ceiling can last 50 years or more. Interior ceilings in climate-controlled spaces require very little maintenance. Exterior porch ceilings may need refinishing every 5 to 7 years depending on weather exposure.
Is a wood ceiling a good DIY project?
Tongue-and-groove and shiplap ceilings are manageable for experienced DIYers with a helper. The biggest challenge is working overhead for extended periods. Coffered ceilings typically require professional carpentry skills for precise framing and finishing.
Last updated: March 2026