Standard flat subway tile is the safe default, but a beveled subway tile backsplash takes that same familiar shape and adds something flat tile never can: dimension. The angled edges catch and bounce light differently across the surface, throwing subtle shadows that give a wall texture and depth even when the tile is a plain, glossy white. It is the small detail that makes a backsplash look intentional rather than generic, and it does it without changing your color scheme or budget dramatically.
What “Beveled” Actually Means
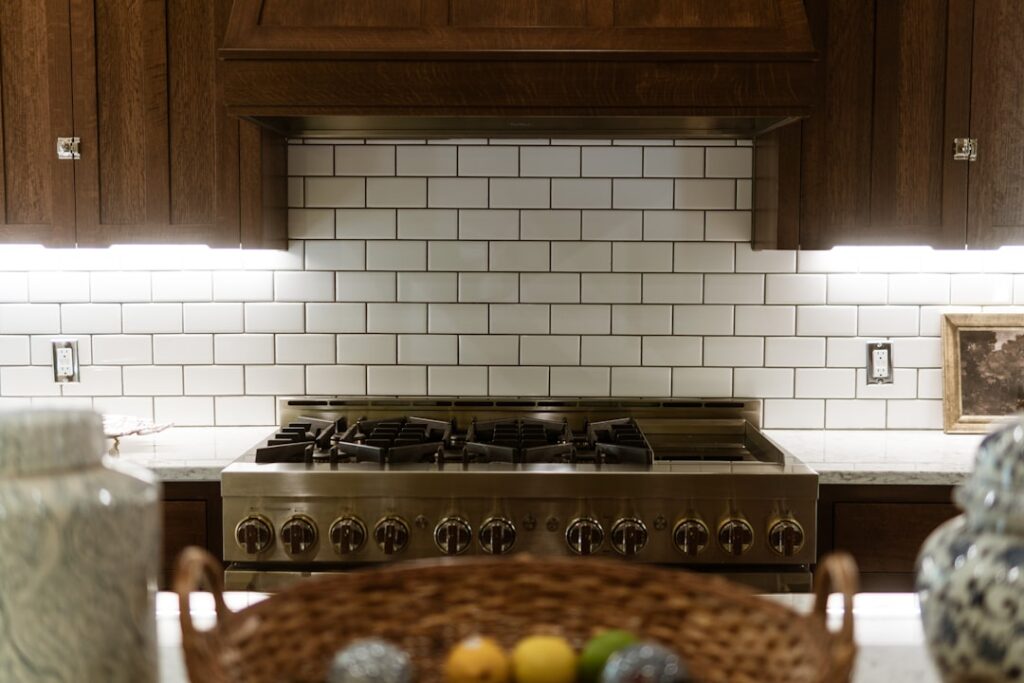
A beveled subway tile has edges that angle down from the raised center face toward the grout line, like a very shallow picture frame around each tile. Instead of the flat, uniform plane of a standard subway tile, the beveled version has a slightly pillowed profile. When light hits the wall, each tile picks it up along the angled edge, creating a repeating pattern of highlight and shadow. The effect is most noticeable with glossy glazes and directional lighting, such as under-cabinet LEDs washing down the wall.
The classic size is 3 by 6 inches, the original subway proportion, though beveled tiles also come in 4 by 8, 2 by 4, and larger formats. The bevel depth is usually modest, which keeps the look refined rather than busy.
Why Homeowners Choose the Beveled Look
The appeal comes down to added interest without added risk. Subway tile is timeless and neutral, which is exactly why it can also read as boring. The bevel solves that. It keeps every advantage of classic subway tile, affordability, easy cleaning, wide availability, while introducing shadow lines and light play that make a white backsplash feel custom.
- Depth and dimension from the angled edges, especially under directional lighting.
- Timeless style that suits farmhouse, transitional, traditional, and modern kitchens alike.
- Forgiving of imperfections because the shadow lines distract the eye from minor wall or grout inconsistencies.
- Budget-friendly at roughly the same price as flat ceramic subway tile.
Layout Patterns That Work
The bevel reads differently depending on how you set the tile, so the pattern matters. A classic 50 percent offset brick pattern, where each row shifts half a tile, is the most common and shows off the horizontal shadow lines beautifully. A stacked layout, with tiles aligned in a straight grid, leans modern and emphasizes the geometric bevel edges in a clean grid of shadows. For more movement, a herringbone or vertical stacked arrangement turns the same beveled tile into a bolder statement wall. Vertical stacking in particular is a favorite for making a low backsplash feel taller.
Choosing the Right Grout
Grout color changes a beveled subway tile backsplash more than almost any other decision. Because the bevel already creates shadow lines, you can lean into that or soften it. A white or off-white grout with white tile gives a seamless, airy look where the bevels provide all the definition. A gray or greige grout outlines every tile crisply, doubling down on the geometric effect and hiding kitchen grime better over time. A dark charcoal grout with white tile is a high-contrast, modern-farmhouse statement, though it demands cleaner grout lines because every imperfection shows.
Whatever color you pick, use an unsanded grout for the typical 1/16-inch subway joints, since sanded grout can scratch glossy glazes and does not pack cleanly into thin lines.
What It Costs
Beveled ceramic subway tile runs about $3 to $8 per square foot for material, with glass and higher-end ceramic reaching $10 to $15. A standard 30-square-foot kitchen backsplash costs roughly $90 to $240 in tile. Add thin-set, grout, and a tile trim or bullnose edge for another $50 to $100. DIY installation keeps the total under $350 for most kitchens, while professional installation adds $10 to $18 per square foot in labor, bringing a finished project to around $600 to $1,000.
Installation Notes for Beveled Tile
Setting beveled tile is nearly identical to flat subway tile, with a couple of extra considerations. Because the beveled edges create a natural shadow gap, sloppy spacing is less forgiving; use consistent 1/16-inch spacers and keep your rows dead level, because the shadow lines act like a ruler that exposes any drift. Comb the wall with a 3/16-inch V-notch trowel, back-butter tiles near outlets and edges, and clean thin-set out of the beveled channels before it sets, since dried mortar in the bevel is hard to remove and ruins the crisp shadow line.
When you grout, wipe carefully. The bevel creates a little valley that grout wants to collect in, so tool the joints cleanly and buff the haze off the raised faces before it dries. Finish edges with a matching bullnose tile or a metal Schluter trim for a professional look where the tile meets the counter or an open wall.
Lighting Makes or Breaks the Effect
The single biggest factor in how a beveled subway tile backsplash looks is the light hitting it, and this is where the bevel earns its keep. Under-cabinet lighting is the classic pairing, because an LED strip mounted at the front underside of the upper cabinets washes light straight down the wall, raking across each beveled edge and casting the crisp little shadow lines that give the tile its dimension. Without that directional light, a glossy beveled tile can flatten out and read almost like standard subway tile, so if the drama of the bevel is what drew you in, plan your lighting alongside the tile.
Glaze choice interacts with lighting too. A high-gloss beveled tile reflects and amplifies light for a bright, lively wall, while a matte or satin glaze softens the effect into something calmer and more subtle. Natural daylight from a nearby window changes the look throughout the day, revealing the bevels strongly in raking morning or evening light and more gently at midday. When you are choosing, hold a sample tile vertically on the actual wall and shine a light down it from above to preview exactly how the shadows will fall in your kitchen before you commit to a full order.
Is a Beveled Subway Backsplash Right for You?
If you love the classic subway look but want it to feel a step above builder-basic, a beveled subway tile backsplash is one of the highest-impact, lowest-cost upgrades in the kitchen. It works in nearly any style, plays beautifully with under-cabinet lighting, and costs about the same as flat tile. Choose your grout color deliberately, keep your layout level, and you will get a backsplash with shadow, light, and character that flat tile simply cannot match.
Prefer to explore on your own?
See how new flooring looks in your actual room in seconds — free, no signup.
Try the free Floor Studio →