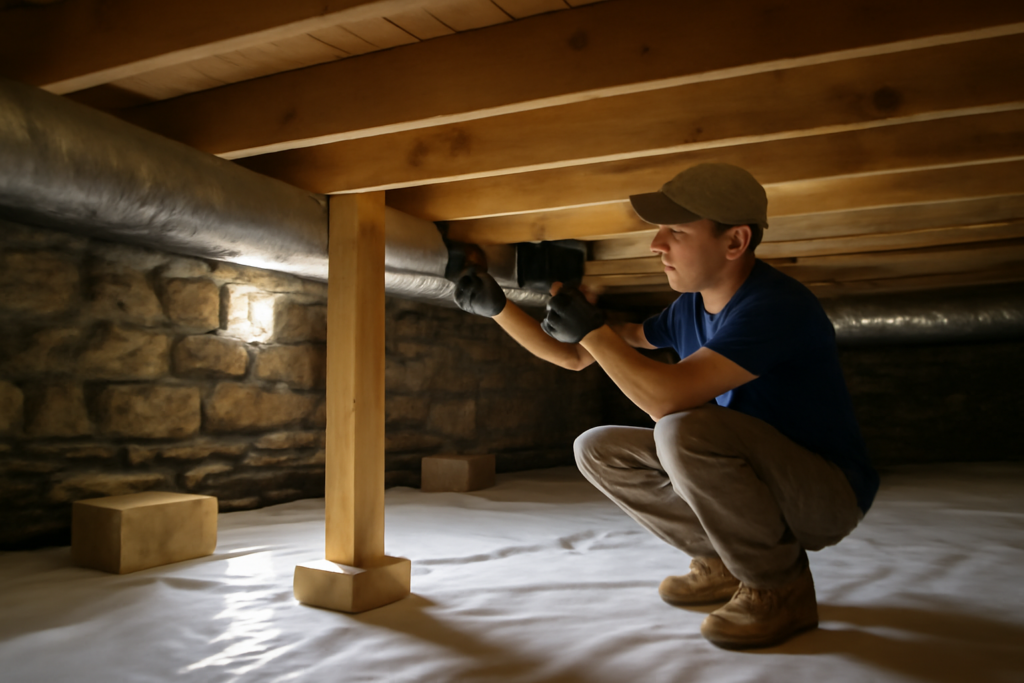
The dank, dirt-floored void under your house does more damage to your home than almost any room you can see. A proper crawl space renovation tackles the moisture, mold, wood rot, and energy loss that a neglected crawl space quietly feeds year after year. Because up to half the air you breathe on the first floor rises out of that space, a crawl space renovation is as much a health and comfort project as a structural one. Here is what the work involves, what it costs, and where the money actually goes.
Why a Crawl Space Renovation Pays Off
The core problem is the stack effect: warm air rises and escapes the top of the house, pulling replacement air up from the crawl space. If that space is damp and moldy, you are drawing that air into your living rooms. A vented dirt crawl space also lets humid outside air condense on cool framing and ductwork all summer, feeding mold and rotting joists and subfloor.
Fixing it delivers real returns: lower humidity upstairs, warmer floors in winter, reduced heating and cooling bills (often 10 to 20 percent when ducts run through the space), no more musty smell, and protection of the wood structure that holds your house up. It also removes a red flag that scares off buyers during a home inspection.
Assessing What Your Crawl Space Needs
Not every crawl space needs the full treatment, so start with an honest assessment. Go under with a flashlight and a moisture meter if you have one, and look for these problems.
- Standing water or damp soil after rain, pointing to grading or drainage issues.
- Efflorescence (white mineral deposits) or dark staining on foundation walls.
- Mold or mildew on joists, subfloor, or insulation.
- Sagging or falling fiberglass batts, which absorb moisture and lose all value.
- Rusted duct straps, corroded pipes, or soft, spongy wood.
- Musty odor, the tell-tale sign of active moisture.
The findings dictate the scope. A dry space may only need a vapor barrier and better drainage; a wet one needs drainage, a sump pump, and full encapsulation.
The Standard Renovation Steps
A comprehensive crawl space renovation follows a logical sequence, addressing water first and moisture control second.
- Clean out debris, old vapor barrier, and any wet or moldy insulation; remediate mold on framing.
- Manage bulk water with a perimeter drain (French drain) and a sump pump if water intrudes.
- Seal the vents and any gaps, converting the space from vented to a sealed, conditioned zone.
- Encapsulate by laying a heavy polyethylene vapor barrier across the floor and up the walls, sealed at the seams and to the foundation.
- Insulate the foundation walls (rigid foam board is common) rather than the floor above, keeping the space within the home’s thermal envelope.
- Control humidity with a dedicated crawl space dehumidifier to hold relative humidity below about 55 percent.
The order matters: encapsulating over a wet floor without solving drainage first just traps the water under the liner.
Encapsulation Materials and Specs
The vapor barrier is the heart of the job, and thickness matters. Cheap 6-mil poly used as a simple ground cover tears easily; a true encapsulation uses a reinforced liner of 12, 15, or 20 mil, with 20-mil being the premium, puncture-resistant choice for spaces where you will crawl or store items.
The liner should run up the foundation walls and be mechanically fastened and sealed with a termite inspection gap left near the top of the wall where code requires it. Seams overlap generously and are taped with a compatible seam tape. Wall insulation is typically 2 inches of rigid foam board (giving roughly R-10) adhered to the foundation, or closed-cell spray foam for a tighter seal in irregular spaces. The dehumidifier should be sized to the square footage and set to drain automatically to the sump or a condensate pump.
What a Crawl Space Renovation Costs
Costs vary widely with the size of the space and how much water work is needed.
- Basic vapor barrier only (DIY-friendly): $0.50 to $1.50 per sq ft in materials.
- Professional partial encapsulation: $3 to $7 per sq ft.
- Full encapsulation with insulation and dehumidifier: $5 to $15 per sq ft.
- Add drainage and a sump pump: $1,200 to $4,000 more.
- Structural repairs (jacks, sistered joists): $1,500 to $10,000-plus depending on damage.
For a typical 1,200-square-foot crawl space, full professional encapsulation commonly runs $6,000 to $15,000. A dry space where you DIY a heavy liner and seal the vents can come in under $2,000. Get multiple quotes, and be wary of contractors who push the most expensive package before diagnosing the actual moisture source.
DIY Versus Hiring a Contractor
A homeowner comfortable working in tight, dirty conditions can DIY the vapor barrier, vent sealing, and even wall foam board in a dry crawl space, saving thousands. The work is unpleasant but not technically difficult; the biggest challenges are maneuvering large sheets of liner in low headroom and sealing them thoroughly.
Hire a pro when you have standing water, active mold, structural sag, or radon concerns, or when the space is too low to work in comfortably. Water intrusion and drainage in particular reward professional diagnosis, because the fix depends on where the water comes from, often exterior grading, gutters, and downspouts that should be corrected first and can solve half the problem before you ever go underground.
Vented Versus Sealed: The Modern Approach
For decades, code required crawl space vents on the theory that outside air would dry the space. Building science has largely reversed that thinking, at least in humid climates. In summer, warm humid outside air flowing through those vents hits cool foundation walls and framing and condenses, actually adding moisture and feeding mold. That is why the modern best practice is to seal the vents and treat the crawl space as a conditioned, encapsulated zone inside the home’s envelope.
A sealed crawl space stays drier, more stable in temperature, and warmer under the floors above. The exception is a genuinely dry crawl space in an arid climate with no moisture problems, where a simple vapor barrier and vents may be adequate and code may still require them. Always check your local code, because some jurisdictions have specific requirements for sealing, dehumidification, and combustion-air makeup if a gas furnace or water heater lives down there.
Radon, Pests, and Air Quality
A renovation is the ideal moment to address problems beyond moisture. Radon, a colorless radioactive gas that seeps up from soil, is the second-leading cause of lung cancer, and crawl spaces are a common entry point. A sealed vapor barrier plus a passive or active soil-depressurization vent pipe can cut radon dramatically; test the home after encapsulation to confirm levels are below the EPA action level of 4 picocuries per liter.
The encapsulation also seals out the pests that love a damp, dark crawl space, mice, termites, and wood-boring insects, though you should leave the code-required termite inspection gap at the top of the wall and keep the area accessible for inspection. That inspection gap, usually about 3 inches of exposed foundation near the sill, lets a pest inspector spot termite mud tubes that would otherwise be hidden behind the liner, so resist any contractor who wants to run the vapor barrier all the way to the top of the wall. Finally, because so much first-floor air originates below, cutting the crawl space’s moisture and mold directly improves the air you breathe upstairs, often reducing musty odors and allergy triggers within days of completing the work.
The Bottom Line
A crawl space renovation is one of those invisible projects that quietly improves everything above it: cleaner air, warmer floors, lower bills, and a structure protected from rot. Diagnose the moisture source first, handle bulk water and drainage before you seal anything, encapsulate with a heavy 12- to 20-mil liner up the walls, insulate the foundation, and add a dehumidifier to hold humidity in check. Whether you DIY a dry space or invest in a full professional encapsulation, few dollars you spend on the house do more good where no guest will ever see them. Keep the finished space accessible and check it once or twice a year: glance at the dehumidifier’s reading, look for any liner tears or new moisture, and confirm the sump pump cycles if you have one. A crawl space is not a set-and-forget project so much as a low-maintenance one, and the ten minutes a year it asks of you protects the tens of thousands of dollars of structure resting on top of it.