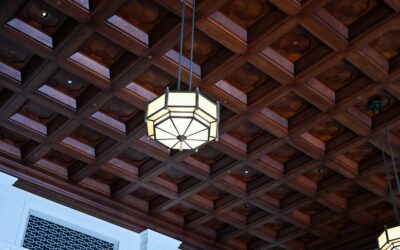
Most people never look up when they walk into a room, until the ceiling gives them a reason to. A farmhouse coffered ceiling does exactly that, trading the formal, heavily molded grids of a Georgian library for simple beams, visible wood grain, and a relaxed rural character. It adds architectural depth to flat drywall, helps define open-plan spaces, and can even soften echo. The catch is that coffers are unforgiving: beams that are too big, a grid that is off-center, or a finish that clashes with the floor can make the room feel heavier rather than warmer.
- What Makes a Farmhouse Coffered Ceiling Different
- Is Your Room a Good Candidate?
- Planning the Grid Layout
- Materials and Construction Methods
- Farmhouse Coffered Ceiling Cost
- Step-by-Step DIY Installation
- Color and Finish Ideas
- Common Mistakes to Avoid
- Lighting Strategies for Coffered Ceilings
- Frequently Asked Questions
What Makes a Farmhouse Coffered Ceiling Different
A traditional coffered ceiling uses multi-piece crown molding, raised panels, and often dentil details inside each recessed box. A farmhouse coffered ceiling strips most of that away. The beams are usually plain rectangles, the panels between them are often shiplap, tongue-and-groove planks, or smooth painted drywall, and the trim is minimal, perhaps a small cove or a simple square bed mold.
Finishes lean natural. You will see stained or wire-brushed beams against white panels, whitewashed pine, or all-white coffers with a faint shiplap texture. The goal is craftsmanship without fuss, the look of structure rather than decoration.
Is Your Room a Good Candidate?
Ceiling height is the first gatekeeper. Beams typically drop 4 to 8 inches below the ceiling plane, and they visually lower the room further. As a rule:
- 8-foot ceilings: possible, but keep beams shallow, 3 to 4 inches deep, and paint them the same color as the ceiling
- 9-foot ceilings: the sweet spot for most farmhouse coffers, with 5 to 6 inch beams
- 10 feet and higher: you can go deeper, 7 to 10 inches, and use contrasting stained wood
Room size matters too. In a small bedroom, a single-direction beam layout often looks cleaner than a full grid. Great rooms, dining rooms, and home offices are the classic spaces for coffers because they have enough area for at least a 3×3 grid.
Planning the Grid Layout
Good coffers start on paper. Measure the room and find its center, then decide how many boxes run each way. Aim for boxes that are close to square, typically 4 to 6 feet across. A 16×20-foot room, for example, might use a 3×4 grid with coffers about 5 feet square.
Always center the grid on the room’s main focal point, not on the walls, because walls are rarely perfectly square. If a fireplace or a dining table is the anchor, center the layout on that. Mark lines with a chalk line or laser level, then snap them onto the ceiling and look at them for a day before committing.
Plan around ceiling fixtures early. Recessed lights usually sit centered in each coffer, while a chandelier needs a box at the center of a coffer rather than on a beam intersection. Moving electrical boxes and adding lights inside the grid is work for a licensed electrician, and it should happen before any beams go up.
Materials and Construction Methods
Box Beams Over Blocking
The most common method is to screw 2×4 or 2×6 blocking to the ceiling joists, then wrap it with 1x boards to form hollow box beams. This keeps weight low and allows wiring to run inside the beams. Poplar or MDF works for painted beams; knotty pine, white oak, or reclaimed barn wood suits stained farmhouse looks.
Faux Beam Kits
Polyurethane faux beams from manufacturers like Ekena Millwork weigh a fraction of real wood and install with adhesive and screws. They can look convincingly rustic from floor level and cost $10 to $30 per linear foot. Up close, texture and seams may give them away, so they work best in rooms with tall ceilings.
Panel Treatments Inside the Coffers
Shiplap or nickel-gap boards installed before the beams give an authentic farmhouse feel. Pre-primed 1×6 or 1×8 pine shiplap runs about $2 to $4 per sq ft. Leaving the existing drywall and simply painting it is the budget option, and it still looks good when the beams carry the texture.
Farmhouse Coffered Ceiling Cost
Budgets vary widely based on beam material, finish, and ceiling height. Typical installed prices:
| Approach | Cost per Sq Ft of Ceiling |
|---|---|
| DIY painted MDF or poplar beams | $4–$10 (materials) |
| Professional painted box beams | $20–$35 |
| Stained hardwood beams with shiplap | $30–$50 |
| Reclaimed timber or custom millwork | $45–$75+ |
For a 15×18-foot living room (270 sq ft), that means roughly $5,400 to $13,500 for professional installation of a typical design. Relocating lights adds $150 to $300 per fixture, and ceilings over 10 feet may require scaffolding rental at around $200 to $400 a week.
Step-by-Step DIY Installation
- Find and mark joists. Use a stud finder and confirm with a small nail. Blocking must hit joists or you need to add cross-blocking between them from above.
- Snap the grid. Mark beam centerlines, then offset lines for each side of the blocking.
- Install perimeter beams first. Fasten 2×4 blocking to joists with 3-inch structural screws, then attach the perimeter boards, keeping them level even if the ceiling is not.
- Add main and cross beams. Run the long beams in one piece where possible, then fit the shorter cross beams between them.
- Wrap the blocking. Attach the bottom boards first, then the sides, using glue and 18-gauge brad nails. A lock-miter or simple butt joint is fine if trim will cover it.
- Trim the inside corners. A small cove, quarter-round, or square stop softens the transitions between beam and panel.
- Fill, caulk, and finish. Use paintable caulk on painted work. For stained beams, stain before installation and touch up nail holes with a matching wax fill stick.
Two people make this job far easier. Expect a 250 sq ft grid to take a skilled DIY pair three to five days, not counting finishing.
Color and Finish Ideas
A few combinations work reliably in farmhouse rooms:
- White on white: beams and shiplap in a warm white like Benjamin Moore White Dove or Sherwin-Williams Alabaster. Subtle, bright, and forgiving on lower ceilings.
- Stained beams, white panels: medium walnut or early American stain on pine or oak beams over white panels. The classic modern-farmhouse contrast.
- Whitewashed wood: a pickled or limed finish on knotty pine for a coastal-farmhouse feel.
- Dark beams, dark ceiling: charcoal or deep green on both, best reserved for tall, well-lit rooms.
Tie the ceiling to the floor. Stained beams look most cohesive when they echo the tone of wide-plank hardwood or wood-look luxury vinyl below, without matching it exactly. A one-shade difference usually looks intentional; a near-match looks like an accident.
Common Mistakes to Avoid
Oversized beams top the list. A 10-inch-deep beam on a 9-foot ceiling makes the room feel like a basement. Another error is ignoring the existing ceiling’s flatness. Many older ceilings sag an inch or more across a span, so shim blocking to a laser line to keep beam bottoms straight.
Skipping a structural check is a further risk when using solid timber. Real 6×8 beams can weigh 10 to 15 pounds per foot. If you want solid wood, have a contractor or engineer confirm the joists can carry the added load, and never cut or notch joists to recess beams.
Lighting Strategies for Coffered Ceilings
Coffers change how light moves through a room. Beams cast shadows, so a single central fixture that lit a flat ceiling well may leave the corners of each box dim. The most common solution is one 4-inch LED wafer light centered in each coffer, spaced so the grid of lights mirrors the grid of beams. Wafer lights are only about 1/2 inch thick and install without cans, which makes retrofitting far easier than traditional recessed housings.
For a softer, more atmospheric effect, some homeowners run LED tape along the top inside edge of each beam, washing the recessed panels with indirect light. This works especially well with shiplap, since the grazing light picks up every board line. Choose 2700K to 3000K for living areas to keep the farmhouse warmth, and put everything on dimmers so the ceiling can shift from bright task lighting to evening glow.
Chandeliers and pendants still work, but they should hang from the center of a coffer, never from a beam intersection, which looks awkward and complicates wiring. In dining rooms, center the grid on the table rather than the room so the fixture and coffer line up with where people actually sit. Any new circuits, boxes rated for fixture weight, or dimmer upgrades should be handled by a licensed electrician and permitted where required.
Frequently Asked Questions
Can you put a farmhouse coffered ceiling on an 8-foot ceiling?
Yes, if the beams are shallow, around 3 to 4 inches, and painted the same color as the ceiling. A single-direction beam layout may feel less crowded than a full grid.
How much does a farmhouse coffered ceiling cost?
Professional installation typically runs $20 to $50 per square foot of ceiling, depending on materials and finish. DIY painted beams can cost as little as $4 to $10 per square foot.
What wood is best for farmhouse coffered beams?
Poplar or MDF works for painted beams. Knotty pine, white oak, and reclaimed barn wood deliver the most authentic look for stained farmhouse finishes.
Do coffered ceilings help with acoustics?
They can reduce echo modestly by breaking up flat surfaces, especially in large rooms with hard flooring. Adding acoustic batts inside hollow beams improves the effect.