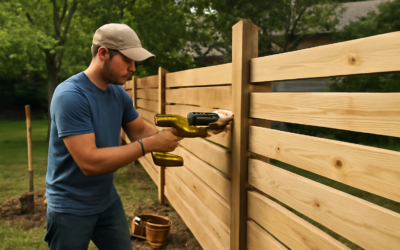
Prefabricated fence panels turn a daunting project into a manageable weekend job, but the secret to a fence that stays straight and latches for years isn’t the panels at all, it’s the posts. Knowing how to install fence panels really means knowing how to set rock-solid posts at the right spacing, then hanging the panels level between them. Get the posts plumb, evenly spaced, and anchored in concrete, and the rest falls into place. Before you dig a single hole, there’s one call you absolutely must make.
Part of our Decks & Outdoor guide — explore the full guide →
- Before You Dig: Call 811
- Tools and Materials You'll Need
- Step 1: Lay Out the Fence Line
- Step 2: Dig the Post Holes
- Step 3: Set the First Post in Concrete
- Step 4: Set the Remaining Posts
- Step 5: Attach the Panels
- Step 6: Add Gates and Finishing Touches
- Common Mistakes to Avoid
- How Long the Project Takes
- Final Tips for a Lasting Fence
Before You Dig: Call 811
Call 811, the national “Call Before You Dig” number, several days before you start. A utility locating service will come mark buried gas, electric, water, and communication lines for free. Hitting an underground line is dangerous and expensive, and it’s entirely avoidable. While you’re at it, confirm your property lines, check local setback rules and height limits, and ask your HOA and municipality whether a permit is required. Fencing disputes with neighbors are far easier to prevent than to fix.
Tools and Materials You’ll Need
- Prefab fence panels and matching posts
- Fast-setting concrete mix and gravel
- Post hole digger or power auger
- Level (a post level is ideal), tape measure, and string line
- Mason’s string and stakes for layout
- Screws or brackets, a drill, and a circular saw for cuts
- Wheelbarrow, water, and a tamping bar
Step 1: Lay Out the Fence Line
Mark each end and corner of your fence run with a stake, then pull a tight mason’s string between them to establish a straight line. This string is your reference for the entire job. Measure your panel width, usually 6 or 8 feet, and mark the post locations along the string, measuring on-center (from the middle of one post to the middle of the next) so the panels fit precisely. Double-check your spacing against the actual panels, since “6-foot” panels can vary slightly.
Step 2: Dig the Post Holes
Dig holes about one-third the height of the post deep, commonly 24 to 36 inches for a typical fence, and roughly three times the post’s width across. In cold climates, dig below the frost line so winter heaving doesn’t push your posts out of alignment. Add about 6 inches of gravel to the bottom of each hole for drainage; standing water at the base of a wood post is what rots it first.
Step 3: Set the First Post in Concrete
Stand the post in the hole, resting it on the gravel. Use a post level to get it perfectly plumb in both directions, then brace it with two scrap boards staked to the ground so it can’t move. Pour in fast-setting concrete mix, add water per the bag instructions (or pour dry mix and add water for some products), and let it set. Recheck plumb before the concrete firms up; this is your last chance to adjust. Crown the concrete slightly above grade and slope it away from the post so water sheds off.
Step 4: Set the Remaining Posts
Here’s the key to even spacing: don’t set all the posts first and hope the panels fit. Instead, work in sequence. After the first post cures, dig and set the next post at the correct on-center distance, using the panel itself or a spacer board to confirm the gap. Keep every post plumb and aligned to your string line. Many installers set a post, attach the panel, then set the next post against the free end of that panel, which guarantees a perfect fit every time.
Step 5: Attach the Panels
Once your posts are set and the concrete has cured (follow the bag’s cure time before hanging weight, often a few hours for fast-set), attach the panels. Rest each panel on temporary blocks or shims to hold it a couple of inches off the ground for airflow and to clear uneven grade. Check the top of the panel with a level, then fasten it to the posts using the brackets, rails, or screws the system provides. For wood panels, two or three screws per rail into each post is typical. Step back and sight down the fence line to confirm everything is straight and level.
Handling Slopes and Short Sections
On sloped ground, you can “step” the panels down in level sections or “rack” certain panel styles to follow the grade. For the last gap that’s narrower than a full panel, measure carefully and cut a panel down with a circular saw, keeping the cut edge against the post.
Step 6: Add Gates and Finishing Touches
Set gate posts with extra-deep footings and a bit more concrete, since gates take constant stress from swinging. Hang the gate with heavy-duty hinges and add a self-latching latch. Once everything is up, seal or stain wood panels to protect them from moisture and UV, and walk the line one more time to tighten any loose fasteners.
Common Mistakes to Avoid
A few errors trip up first-time fence builders again and again. Setting posts too shallow is the big one; a post that isn’t anchored below the frost line or deep enough will lean within a season or two. Skipping the gravel base traps water and rots wood posts from the bottom up. Setting all the posts before checking panel fit leads to gaps that are too wide or too narrow at the ends. Rushing the concrete cure and hanging panels too soon can pull a post out of plumb. And forgetting to account for slope leaves panels dragging on high ground or floating above low spots. Slow down at each post and the finished fence rewards the patience.
How Long the Project Takes
Set realistic expectations on timing. For an average backyard run, expect the layout and digging to take the better part of a day, especially if you’re using a manual post-hole digger instead of a powered auger. Setting posts and waiting for concrete to cure often means spreading the job across two days, since you want the footings firm before hanging panels. A motivated DIYer can usually complete a straightforward fence over a weekend, though larger yards, rocky soil, or lots of gates will stretch that out. Renting a power auger and recruiting a helper to hold posts plumb both speed things up considerably.
Final Tips for a Lasting Fence
Patience pays off here. Let concrete cure properly before stressing the posts, keep checking plumb and level as you go, and never skip the gravel at the base of each hole. A fence is only as good as its posts, so spend your care there. Do it right and you’ll have a straight, solid fence that still closes cleanly long after the project is a memory.