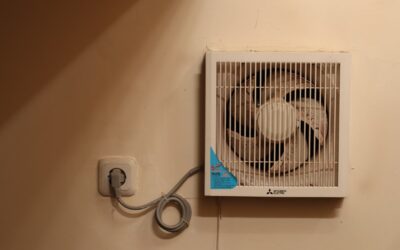
Plenty of kitchens have no range hood at all: older homes, galley apartments, cooktops on islands with no room overhead, or remodels where the budget ran out. In those spaces a kitchen vent fan mounted in an exterior wall or the ceiling is the next best way to pull smoke, steam, cooking odors, and airborne grease out of the room. It will not capture fumes as effectively as a hood sitting right over the burners, but a properly sized and placed fan makes a real difference in air quality and in how fast grease builds up on cabinets.
Part of our Kitchen Remodeling guide — explore the full guide →
The essentials: pick a fan rated for kitchen use, size it by airflow in cubic feet per minute (CFM), place it as close to the cooktop as you can, and duct it to the outdoors. Never vent into an attic, a soffit cavity, or a wall space. If you cook on gas, the fan is part of your combustion safety plan too, so add carbon monoxide alarms and ventilate every time the burners run.
What a Kitchen Vent Fan Does (and Does Not Do)
A kitchen vent fan is a through-wall or ceiling exhaust unit, similar in concept to a bathroom fan but built to handle heat, grease, and higher airflow. Many models include a removable metal grease filter and a backdraft damper that closes when the fan stops. Some are designed to sit in a window or wall opening with a direct path outside, while ceiling models connect to a duct that runs to a roof or wall cap.
What it cannot do is create a capture zone over the cooktop. A hood works because rising smoke and steam are funneled into its canopy before they spread. A wall or ceiling fan has to pull contaminated air across the room, so some of it will drift toward cabinets and ceilings first. That is why placement matters more for a standalone kitchen exhaust vent than for a hood. People searching for a “kitchen ceiling vent,” a “kitchen smoke extractor,” or a full “kitchen ventilation system” are usually weighing exactly this trade-off.
Sizing: CFM and Noise Ratings
Airflow is measured in CFM. For a standalone kitchen fan, a common starting point is enough capacity to change the kitchen’s air about 15 times per hour. To estimate:
- Multiply kitchen length by width by ceiling height to get cubic feet.
- Multiply by 15 air changes.
- Divide by 60 minutes.
A 12-by-12-foot kitchen with 8-foot ceilings holds 1,152 cubic feet. That works out to roughly 290 CFM. Many through-wall kitchen fans fall in the 150 to 400 CFM range, so a small kitchen can often be served by a single unit, while an open-plan space may need a larger fan or a hood.
Noise is rated in sones. One sone is about the hum of a quiet refrigerator; four sones is roughly normal conversation. Higher-CFM fans tend to be louder, and a fan nobody wants to run does no good. Look for a model with a speed control so you can run it gently while simmering and at full power when searing.
Make-up air matters
Every cubic foot pushed outside has to be replaced. In a tight modern home, a strong exhaust fan can depressurize the house enough to pull air backward down a fireplace flue or water heater vent. Many jurisdictions require a make-up air system when kitchen exhaust exceeds about 400 CFM. Even below that, cracking a window while the fan runs helps it work better and reduces backdraft risk.
Where to Place a Kitchen Exhaust Fan
Aim to put the fan as close to the cooking surface as possible and above it, since heat and smoke rise. Good locations include:
- Exterior wall beside or directly behind the range: Mount high on the wall, within a few feet horizontally of the cooktop. This is usually the shortest duct path.
- Ceiling directly above or next to the cooktop: Works well for island ranges if there is a route through a joist bay to an exterior wall or roof.
- Window-mounted units: A quick fix for renters, but less effective unless the window is close to the stove.
Avoid locations across the room from the cooktop, where the fan pulls fresh air from nearby doors instead of the smoke you want to remove. Keep the fan away from a fan-assisted draft path of any gas appliance vent.
Ducting to the Outdoors
This is the non-negotiable part. A kitchen exhaust fan must discharge outside the home through a wall cap or roof cap with a damper. Venting into an attic, a soffit, a crawlspace, or a closed wall cavity deposits grease and moisture where it causes mold, rot, and a serious fire risk. Grease-laden lint in a hidden space can ignite from a cooking flare-up.
Ducting tips that apply to most installations:
- Use smooth rigid metal duct sized to the fan’s outlet. Do not reduce the diameter along the run.
- Keep the run as short and straight as possible. Each elbow adds resistance roughly equal to several feet of straight duct.
- Seal joints with foil tape rated for ducts, not cloth duct tape.
- Insulate duct runs that pass through unconditioned spaces to prevent condensation.
- Install an exterior cap with a backdraft damper and a screen or flap to keep pests out.
Gas Ranges and Carbon Monoxide
Gas burners produce combustion byproducts, including carbon monoxide and nitrogen dioxide. A kitchen vent fan helps clear them, but it does not replace a CO alarm. Install carbon monoxide alarms on every level of the home and near sleeping areas, and test them monthly. Run the exhaust fan every time you use gas burners or the oven, not just when something smokes. If a burner flame burns yellow or sooty instead of blue, have the range serviced. Any gas line or gas appliance work belongs with a licensed professional, and if you smell gas, leave the home and call the utility from outside.
Installation Overview and Safety
A basic through-wall installation looks like this, though the maker’s manual governs the details:
- Plan and locate hazards. Use a stud finder and inspect from the exterior to find studs, wiring, and plumbing before marking the opening. Pre-1978 exterior paint or siding should be tested for lead before cutting.
- Kill the power. If there is any wiring nearby, turn off the breaker and confirm power is off with a non-contact voltage tester.
- Cut the opening between studs, sized to the fan housing, working from inside with a drywall saw and then outside with a reciprocating saw.
- Set the housing and fasten it to framing, then attach the exterior cap and seal around it with exterior sealant.
- Wire the fan. A new fan circuit or switch loop should be run by a licensed electrician, who will also confirm the fan is on an appropriately rated circuit.
- Test airflow by holding a tissue near the grille; check that the exterior damper opens.
Ceiling and high-wall work puts you on a ladder. Use a stable stepladder rated for your weight, keep three points of contact, and do not stand on the top two steps. For exterior cap installation on a second story, hire a pro rather than working from an extension ladder.
Troubleshooting
Fan runs but smoke lingers: The fan may be undersized or too far from the cooktop. Check that the damper opens fully and that the duct is not crushed or clogged.
Rattling or banging on windy days: The exterior damper is flapping. A cap with a weighted or spring-loaded damper usually cures it.
Grease dripping from the grille: The filter is saturated. Soak metal filters in hot water with a degreasing dish soap every one to three months.
Cold drafts in winter: The damper is not sealing. Replace a warped damper or add an insulated cap.
Cost Ranges
Through-wall kitchen vent fans typically cost about $80 to $400 for the unit. Ceiling-mounted models with ducting kits often land in a similar range, though premium quiet units cost more. Professional installation, including cutting the wall, ducting, and wiring, commonly runs $300 to $1,000. Adding make-up air for a large system is a separate project that can cost more than the fan itself.
When to Call a Licensed Professional
Hire a licensed electrician for any new circuit, switch, or hardwired connection, and ask about permits, since many towns require them for new exhaust openings and wiring. Call an HVAC contractor if you need make-up air or if the fan will exceed about 400 CFM. A general contractor is the right call when the duct must pass through a bearing wall, a second-story exterior, or a roof. Any gas appliance adjustments must be done by a licensed gas professional.
Frequently Asked Questions
Can a kitchen vent fan replace a range hood?
It can serve kitchens that cannot fit a hood, but it captures less smoke and grease because it is not directly over the burners. Place it as close to the cooktop as possible.
How many CFM do I need for a kitchen exhaust fan?
A common target is about 15 air changes per hour. Multiply kitchen volume in cubic feet by 15, then divide by 60 to get the approximate CFM.
Can I vent a kitchen fan into the attic?
No. Kitchen exhaust must go to the outdoors through a wall or roof cap. Venting into an attic or wall cavity causes grease buildup, moisture damage, and fire risk.
Do I need a CO alarm if I have a kitchen vent fan?
Yes. A fan helps clear combustion gases, but carbon monoxide alarms on every level and near bedrooms are still essential in homes with gas appliances.
How often should I clean the grease filter?
Every one to three months for regular cooking. Soak metal filters in hot soapy water or run them through the dishwasher if the maker allows it.