Most weed barrier failures have nothing to do with the fabric itself. They happen because the landscape fabric pins were too short for the soil, spaced too far apart, or skipped along the seams where wind and water do their damage. Here is the short answer: use 6-inch, 11-gauge steel U-pins for most garden beds, step up to 8-12 inches in sandy or loose soil, and place them every 12 inches along edges and seams and every 3 to 4 feet across the middle. The rest of this guide explains why those numbers work and when to change them.
- What Landscape Fabric Pins Are and How They Hold
- Types of Landscape Fabric Pins
- Choosing the Right Pin Length for Your Soil
- Gauge and Material: Why Thickness Matters
- Spacing: How Far Apart to Place Landscape Fabric Pins
- How Many Pins Do You Need?
- Step-by-Step: Installing Fabric and Pins Correctly
- Common Mistakes and How to Fix Them
- When Pins Are Not Enough
- Landscape Fabric Pins FAQ
What Landscape Fabric Pins Are and How They Hold
Landscape fabric pins are metal or plastic stakes driven through weed barrier, erosion blanket, sod netting, or drip line to hold it tight against the ground. They go by several names at the garden center: sod staples, garden staples, U-pins, ground staples, and landscape stakes. Functionally they are the same product family, just sold in different shapes and weights.
A pin holds by friction. The longer the legs and the denser the soil, the more grip it has. That is why a 4-inch staple that stays put in clay will pop right back out of a sandy bed after the first storm. Once mulch, gravel, or rock goes on top, the pins are really only doing their job during installation and in the months before the cover layer settles. Exposed fabric, like a temporary weed-smothering tarp or a slope blanket, relies on them far more.
Types of Landscape Fabric Pins
You will run into four main styles. Each has a place, and mixing two types in one project is completely normal.
U-shaped staples
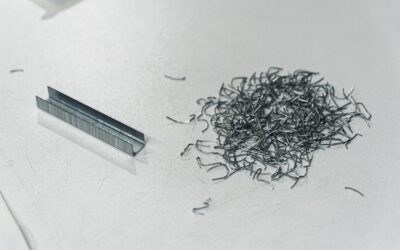
The classic sod staple is a single length of wire bent into a square U with a 1-inch crown. The two legs double the grip compared to a single spike, and the flat crown presses a wide strip of fabric down. These are the default choice for weed barrier under mulch and for erosion control matting. They are also the cheapest per piece, usually sold in bags of 50 to 500.
Round-top or washer pins
These look like a large nail with a round head, sometimes paired with a plastic or metal washer about 1.5 to 2 inches wide. The washer spreads the holding force over a larger area so the fabric does not tear around the hole. Use them on woven fabric that will stay exposed, on seams that take foot traffic, and anywhere you expect the fabric to flap in the wind.
Plastic and biodegradable pegs
Plastic pegs are barbed so they resist pulling out, and they will not rust or hurt a mower blade if one works loose. Biodegradable pins made from plant-based resin or wood are designed for erosion blankets and new lawns where you want the staple to disappear after the vegetation takes hold, usually within one to two growing seasons. Neither is a good choice for permanent weed barrier under rock.
Heavy-duty spikes and rebar-style stakes
For landscape edging, geogrid, or fabric under driveway gravel, a 10- to 12-inch spike or a bent rebar stake gives far more holding power than wire staples. They cost more but a handful at the corners and transitions can save the whole installation.
Choosing the Right Pin Length for Your Soil
Length is the single most important variable. Match it to how firm the ground is at the depth the pin will reach, not just at the surface.
- 4-inch pins: Hard clay, compacted fill, or rocky ground where longer pins will bend. Also fine for holding drip tubing in soft beds.
- 6-inch pins: The all-purpose length. Works in average loam, amended garden beds, and most lawn edges.
- 8-inch pins: Freshly tilled soil, light sandy loam, and slopes where the fabric carries some load.
- 10- to 12-inch pins: Pure sand, loose fill, steep banks, and exposed fabric in windy areas.
A quick field test helps. Push a screwdriver into the soil by hand. If it slides in more than 4 inches with little effort, your soil is loose enough that 8-inch pins or longer are worth the extra cost. If you struggle to get it 2 inches deep, stay with 4- to 6-inch pins and pre-drive a pilot hole with a steel spike for any spots where they fold over.
Gauge and Material: Why Thickness Matters
Wire gauge works backward: a lower number means thicker wire. Most bagged landscape fabric pins are 11-gauge steel, roughly 1/8 inch thick, which is stiff enough to push into average soil by hand or with a light tap from a rubber mallet. Budget bags sometimes use 12- or 14-gauge wire that bends as soon as it hits a pebble. For clay, rocky ground, or anything under gravel, 9-gauge staples are worth tracking down.
Plain steel will rust, and that is not always a bad thing. A light coat of rust roughens the surface and actually increases grip in the soil over the first few months. Galvanized pins last longer in wet beds and near water features. If you are pinning fabric near a pond liner or anywhere a sharp end could puncture something, use round-top pins with washers so nothing sharp faces upward.
Spacing: How Far Apart to Place Landscape Fabric Pins
Spacing depends on where the pin sits. Edges and seams need the most attention because that is where wind lifts the fabric and where weeds find their way through.
- Seams and overlaps: Every 12 inches. Overlap adjacent strips by 6 to 12 inches and pin through both layers down the middle of the overlap.
- Perimeter edges: Every 12 to 18 inches, set about 2 to 3 inches in from the edge so the pin does not rip out.
- Open field: Every 3 to 4 feet in a staggered grid under mulch or rock. Tighten to every 2 feet on exposed fabric.
- Slopes: Every 12 to 24 inches across the entire surface, with a row at the top edge buried in a small trench.
- Around plants: Two or three pins around each X-shaped planting cut to hold the flaps down.
Stagger the pins in the field rather than lining them up in rows. A staggered pattern distributes tension evenly and prevents the fabric from forming ridges between rows when soil shifts in freeze-thaw cycles.
How Many Pins Do You Need?
Bags are sold by count, so it helps to estimate before you shop. A reliable rule of thumb is one pin per 3 to 4 square feet for weed barrier under mulch, and one pin per 1 to 2 square feet for exposed fabric or slopes. Then add extra for seams.
| Project | Area | Approximate pins |
|---|---|---|
| 3 ft x 50 ft roll, flat bed under mulch | 150 sq ft | 115-130 |
| 4 ft x 100 ft roll, flat bed under rock | 400 sq ft | 250-300 |
| Slope blanket, 4 ft x 50 ft | 200 sq ft | 150-200 |
For that first example, the math looks like this: two long edges at 12-inch spacing is about 100 pins, plus a center row every 3 feet adds roughly 17 more. Buying a 150-count bag leaves spares for bent pins and planting cuts. It is always cheaper to overbuy staples than to reinstall fabric that blew into the neighbor’s yard.
Step-by-Step: Installing Fabric and Pins Correctly
- Prep the ground. Remove existing weeds with roots, rake out sticks and stones larger than a golf ball, and level the bed. Lumps create air pockets that let the fabric flex and pull pins loose.
- Roll out the fabric. Place the fuzzy or textured side down if your product has one. Leave a few inches of excess at each edge.
- Anchor one end first. Pin the starting edge every 12 inches, then pull the fabric snug, not drum-tight, and pin the opposite end.
- Pin the long edges. Work from the middle toward the ends so wrinkles push outward.
- Add field pins. Follow a staggered grid at your chosen spacing.
- Overlap and pin seams. Lap the next strip 6 to 12 inches and pin through both layers every foot.
- Cut planting holes. Make an X cut, fold the flaps under, set the plant, and pin the flaps back around the stem.
- Cover promptly. Spread 2 to 3 inches of mulch or rock within a day or two. UV light degrades most non-woven fabric within a season if left exposed.
Drive pins straight down, never at a steep angle. An angled pin has less soil holding it and tends to work its way out as the ground heaves. If you are using a mallet, tap until the crown just touches the fabric. Driving it deeper can tear the material and create a weak spot.
Common Mistakes and How to Fix Them
Fabric edges curling up along a walkway is the most frequent complaint. The fix is to trench the edge: cut a 3-inch slot along the border, tuck the fabric in, pin it inside the trench, and backfill. That buried edge will not lift, and it hides the fabric line neatly.
Pins popping up after winter is another. Frost heave pushes short staples upward in cold climates, especially in clay. Reset them with a mallet in spring and replace any that come out easily with longer pins. In zones with deep frost, starting with 8-inch pins is worth the small upcharge.
Rusted-through pins under old mulch are normal after five to ten years. By then the mulch layer holds the fabric in place, so you rarely need to replace them unless you are pulling up and relaying the bed.
Finally, avoid pinning fabric over tree roots or buried lines. Call 811 before driving long stakes near utility runs, since a 12-inch spike can reach shallow irrigation or low-voltage lighting cable. The service is free and marks public lines; private lines such as landscape lighting you installed yourself still need your own caution.
When Pins Are Not Enough
For fabric under a gravel driveway, a paver base, or a dry creek bed, pins are a temporary positioning aid, not a structural anchor. The weight of the aggregate is what holds the geotextile in place. In those cases, use a heavier woven or non-woven geotextile rated for the load, pin the edges generously during placement, and rely on compacted base material to finish the job.
On steep embankments steeper than roughly 3:1, erosion blankets need a staple pattern specified by the manufacturer, often printed right on the roll. Follow it. Engineered slopes, retaining walls, and drainage swales that carry concentrated water are situations where a landscape contractor or civil engineer should design the system rather than relying on staples alone.
Landscape Fabric Pins FAQ
What size landscape fabric pins should I use?
Six-inch, 11-gauge U-shaped staples fit most garden beds. Choose 4-inch pins for hard clay or rocky ground and 8- to 12-inch pins for sandy soil, tilled beds, slopes, or exposed fabric in windy spots.
How far apart should landscape fabric pins be?
Place them every 12 inches along seams and edges and every 3 to 4 feet in a staggered grid across the middle. On slopes or exposed fabric, tighten the field spacing to every 1 to 2 feet.
Do I still need pins if I put rock or mulch on top?
Yes. Pins keep the fabric flat and positioned while you spread the cover and during the first few months before the layer settles. Without them, edges curl and seams separate, letting weeds through.
Can I reuse landscape fabric pins?
Straight, unrusted steel pins can be reused. Discard any that are bent, heavily rusted, or thinner than 11 gauge, since they will fold over when driven a second time.