Nothing sinks a bathroom remodel faster than a surround panel that bubbles off the wall three weeks after you install it, and nine times out of ten the cause is the wrong adhesive or the wrong bead pattern. Loctite Power Grab tub surround adhesive is one of the few construction adhesives specifically formulated for the punishing conditions behind a tub panel — constant humidity, temperature swings, and zero tolerance for water intrusion — but only if you use the correct formula and apply it the way the panel manufacturers actually specify. I have set a lot of surrounds, and this guide covers which Power Grab to buy, exactly how to lay it down, and the mistakes that cause panels to fail.
- Why Standard Construction Adhesive Fails Behind a Tub
- Which Power Grab Formula to Buy
- Prepping the Wall — Do Not Skip This
- The Correct Bead Pattern
- Setting the Panel and Working Time
- Cure Time and Sealing the Seams
- Common Mistakes That Cause Failure
- How Much You Need and What It Costs
- Removing and Reworking a Panel
- Working Temperature and Storage
- The Bottom Line
Why Standard Construction Adhesive Fails Behind a Tub
A tub surround lives in the wettest, most humid microclimate in your house. Ordinary construction adhesives either never fully cure in that humidity, soften when they get warm behind the panel, or react chemically with the polystyrene and composite backing of the surround and eat right through it. That last failure is the sneaky one — a solvent-based adhesive can dissolve the back of a foam-backed panel, leaving a soft spot that eventually caves. The adhesive behind a surround has to be waterproof, low-odor, and specifically labeled safe for the panel material.
Which Power Grab Formula to Buy
Loctite makes several Power Grab products, and grabbing the wrong tube is the first mistake. For tub and shower surrounds, buy the tube explicitly labeled for the job — Loctite offers a “Tub Surround & Shower Wall” or “All Purpose” Power Grab formula that is water-resistant and safe on the plastics and composites most surround kits use. Confirm two things on the label before you check out:
- Panel compatibility: it must state it works with your surround material — typically fiberglass, acrylic, PVC, or composite. Avoid any adhesive that warns against polystyrene or foam if your panel is foam-backed.
- Water resistance: it must be rated for high-moisture and wet-area use, not just “interior.”
The product comes in a standard 9-ounce caulk-gun cartridge. Most single-piece three-wall surrounds need two to three tubes; budget three so you are not running to the store mid-set with adhesive already flashing over.
Prepping the Wall — Do Not Skip This
Adhesive bonds to the surface, so a dirty or loose surface is a failure waiting to happen. The wall behind a surround should be a moisture-resistant substrate — cement board or a proper tile backer, not plain paper-faced drywall, which turns to mush if any water ever gets behind the panel. Clean the surface of dust, soap residue, and old adhesive. It must be dry. Dry-fit the panel first, mark the top edge with a pencil line using a level, and confirm the fit around the tub flange and any plumbing cutouts before a drop of adhesive comes out of the tube.
The Correct Bead Pattern
This is where most DIY installs go wrong. You do not slather adhesive edge to edge — the panel needs to breathe and the adhesive needs air to cure, and a solid coat traps moisture and never sets in the middle. The standard pattern the surround manufacturers specify:
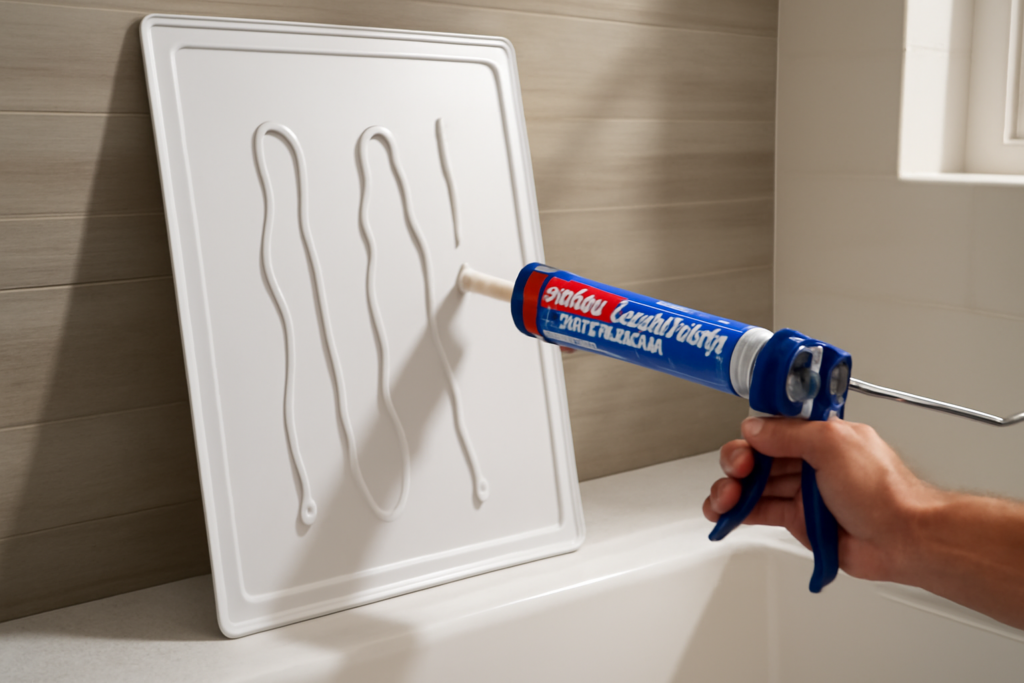
- Run continuous beads around the entire perimeter of each panel, about 1 inch in from the edges.
- Fill the field with vertical or S-shaped serpentine beads spaced roughly 12 inches apart.
- Keep the bead about 1/4 inch thick — enough to bridge minor wall irregularities without oozing out the seams.
- Stay a couple of inches back from any edge that will get caulked, so adhesive does not squeeze into the seam.
Cut the nozzle at a 45-degree angle to about a 1/4-inch opening. Work one panel at a time; do not spread adhesive across a whole wall and then fumble panels, because the surface skins over faster than you think.
Setting the Panel and Working Time
Power Grab’s selling point is instant grab — the panel holds on contact, so you rarely need to brace it, which is why it beats mastic for a solo installer. But instant grab does not mean instant cure. You have a few minutes of repositioning time to slide the panel into your pencil line and true it up. Press the entire panel firmly against the wall, working from the center outward with the flat of your hand to seat every bead and push out trapped air. Roll a J-roller or a clean paint roller over the whole surface if you have one — that even pressure is what prevents bubbles.
Check for bulges. Any spot that stands proud means a bead that hasn’t seated; press it flat immediately. Once the adhesive skins, you have lost your chance.
Cure Time and Sealing the Seams
The panel grabs on contact but reaches full strength over 24 to 48 hours, and it cures slower in a cold or extremely humid bathroom. Keep water off the surround for at least 24 hours — no showers, and ventilate the room so the adhesive can off-gas and set. Only after the adhesive has cured do you run your waterproof silicone caulk along every seam, corner, and the joint where the surround meets the tub. That caulk line, not the adhesive, is your final defense against water getting behind the panel, so tool it smooth and leave no gaps.
Common Mistakes That Cause Failure
- Full-coverage troweling: traps moisture, never cures in the field, and the panel eventually bubbles. Use the bead pattern.
- Bonding to paper-faced drywall: the substrate fails even when the adhesive holds. Use cement board.
- Wrong formula: a solvent-based tube can dissolve a foam-backed panel from behind.
- Showering too soon: water before the 24-hour cure breaks the bond.
- Skipping the seam caulk: the adhesive is not a waterproofing product; the silicone is.
How Much You Need and What It Costs
Estimating adhesive is where people either run short mid-job or overbuy. A standard 9-ounce cartridge of Power Grab covers roughly 20 to 30 linear feet at a 1/4-inch bead, which sounds like plenty until you account for the perimeter beads plus the serpentine field pattern on every panel. A typical three-wall tub surround kit — one back panel and two end panels — usually takes two to three tubes. Buy three so a panel is never left half-set while you make a hardware-store run, because a bead that skins over before the panel goes up will not bond. At roughly $6 to $9 a tube in 2026, the adhesive is a small line item on a surround project; the surround kit itself, cement board, and a quality tube of silicone for the seams make up the rest. Do not economize here — the difference between the right adhesive and a $2 generic tube is the difference between a panel that lasts 20 years and one you re-glue next spring.
Removing and Reworking a Panel
Power Grab’s instant grab is a blessing during install and a curse if you need to pull a panel later. Once cured, the bond is strong enough that removing a bonded surround panel usually destroys the panel and often damages the wall behind it — plan on replacing both if you have to take one down. If you catch a misaligned panel within the first few minutes, while the adhesive is still workable, you can carefully pry it off and reposition it, but scrape off the disturbed adhesive and apply fresh beads rather than trying to reuse the smeared original. This is exactly why the dry-fit and pencil-line step matters so much: with an instant-grab adhesive, your one clean shot at placement happens in the first couple of minutes, and there is no leisurely repositioning window the way there is with slow-set mastic. Measure, mark, and dry-fit twice so you only have to bond once.
Working Temperature and Storage
Like most construction adhesives, Power Grab has a comfort zone, and ignoring it causes weak bonds and slow curing. Apply it in a room that is above the minimum temperature on the label — a cold bathroom slows the cure dramatically and can prevent a proper set, so warm the space with the heat on for a few hours before you start in winter. Store unused cartridges capped and above freezing; a tube that has frozen may be compromised even after it thaws. Keep the nozzle sealed between panels with a nail or the cap so the tip does not skin over and clog. These small habits keep every tube performing the way the fresh one did, and they cost nothing but a little attention.
The Bottom Line
Loctite Power Grab is a genuinely good choice for a tub surround, but it rewards discipline. Buy the formula labeled for wet-area and shower-wall use, confirm it is compatible with your panel’s backing, bond to cement board rather than drywall, and apply a perimeter-plus-serpentine bead rather than a solid coat. Seat the panel with firm even pressure, keep it dry for 24 to 48 hours, and finish with a proper silicone seam. Follow that sequence and the surround stays flat and bonded for the life of the bathroom; rush the bead pattern or the cure and you will be pulling a bubbled panel off the wall before the season is out.