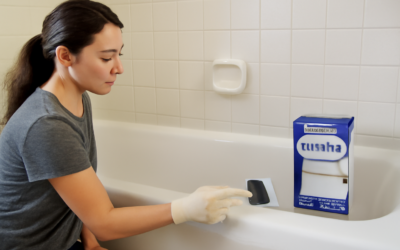
A dated avocado-green tub or chipped pink tile can drag down an entire bathroom, yet ripping it all out can run thousands of dollars. That is exactly why Rust Oleum Tub and Tile has become a go-to fix for homeowners who want a refresh without demolition. This two-part epoxy acrylic coating bonds to porcelain, ceramic, fiberglass, and acrylic surfaces, leaving behind a hard, glossy finish that mimics professional reglazing. Done right, a single kit transforms a tub or a small tile wall in an afternoon.
Part of our Tile & Grout guide — explore the full guide →
What the Kit Actually Is
This product is a two-component coating: a base (Part A) and an activator (Part B) that you mix together right before use. Once combined, you have a working window of roughly six hours before the mixture starts to set up. The chemistry is what gives it durability. Unlike a single-can spray paint, the catalyzed epoxy cross-links as it cures, creating a surface that resists water, mild abrasion, and household cleaners.
A standard 32-ounce kit covers about 110 square feet with two coats, which is enough for a typical bathtub or a modest tile surround. The coating comes in white and almond, the two shades that match most older fixtures.
Surface Prep: Where Success Is Won or Lost
Roughly 80 percent of failed refinishing jobs trace back to bad prep. The coating needs a clean, dull, oil-free surface to grip. Start by scrubbing away soap scum and body oils with an abrasive cleaner, then rinse thoroughly. Any silicone caulk should be cut out and removed completely, because the coating will not stick over it.
Next comes etching and sanding. Wet-sand the entire surface with 400 to 600 grit sandpaper until the original gloss is gone and the surface feels uniformly matte. This microscopic roughness is what the epoxy keys into. Wipe down with a tack cloth, then do a final wipe with the recommended cleaner so no dust or residue remains.
Quick Prep Checklist
- Remove all caulk and hardware (drain trim, overflow plate, faucet handles)
- Deep-clean with an abrasive, non-oily cleaner
- Wet-sand to a uniform dull finish
- Rinse, dry completely, and tack off all dust
- Mask adjacent walls, fixtures, and the floor with painter’s tape and plastic
Mixing and Application
Pour the activator into the base and stir slowly for two full minutes, scraping the sides of the can. Avoid whipping in air bubbles, which can telegraph into the finish. Let the mixed coating stand for the time noted on the label so trapped air can escape.
You can apply it with a high-density foam roller, a quality synthetic brush, or an HVLP sprayer. For most homeowners, a foam roller paired with a brush for corners gives the smoothest hand-applied result. Lay down thin, even coats. Two thin coats always beat one thick coat, which tends to sag and stay tacky. Wait the recommended interval, usually one to two hours, between coats.
Curing and First Use
Patience during curing separates a finish that lasts years from one that peels in months. The coating is dry to the touch within hours, but full chemical cure takes about three days at 70°F or warmer. Keep the bathroom ventilated and warm. Cooler temperatures slow the cure dramatically, so avoid refinishing in an unheated space during winter.
Do not run water in the tub, reinstall caulk, or replace hardware until the surface has cured for the full recommended period. Rushing this step is the single most common reason a finish softens or lifts. Once cured, recaulk seams with a quality silicone caulk to keep water from creeping underneath the new coating.
Realistic Expectations and Longevity
Refinishing is a cosmetic upgrade, not a structural one. A well-prepped coating can look great for five to ten years on a tub that sees normal use. Heavy daily abuse, harsh abrasive cleaners, and standing water around a worn drain will shorten that life. Treat the surface gently and it rewards you.
- Skip abrasive scrub pads and powdered cleansers, which dull and scratch the finish
- Use a soft cloth and a non-abrasive bathroom cleaner
- Wipe down standing water, especially around the drain and corners
- Avoid rubber bath mats with suction cups, which can pull at the coating over time
When Refinishing Makes Sense vs. Replacing
If your tub or tile is structurally sound but cosmetically tired, refinishing is a smart, budget-friendly move. The material cost of a single kit is a tiny fraction of a full tear-out and re-tile job, and you skip the dust, debris, and contractor scheduling. That said, refinishing cannot fix a cracked tub shell, rotted substrate behind tile, or active leaks. If water has already damaged what is behind the surface, address the root problem first.
For a homeowner weighing options, the calculus is simple. A surface that is ugly but solid is an ideal candidate for a coating like this. A surface hiding water damage or structural cracks needs real repair before any finish goes on.
Choosing the Right Color and Coverage
Because the coating comes in a limited palette, plan your color before you start. White is the safe, neutral default that brightens a bathroom and pairs with any wall color. Almond suits homeowners trying to match warmer existing fixtures or who want a softer, less stark look. If your tile and tub are different shades, decide whether you want to coat both for a uniform result or leave one as is.
Coverage math is worth doing up front so you do not run short mid-project. Measure the surface area you intend to coat in square feet, then compare it to the kit’s stated coverage at two coats. A single tub usually fits within one kit, but a tub surround with full tile walls may push you toward a second kit. Buy a little extra rather than racing to a store with wet, half-coated walls.
Ventilation and Working Environment
This coating gives off strong fumes during application and curing, so ventilation is not optional. Open a window, run an exhaust fan, and consider a respirator rated for organic vapors rather than a simple dust mask. Keep pets and family members out of the bathroom while you work and during the early cure. Aim for a room temperature between 70°F and 80°F, since the coating both applies and cures best in that range. Cold, damp conditions are the enemy of a smooth, fully hardened finish.
Common Mistakes to Avoid
Beyond skipping prep, the errors that sink most projects are predictable. Applying coats too thick leads to runs and a tacky surface that never fully hardens. Working in a cold or humid room stalls the cure. Reusing a tub before it is ready guarantees disappointment. And leaving old caulk in place creates a weak edge where the coating fails first.
Take your time, follow the label, and respect the cure schedule. With careful prep and thin, even coats, this product delivers a glossy, professional-looking refresh that makes a dated bathroom feel new again, all for the cost of a kit and an afternoon of work.
Prefer to explore on your own?
See how new flooring looks in your actual room in seconds — free, no signup.
Try the free Floor Studio →