The little raised threshold at the edge of your shower does far more work than it looks like it does. Shower curb tile caps the barrier that keeps water inside the shower and off your bathroom floor, and tiling it correctly is one of the trickiest small details in any bathroom remodel. A curb that is sloped wrong, waterproofed poorly, or tiled carelessly becomes the exact spot where leaks and cracks begin. Get the slope, the waterproofing, and the tile cuts right, and the curb disappears into a seamless, watertight shower that lasts for decades.
- What the Shower Curb Does
- The Critical Detail: Slope It Toward the Shower
- Waterproofing Comes First
- Tiling the Three Surfaces
- Handling the Corners and Edges
- Design Choices That Work
- Grouting and Sealing the Finished Curb
- Curbed Versus Curbless Showers
- Building the Curb Itself
- Common Mistakes to Avoid
What the Shower Curb Does
The curb is the raised lip, usually a few inches tall, that separates the shower floor from the rest of the bathroom. Its job is to contain water, both the splash from the showerhead and the water draining across the sloped shower floor. Tile finishes the curb and ties it visually into the rest of the shower, but the tile is only the final layer. Underneath sits a waterproofed, sloped structure that does the real work. Treating the tile as decoration over a properly built core is the right mindset.
The Critical Detail: Slope It Toward the Shower
If there is one rule that prevents most curb problems, it is this: the top of the curb must slope slightly back toward the inside of the shower, never flat and never outward. A small pitch, roughly 1/8 to 1/4 inch back toward the drain side, ensures any water that lands on the curb runs back into the shower instead of pooling on top or running out onto the bathroom floor. A perfectly flat curb top holds standing water that eventually finds its way into the structure. An outward slope sends water straight onto your finished floor.
Waterproofing Comes First
Before a single tile goes on, the curb must be fully waterproofed as part of the shower’s overall waterproofing system. This is the step that separates a curb that lasts from one that rots from the inside.
- Wrap the curb in the same waterproofing membrane used for the shower walls and pan, with no gaps at the corners.
- Overlap and seal the membrane where the curb meets the shower floor and the walls.
- Pay special attention to the inside and outside top corners, which flex and crack most easily.
- Never rely on the tile and grout alone to keep water out. Grout is not waterproof.
A continuous, unbroken waterproof layer over the entire curb is what protects the framing beneath it.
Tiling the Three Surfaces
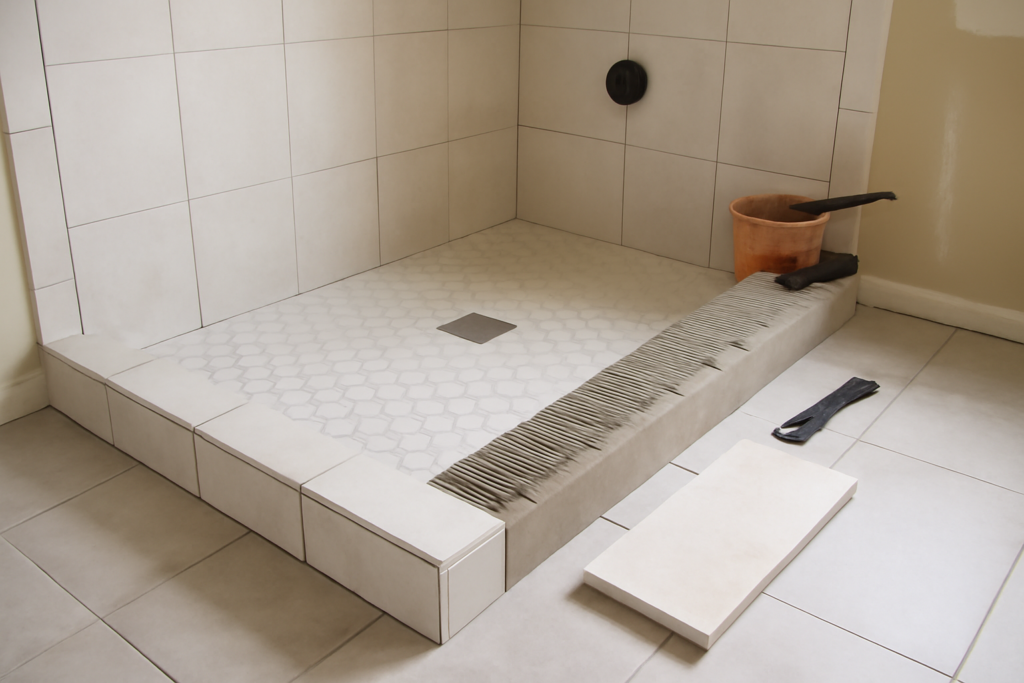
A curb has three visible faces to tile: the top, the inside (shower-facing) edge, and the outside (bathroom-facing) edge. Planning how those pieces meet at the corners is where the craftsmanship shows.
- Dry-fit first: Lay out your tile to balance cuts and avoid tiny slivers at the edges.
- Set the top last or in sequence: Many installers tile the inside and outside faces, then cap the top so the top piece overlaps the edges cleanly.
- Maintain the slope: As you set the top tiles, preserve the back-pitch you built into the curb.
- Use the right thinset: Back-butter pieces and ensure full coverage so there are no hollow spots that can crack.
Handling the Corners and Edges
Corners are where curbs look amateur or polished. You have a few ways to finish the exposed edges. A clean 45-degree miter where two tile faces meet at the corner gives the most seamless, high-end result, but it requires precise cutting and leaves a slightly fragile edge. Alternatively, a metal or PVC tile trim, often called a Schluter-style edge profile, caps the edges crisply and protects them from chipping. For a softer look, bullnose tiles with a finished rounded edge wrap the corners without sharp lines. Choose based on your skill level and the look you want, but never leave a raw, unfinished tile edge exposed.
Design Choices That Work
Beyond function, the curb is a chance to refine the shower’s look. Most installations either continue the shower floor tile across the curb top for a unified look, or use the same tile as the surrounding bathroom floor to blend the threshold into the room. A contrasting accent, like a strip of the wall tile or a small mosaic, can dress up the curb top as a subtle detail. Whatever you choose, keep the grout joints aligned with the adjacent surfaces where possible, because misaligned lines on a small element like a curb are immediately noticeable.
Grouting and Sealing the Finished Curb
Once the tile has set, grout the joints, then seal them in this constantly wet location. Use a quality grout and, for the curb especially, consider an epoxy grout or a well-sealed cement grout, since the curb takes direct water exposure. Where the curb tile meets the shower pan, the walls, and any change of plane, use a color-matched silicone caulk rather than rigid grout. Those movement joints flex slightly over time, and silicone absorbs that movement where grout would crack.
Curbed Versus Curbless Showers
Before you tile a curb, it is worth knowing the alternative exists. A curbless or zero-threshold shower eliminates the raised lip entirely, with the bathroom floor flowing seamlessly into the shower and a linear drain handling the water. Curbless designs look sleek and improve accessibility for wheelchairs and aging-in-place, but they demand more careful sloping and waterproofing across the whole floor and usually require recessing the subfloor. A traditional curbed shower is simpler to build, contains water more forgivingly, and remains the standard choice for most remodels. If accessibility or a modern open look is a priority, weigh curbless early, because it changes the entire floor structure, not just the threshold.
Building the Curb Itself
The tile is only as good as the curb beneath it, and there are a few common ways to build that core. Traditionally, curbs were stacked from masonry blocks or bricks set in mortar, then waterproofed. Today many installers use preformed foam curbs that come ready to waterproof and tile, which are lightweight, already correctly shaped, and faster to install. Whichever method you use, the structural curb must be solid, securely fastened, and dimensioned so the finished tile lands at a comfortable height, typically a few inches above the shower floor. A wobbly or hollow curb base will crack its tile no matter how carefully you set it, so get the core right before you ever mix thinset.
Common Mistakes to Avoid
The errors that cause curb failures repeat constantly. A flat or outward-sloped top sends water the wrong way. Skipping or shortcutting the waterproofing lets water reach the framing. Filling corner movement joints with grout instead of silicone guarantees cracks. And leaving sharp, unfinished tile edges results in chips and an unpolished look. Build the curb sloped, wrap it completely in waterproofing, finish the edges deliberately, and caulk the movement joints. Do those four things and your shower curb tile will stay watertight and sharp-looking long after the rest of the bathroom shows its age.
Prefer to explore on your own?
See how new flooring looks in your actual room in seconds — free, no signup.
Try the free Floor Studio →