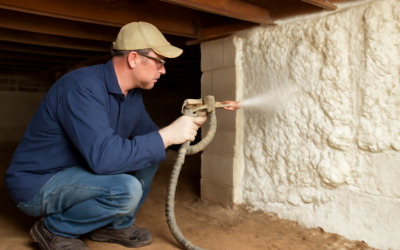
A damp, vented crawl space is one of the biggest hidden sources of energy loss, moisture problems, and poor air quality in a home. Spray foam crawl space encapsulation seals and insulates the space to fix all three at once, turning a musty, unconditioned void into a dry, efficient part of your home’s building envelope. This guide explains how it works, the foam options, costs, and how to decide between DIY and professional work.
- What Crawl Space Encapsulation Is
- Why Spray Foam Is Used
- Open-Cell vs Closed-Cell Foam
- How Encapsulation Controls Moisture
- The Role of Dehumidification
- Benefits of Encapsulation
- The Encapsulation Process
- Insulation Approach: Walls vs Floor
- Building Codes and Fire Safety
- Cost Expectations
- DIY vs Professional Installation
- Common Mistakes to Avoid
- Spray Foam vs Rigid Foam Board
- Signs Your Crawl Space Needs Attention
- Return on Investment and Energy Savings
- Final Thoughts
What Crawl Space Encapsulation Is
Encapsulation means completely sealing a crawl space from outside air and ground moisture. A full encapsulation typically combines a heavy vapor barrier on the floor and walls, sealed vents, and insulation, most effectively spray foam applied to the perimeter walls and rim joist. The result is a conditioned or semi-conditioned space that stays dry and closer to the temperature of the living area above, rather than a damp, drafty vent to the outdoors.
Why Spray Foam Is Used
Spray polyurethane foam is popular for crawl spaces because it does two jobs at once: it insulates and it air-seals. Applied to the foundation walls and the rim joist (the band of framing where the floor meets the foundation), it expands to fill gaps and cracks, stopping air leakage while adding R-value. This dual action is why it outperforms fiberglass batts, which insulate but do nothing to stop air and moisture movement, and often sag and grow moldy in crawl spaces.
Open-Cell vs Closed-Cell Foam
There are two types of spray foam, and the difference matters a great deal in a crawl space:
- Closed-cell foam: Dense and rigid, roughly R-6 to R-7 per inch. It resists water and acts as a vapor barrier, making it the preferred choice for crawl space walls and rim joists in most climates.
- Open-cell foam: Lighter and softer, about R-3.5 to R-4 per inch. It is vapor-permeable and absorbs water, so it is generally not recommended for below-grade or moisture-prone crawl space walls.
For crawl spaces, closed-cell foam is almost always the right choice because of its moisture resistance and higher R-value per inch.
How Encapsulation Controls Moisture
Moisture is the root of most crawl space problems. Encapsulation attacks it on multiple fronts. A vapor barrier on the ground, typically a 10- to 20-mil reinforced polyethylene sheet, blocks moisture rising from the soil. Sealing the vents stops humid outside air from entering and condensing on cool surfaces in summer. Closed-cell spray foam on the walls prevents condensation and air infiltration. Together these keep relative humidity low, which stops mold, wood rot, and pest attraction.
The Role of Dehumidification
A properly sealed crawl space often needs a way to manage residual humidity. Many encapsulation projects include a dedicated crawl space dehumidifier or a supply of conditioned air from the home’s HVAC system to keep relative humidity below about 60 percent. Without this, a tightly sealed space can occasionally trap moisture. Discuss humidity management as part of any encapsulation plan rather than treating it as optional.
Benefits of Encapsulation
- Lower energy bills: Sealing and insulating reduces heat loss and gain, often cutting heating and cooling costs meaningfully.
- Better air quality: Because up to half of the air in your living space can rise from the crawl space, sealing out mold and soil gases improves indoor air.
- Structural protection: Controlling moisture prevents wood rot, mold, and rust on ductwork and fasteners.
- Pest reduction: A sealed, dry space is far less inviting to insects and rodents.
- Comfort: Floors above feel warmer and drafts diminish.
The Encapsulation Process
- Clear debris and address any standing water, drainage, or grading issues first.
- Repair or install a sump pump and any needed drainage if water intrusion is present.
- Seal all vents and openings to the outside.
- Install the heavy vapor barrier across the floor and up the walls, overlapping and sealing seams.
- Apply closed-cell spray foam to the rim joist and perimeter walls to the required thickness.
- Install a dehumidifier or conditioned air supply to manage humidity.
Insulation Approach: Walls vs Floor
In an encapsulated crawl space, the modern approach is to insulate the perimeter walls rather than the floor above. Because the space is now sealed and conditioned, insulating the walls brings it inside the building envelope, keeping ductwork and plumbing in a protected zone. This differs from the old method of stuffing fiberglass between the floor joists, which left the crawl space cold and moisture-prone. Foam on the walls is more effective and durable.
Building Codes and Fire Safety
Spray foam is combustible and, per building codes, generally must be covered with a thermal or ignition barrier in occupied or accessible spaces. In many crawl spaces, an intumescent coating sprayed over the foam satisfies the ignition barrier requirement. Always confirm local code requirements, as inspectors will look for proper coverage. This is one reason professional installation is common, since installers know the code specifics for your area.
Cost Expectations
Encapsulation is a significant investment. Professional spray foam crawl space encapsulation typically runs $5,000 to $15,000 or more depending on the size of the crawl space, the amount of foam, whether drainage and a dehumidifier are needed, and regional labor rates. On a per-square-foot basis, expect roughly $3 to $8 for encapsulation, with spray foam being one of the pricier components. While costly upfront, the energy savings and avoided moisture damage often justify the expense over time.
DIY vs Professional Installation
Some parts of encapsulation, such as laying a vapor barrier and sealing vents, are within reach for a determined DIYer. However, applying closed-cell spray foam is best left to professionals. The two-part foam requires specialized equipment, precise mixing and temperature control, and proper respiratory protection, since the chemicals are hazardous until cured. Improperly applied foam can off-gas or fail to cure. Given the health and code considerations, most homeowners hire a licensed insulation contractor for the foam work.
Common Mistakes to Avoid
- Encapsulating over an existing moisture or drainage problem instead of fixing it first.
- Using open-cell foam or fiberglass on crawl space walls where moisture is a risk.
- Skipping humidity management and trapping moisture in a sealed space.
- Failing to cover the foam with a required ignition barrier per local code.
- Leaving vents unsealed, which defeats the purpose of encapsulation.
Spray Foam vs Rigid Foam Board
Spray foam is not the only insulation used in encapsulated crawl spaces; rigid foam board is a common alternative on the walls. Rigid boards, such as extruded polystyrene (XPS) or polyisocyanurate, are cut to fit and adhered or fastened to the foundation walls, then sealed at the seams. Boards can be less expensive per R-value and are a DIY-friendly option, but they require careful sealing at every joint and edge to match the air-sealing that spray foam achieves in one step. Spray foam’s advantage is that it conforms to irregular surfaces and seals gaps automatically, making it the more thorough choice for uneven stone or block foundations, while rigid board suits smooth, regular poured walls.
Signs Your Crawl Space Needs Attention
Several warning signs indicate a crawl space is due for encapsulation. Musty odors in the home, especially on the ground floor, often trace to a damp crawl space, since much of your indoor air rises from below. Cold or bouncy floors above, high humidity readings, condensation on ductwork, visible mold on framing, rusting metal, and increased pest or insect activity all point to a moisture problem. If you notice standing water after rain or a persistent damp smell, investigate before the moisture causes wood rot or structural damage. Catching these signs early makes encapsulation a preventive measure rather than a costly repair.
Return on Investment and Energy Savings
Although encapsulation is a significant expense, it delivers measurable returns. By sealing air leaks and insulating the walls, it commonly reduces heating and cooling costs, since the crawl space and the floors above are no longer exposed to outdoor temperatures and humid air. It also protects the structure from moisture damage that would be far more expensive to repair, and it improves indoor air quality, which is hard to put a price on. Many homeowners also find it improves comfort with warmer floors and fewer drafts. Combined with avoided future repairs, the payback period is often reasonable over the years you own the home.
Final Thoughts
Spray foam crawl space encapsulation transforms one of a home’s most problematic areas into a dry, efficient, and healthy part of the building envelope. By combining a vapor barrier, sealed vents, moisture management, and closed-cell foam on the walls, it lowers energy bills, protects the structure, and improves the air you breathe upstairs. Address drainage first, use closed-cell foam, plan for humidity control, and hire a qualified pro for the foam application to get lasting, code-compliant results.