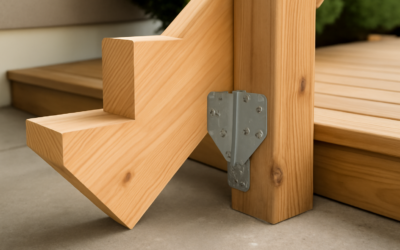
The connection where a staircase meets its top header carries every footstep in the whole flight, and a stair stringer hanger is the hardware engineered to make that joint safe. Toe-nailing stringers to a rim joist may hold for a while, but it relies on fasteners loaded in withdrawal, exactly the direction nails are weakest. A proper stair stringer hanger transfers the load in shear, the way the connection is meant to work, and it is the difference between stairs that feel rock-solid and stairs that develop a nerve-racking bounce.
Part of our Stairs & Stair Flooring guide — explore the full guide →
This guide covers the hanger types available, their load ratings, the fasteners they demand, and a clean step-by-step for anchoring stringers to a header on interior stairs, deck stairs, and everything between.
- Why Stringers Need Dedicated Hardware
- Common Types of Stringer Hangers
- Load Ratings and Fastener Requirements
- Tools and Materials Checklist
- Step-by-Step: Anchoring Stringers to a Header
- Bottom Connection Matters Too
- Code, Inspection, and When to Call a Pro
- Cut Stringers vs. Solid Stringers
- Preventing Squeaks and Long-Term Movement
Why Stringers Need Dedicated Hardware
A cut stringer, the sawtooth type, loses a lot of its depth at the notches. At the top, where it meets the header, there is often only a few inches of solid wood to fasten through. Drive a couple of framing nails there and you are asking a thin triangle of lumber to hold up the entire flight through fastener grip alone. Over time, foot traffic works those nails loose and the stairs start to separate from the header.
A stringer hanger wraps the wood and pins it with multiple fasteners loaded in shear, spreading the load across a steel bracket rated for a specific capacity. On decks and any exterior application, code increasingly calls for a tested connector rather than nails. Simpson Strong-Tie and USP make brackets specifically for this joint.
The distinction between shear and withdrawal is the heart of why this matters. A nail driven into end grain and then pulled straight out, which is what a toe-nailed stringer connection experiences under load, has almost no holding power because the wood fibers simply release the shank. A fastener loaded in shear, by contrast, has to be sheared through to fail, which requires far more force. A steel hanger converts the connection from the weak withdrawal condition to the strong shear condition, and that single change is what makes the difference between a staircase that feels solid and one that develops a worrying flex at the top step.
Common Types of Stringer Hangers
- Adjustable stringer connectors (Simpson LSC and similar): A field-adjustable steel angle that bends to match your exact stair pitch, then screws to both the stringer and the header. These are the go-to for cut stringers and handle the varied angles real stairs present.
- Concealed-flange joist hangers: For solid (housed) stringers or where a stringer sits like a joist, a standard hanger sized to the lumber works, though the sloped cut still needs a skewed or adjustable model.
- Skewed hangers: Pre-bent to a set angle, useful when the geometry is known and repeated.
- Angle brackets and framing angles: L-shaped connectors like the Simpson A35 or L70 reinforce the joint alongside the primary hanger for extra capacity.
For most residential stairs, an adjustable connector such as the Simpson LSC is the simplest correct answer because it flexes to your rise-and-run angle without custom fabrication.
Load Ratings and Fastener Requirements
Every listed connector has a published allowable load, and it only reaches that rating with the exact fasteners the manufacturer specifies. Substituting a drywall screw for a structural connector screw can cut the rated capacity by more than half. For a Simpson LSC installed with the specified 10d common nails or SD screws, allowable loads commonly run in the 400 to 900 pound range per connector depending on orientation and lumber, which is plenty for typical stair loads when you use one per stringer.
Use only connector nails or structural wood screws such as Simpson SD9 or SD10, never deck screws or drywall screws, which are brittle in shear. Fill every fastener hole the bracket provides; a connector installed with half its nails carries a fraction of its rating.
Tools and Materials Checklist
- Stringer hangers, one per stringer (a 36-inch flight usually has three stringers)
- Manufacturer-specified connector nails or structural screws
- Framing hammer or palm nailer, plus an impact driver for screws
- Speed square, tape measure, and a pencil
- Framing angles (A35 or L70) if you want added reinforcement
- Hot-dip galvanized or stainless hardware for any exterior or pressure-treated application
Match the metal coating to the lumber. Pressure-treated wood is corrosive to bare steel, so exterior deck stairs need ZMAX or stainless connectors and matching fasteners.
Step-by-Step: Anchoring Stringers to a Header
- Confirm layout. Set the stringers in position against the header and mark their locations. Standard spacing is 16 inches on center, tightening to 12 inches for wide treads or heavy use.
- Adjust the connector. Take an adjustable hanger and bend the seat to match your stringer’s pitch so the bracket sits flush against both the header and the underside of the stringer.
- Fasten to the header first. Hold the bracket tight to the header and drive the specified fasteners through the header flange. This locks the position.
- Fasten to the stringer. Drive the remaining fasteners through the seat and side flanges into the solid part of the stringer, avoiding the thin notched areas.
- Reinforce if needed. Add a framing angle on the opposite face for wide flights or where the stringer carries extra load.
- Check for movement. Load the stairs and feel for flex. A properly hung stringer should not shift or squeak at the header.
Bottom Connection Matters Too
The top hanger gets the attention, but the base of the stringers needs positive anchorage as well. On a concrete landing, fasten the stringers to a treated kicker board bolted to the slab. On a deck, connect to a treated ledger or blocking with the same class of connectors. Stairs that are secure at the top but only resting at the bottom will still creep and slide underfoot.
Code, Inspection, and When to Call a Pro
Most residential codes reference the International Residential Code, which expects stair connections to be capable of carrying a 300-pound concentrated load and a 40-pound-per-square-foot uniform load. Using a listed stringer hanger with correct fasteners is the straightforward way to satisfy an inspector, and it is one of the details deck inspectors specifically look for on exterior stairs.
Cut Stringers vs. Solid Stringers
The stringer type you have changes how the hanger works. A cut stringer, also called a sawtooth or open stringer, has the tread and riser notches sawn directly into the board, which removes a lot of material and leaves only a thin zigzag of wood. Because the top of a cut stringer offers little solid depth to fasten through, an adjustable connector that grabs the full remaining section is essential.
A solid or housed stringer keeps its full depth, with the treads set into routed pockets rather than cut notches. These are common on enclosed staircases and interior stairs against a wall. A solid stringer can often be hung much like a joist, and it gives fasteners far more wood to bite into, which is one reason enclosed stairs tend to feel more solid than open deck stairs. Knowing which you have tells you whether a standard hanger will work or whether you need the adjustable, angle-matching variety.
Preventing Squeaks and Long-Term Movement
A properly hung stringer should be silent, and squeaks almost always signal movement at a connection. Beyond the hanger itself, add a bead of construction adhesive between the stringer and the header before fastening; the glue eliminates the micro-shifting that fasteners alone cannot stop. On wide flights, an intermediate stringer carrying the center of each tread does more to kill bounce and squeak than any amount of extra hardware at the ends.
Recheck the connections after the first heating season. Lumber shrinks as it dries, and a hanger that was tight in humid summer conditions can loosen slightly by winter. A quarter turn on each fastener restores the grip. For exterior stairs, inspect the connectors annually for corrosion, especially where salt or de-icer is used, and confirm the base anchorage to the concrete or deck framing remains solid.
Hardware itself is inexpensive, usually $5 to $15 per connector, so there is no reason to cut corners here. If your stairs are wider than 48 inches, part of a two-story open run, or you are unsure about the header’s own capacity, have a contractor or building official confirm the design. For a standard flight, though, installing the right stringer hanger is a straightforward upgrade that turns a nervous, springy staircase into one that feels planted for the life of the house.