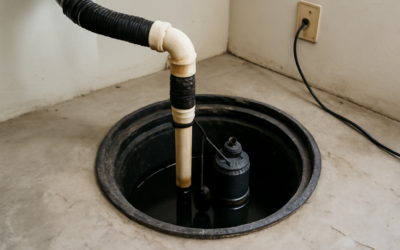
The pump gets all the attention, but the pit it sits in determines whether the whole system works. A sump pump bucket, the perforated basin or liner buried in your basement floor, collects groundwater and gives the pump a reservoir to work from. Choose one too small and the pump short-cycles itself to an early death; skip the weep holes or the gravel base and it clogs with silt. Understanding the basin is essential to a dry basement, so here is everything that goes into doing it right.
What the Sump Bucket Does
The sump bucket is the container that holds the pump and captures water as it seeps up through the soil and drains in from around the foundation. Its perforated sides let groundwater flow in while keeping soil and gravel out. When the water rises to the float’s trigger point, the pump kicks on and empties the basin through the discharge pipe.
Think of it as a well for your basement. The pump can only remove water that reaches it, so the basin’s size, placement, and inflow openings directly control how well the system protects your floor.
Sizing the Basin Correctly
Basin size is the decision that trips up most DIYers. Too small a bucket fills fast, forcing the pump to start and stop constantly, called short-cycling, which burns out motors and switches prematurely.
- Standard basins run about 18 inches wide by 22 to 30 inches deep
- Capacity typically ranges from 20 to 30 gallons for residential pits
- Deeper is generally better for a bigger reservoir and fewer pump cycles
- Match the basin to your inflow; high water tables need larger capacity
A 5-gallon utility bucket is a common improvised choice, but it is usually too small for a primary pump and leads to constant cycling. Buy a purpose-made sump basin with pre-drilled perforations for anything beyond a light-duty situation.
Liner Types and Materials
Purpose-built sump basins are made of durable structural plastic or fiberglass, sized to house standard submersible pumps and rated to resist crushing from surrounding concrete and soil. Many come with a fitted lid, which is important for safety, radon control, and keeping debris out.
A quality basin has factory-drilled holes or slots around the sides and bottom to admit water evenly. If yours is not pre-perforated, you will drill holes yourself, but a professionally slotted basin admits water more consistently and resists clogging better.
The Gravel Base Matters
Never set a sump basin directly on bare dirt. A bed of clean gravel beneath and around the basin does two critical jobs: it supports the basin so it will not settle or crush, and it filters incoming water so silt drops out before it reaches the pump.
- Excavate the pit a few inches deeper and wider than the basin
- Lay 2 to 3 inches of washed gravel in the bottom for drainage and support
- Set the basin level on the gravel bed
- Backfill around the sides with more clean gravel, not soil
The gravel envelope is what keeps silt out of the pump’s impeller. Skip it and you will be pulling a clogged pump every few months.
Weep Holes and Perforations
Water enters the basin through perforations, so their placement matters. Holes should ring the sides and bottom to admit water from all directions as the surrounding gravel fills. If you are drilling your own, use a 1/2 inch bit and space holes several inches apart around the lower two-thirds of the basin.
Separately, the pump’s discharge pipe often needs a small 3/16 inch weep hole drilled just above the pump, below the check valve, to prevent airlock. Do not confuse the two: basin perforations let water in, the discharge weep hole releases trapped air so the pump can prime.
Installing the Basin Step by Step
Setting a new sump basin in an existing slab is real work but achievable for a determined DIYer:
- Break out a section of concrete floor at the low point where water collects
- Dig the pit deeper and wider than the basin to allow for gravel
- Lay the gravel base, set the basin level, and backfill with gravel
- Place the pump inside, connect the discharge line and check valve
- Patch the concrete around the basin rim and fit the sealed lid
If you have a high water table, radon concerns, or no existing pit, this is often worth hiring out at $1,000 to $3,000 installed, since basin placement and drainage tie-ins affect the whole system.
Sealed Lids and Radon Control
An open sump pit is more than an eyesore; it lets humidity, sewer-like odors, and radon gas rise into the basement. A properly fitted, sealed lid solves all three. It keeps the basement drier by trapping evaporation, blocks debris and small objects from falling in, and, critically, is part of any radon mitigation system.
If your home tests high for radon, the sump pit is a major entry point, and a sealed, gasketed lid with a port for the radon fan is essential. Even without a radon concern, a sealed lid with a grommet for the discharge pipe and power cord is worth the small upgrade for a cleaner, drier, safer basement.
Choosing the Right Pump for the Basin
The basin and pump work as a system, so pick a pump sized to your pit and your water volume. Submersible pumps sit inside the basin and run quieter, which is what most modern pits use. Pedestal pumps keep the motor above the water on a shaft and last longer in some cases but are noisier and more visible.
Match the pump’s horsepower to your needs: 1/3 HP handles most homes with average water tables, while 1/2 HP or more suits high water tables or deep pits with long discharge runs. Make sure the basin is deep and wide enough to house the pump with clearance for the float to move freely, another reason not to improvise with an undersized bucket.
Maintenance and Common Issues
Once installed, keep the basin healthy. Remove the lid a couple times a year and clear any silt, gravel, or debris from the bottom so the pump intake stays clear. A basin that fills with sludge starves and clogs the pump.
If the pump short-cycles, the basin may be undersized or the float set too tight; a larger basin or an adjusted float lengthens the run time and saves the motor. Get the sump pump bucket sized, based on gravel, and perforated correctly, and the pump inside it will run efficiently for years while keeping your basement reliably dry.