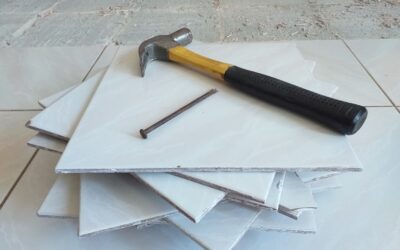
Tearing out old tile looks simple until you are an hour in, knuckles scraped and barely a square foot cleared. The difference between a brutal afternoon and an efficient demo almost always comes down to the right tile removal tool. From a basic hand chisel to a powered demolition hammer, each tool suits a different job size and surface. Choosing well saves your back, protects the subfloor, and gets the old tile out far faster.
Part of our Tile & Grout guide — explore the full guide →
Why the Right Tool Matters
Tile is set in hard mortar or adhesive and does not let go easily. Using an undersized or wrong tool means more swings, more frustration, and a higher chance of gouging the subfloor or breaking tiles into dangerous shards. Matching the tool to the job, whether it is a small backsplash or an entire bathroom floor, makes the work safer and protects the surface you plan to retile.
The size of the project is the biggest factor. A few square feet of wall tile calls for hand tools, while a large mortar-bed floor needs power.
Manual Tile Removal Tools
- Masonry or brick chisel: the classic; drive it under tile edges with a hammer to pop tiles loose
- Floor scraper with long handle: stand-up leverage for scraping tile and old adhesive off floors
- Hand maul or club hammer: pairs with a chisel to deliver controlled force
- Pry bar: lifts stubborn tiles and helps remove backer board
- Putty knife or stiff scraper: cleans up residual thin-set after tiles are off
Manual tools are affordable, quiet, and perfect for small jobs and tight spots. They give you precise control, which matters when you want to save the surface underneath.
Power Tile Removal Tools
For large floors or thick mortar beds, power tools earn their keep quickly. A rotary hammer or SDS demolition hammer fitted with a flat chisel bit drives under tile and breaks the bond with a fraction of the effort, clearing in minutes what would take an hour by hand. An oscillating multi-tool with a rigid scraper blade is excellent for delicate work, removing wall tile, grout, and adhesive in confined areas without tearing up everything around it.
For commercial-scale or whole-house jobs, ride-on or walk-behind powered floor strippers exist, though those are usually rentals reserved for big projects.
Choosing the Right Tool for Your Job
Match the tool to the scope:
- Small backsplash or a few tiles: hammer and masonry chisel, plus a putty knife for cleanup.
- Medium floor or shower: a long-handled floor scraper and possibly a rented demolition hammer.
- Large floor with thick mortar: an SDS or demolition hammer with a chisel bit, often a rental.
- Detail and edge work: an oscillating multi-tool for precision.
Renting a power tool for a one-time job is usually smarter than buying. Tool rental counters at home centers offer demolition hammers by the day at a reasonable cost.
Safety and Technique
Tile demolition throws sharp fragments and fine dust, so protection is essential.
- Wear safety glasses, heavy gloves, knee pads, and a dust mask or respirator
- Work from a corner or a broken tile and angle the chisel low to slide under tiles
- Keep your body out of the swing path and clear debris frequently
- Mist the area lightly or use dust control to cut down on airborne silica
- Watch for hidden wiring or plumbing when chiseling near walls
Steady, controlled strikes work better than wild swinging, which breaks tile into hard-to-clear shards and risks damaging the subfloor.
Removing the Thin-Set Afterward
Pulling up the tile is only half the battle; the layer of hardened thin-set or adhesive left on the subfloor must come off before you can install new flooring. For thin residue, a long-handled floor scraper or a stiff putty knife often does the job with elbow grease. For thick, stubborn mortar beds, an oscillating multi-tool or a demolition hammer with a wide chisel bit shears the material away in sheets. Work methodically across the floor and check often with a straightedge, since a smooth, level surface is critical for the next floor to sit flat. Skipping this step leaves bumps that telegraph through new tile, vinyl, or laminate.
Protecting the Subfloor
It is easy to gouge or crack the subfloor with an aggressive tool, which only creates more work. Keep the chisel or scraper angle low and let the cutting edge slide along the surface rather than dig into it. On a wood subfloor, watch for loosened screws, raised nails, and soft spots that may need repair. On concrete, minor pitting is usually fine since it can be patched with a leveling compound, but deep gouges should be filled before new flooring goes down. If you are working over a finished floor below, such as in an upstairs room, take extra care not to punch through the subfloor entirely.
Manual Versus Power Tools
The core decision is whether to muscle through by hand or bring in power. Manual tools like a masonry chisel, hand maul, and long-handled floor scraper are cheap, quiet, precise, and perfectly adequate for small jobs such as a backsplash or a few replacement tiles. They give you control to avoid damaging the surface beneath. Power tools, including SDS demolition hammers and oscillating multi-tools, dramatically cut the time and effort on large floors and thick mortar beds, clearing in minutes what would take an hour by hand. The trade-off is cost, noise, dust, and a steeper learning curve. For most homeowners, renting a power tool for a big one-time job and keeping hand tools for detail work is the smart combination.
Saving and Reusing Tiles
Sometimes the goal is not full demolition but lifting a few intact tiles, perhaps to keep matching spares or to reuse pricey or discontinued tile. This calls for patience and the right approach. Work a thin grout saw or oscillating tool along the grout lines first to free the tile edges, then slide a wide putty knife or thin pry bar gently underneath and lift with steady, even pressure. Heat from a heat gun can soften some adhesives. Expect a fair amount of breakage even with care, since tiles bonded in strong thin-set rarely come up cleanly. If you only need a couple of intact tiles, removing several to get a few survivors is a realistic plan.
Cost and Final Tips
Hand tools are inexpensive, with a quality masonry chisel and floor scraper each running in the range of a few tens of dollars. Renting a demolition hammer typically costs a modest daily fee, while buying one runs into the low hundreds. Have a plan for hauling away the heavy debris, since tile is dense and a small floor can fill several contractor bags fast. With the right tool, proper protection, and patient technique, you can clear old tile efficiently and leave a clean surface ready for whatever comes next.
Prefer to explore on your own?
See how new flooring looks in your actual room in seconds — free, no signup.
Try the free Floor Studio →