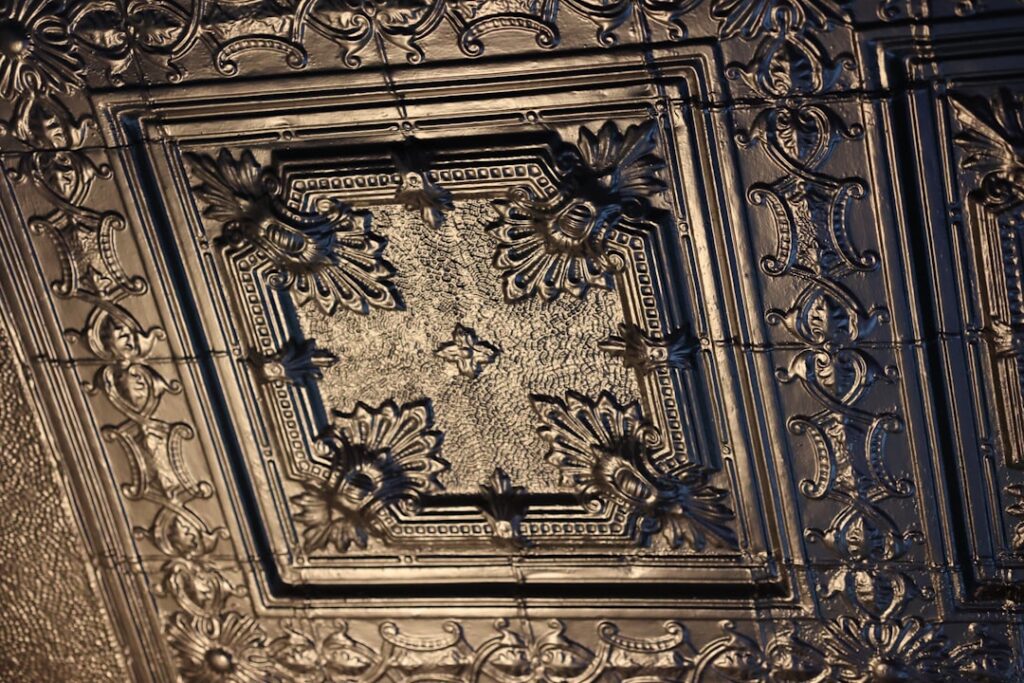
Pressed-metal ceilings were America’s affordable answer to European plasterwork — Victorian shopkeepers installed them by the millions between 1880 and 1930, and thousands of those ceilings are still overhead today, a century of durability that drywall will never match. Modern tin ceiling tiles revive that look in everything from restored brownstones to new kitchens and bar ceilings, and the market now splits between real pressed metal and convincing faux versions at a third of the price. This guide covers what the tiles are actually made of, nail-up versus drop-in systems, the style families, and what a metal ceiling really costs.
Part of our Tile & Grout guide — explore the full guide →
What “Tin” Tiles Are Actually Made Of
The name is a historical shorthand — original tiles were tin-plated steel, and modern “tin” tiles are almost always bare cold-rolled steel, aluminum, copper, or brass, stamped with a pattern under a press. Standard panels come in 2×2-foot and 2×4-foot sizes, in five finish routes: unfinished steel (must be painted or clear-coated or it will rust), powder-coated white ready for paint, factory-painted colors, plated finishes like chrome and copper, and solid copper or brass for patina lovers. Major American manufacturers — American Tin Ceilings, W.F. Norman (pressing some of the same dies since 1898), Shanker, and Abingdon — sell real metal panels from roughly $6 to $18 per square foot depending on metal and finish.
Faux tin is the budget parallel track: PVC or polystyrene panels molded from the same patterns, sold at $2-$5 per square foot, glue-up installed, and impossible to distinguish from paint-finished metal at ceiling distance once painted. The trade-offs are real, though — plastic dents permanently rather than springing back, carries no fire-resistance story, and reads as plastic up close in raw metallic finishes. Choose faux for rentals, basements, and glue-up-over-popcorn projects; choose metal where you will see it up close, want the authentic ring, or are matching historic fabric.
Nail-Up: The Traditional System
Nail-up (or screw-up) installation attaches metal panels directly to a solid substrate — historically wood furring strips at 12 inches on center, today more often a full layer of 3/8-inch plywood over the existing ceiling. Panels overlap at stamped nailing rails and fasten with decorative cone-head nails or screws every 6 inches along seams. The look is seamless and period-correct, and this is the only method for authentic restorations.
Plan the layout before the first nail: snap chalk lines from the room’s center so cut panels land symmetrically at the walls, exactly like tiling a floor. Seams can be caulked with paintable silicone before painting for a monolithic look. Perimeter gaps disappear under matching cornice — stamped metal crown from the same makers, $3-$8 per linear foot — which is not optional aesthetically; a tin field without its cornice looks unfinished. Budget a weekend for an average 150-square-foot room, and buy 10 percent overage for cuts and the panel you will inevitably dent learning the rhythm.
Drop-In: Tin for Suspended Grids
Drop-in (lay-in) tin tiles are made to replace the acoustic panels in a standard 15/16-inch T-bar suspended grid — the fastest route to a metal ceiling in basements, offices, and commercial spaces. Panels are stamped with a flange sized for 2×2 or 2×4 grid openings and simply lay into place; a 10×12 basement ceiling converts in an afternoon with no fasteners at all. Painting the grid rails a matching or contrasting color (most makers sell grid tape or paint-matched rails) is the detail that elevates the result from “replaced tiles” to “designed ceiling.”
Two practical notes: metal panels weigh 1-2 pounds each versus ounces for mineral fiber — well within grid ratings, but verify old grids are properly hung — and if the room needs acoustic absorption, keep some perforated or fiber panels in the field, because a full metal ceiling is sonically lively. That liveliness suits bars and kitchens; it fights home theaters.
Style Families: Matching Pattern to Period
Pattern choice does more for the result than finish choice, and the catalogs group into recognizable eras:
- Victorian (1880s-1900s): dense florals, rosettes, and scrollwork on 6- or 12-inch repeats — right for Queen Anne houses and vintage-shop looks.
- Classical/Colonial Revival: egg-and-dart borders, wreaths, symmetrical medallions; the safest choice in traditional homes.
- Art Deco (1920s-30s): geometric fans, sunbursts, stepped motifs — spectacular over bars and dining rooms.
- Simple geometric/farmhouse: plain beads, squares, and hammered textures on large repeats; the modern-kitchen favorite because it reads textural, not busy.
Scale the repeat to the room: 24-inch medallion patterns need ceiling area to breathe and suit rooms over 12×12, while tight 6-inch repeats work in powder rooms and backsplash-style accent uses. In low rooms, small patterns in light finishes keep the ceiling from pressing down; high-gloss white paint over a subtle pattern is the classic trick for adding interest without losing light.
Costs and Planning Numbers
For a 12×14-foot room (168 square feet), realistic budgets run: faux PVC glue-up $450-$900 DIY; real steel nail-up $1,400-$2,800 in materials including plywood substrate, fasteners, and cornice; drop-in steel into an existing grid $1,100-$2,400; copper or brass, double the steel numbers. Professional installation adds $3-$7 per square foot for nail-up work. Unfinished steel needs immediate priming and painting — oil-based or acrylic over a metal primer — especially in kitchens and bathrooms, where humidity finds bare steel within months. In damp rooms, aluminum or factory-finished panels are worth their premium simply because they cannot rust.
Cutting, Finishing, and Living With Metal Overhead
Working the material is easier than its industrial look suggests. Tin snips or aviation shears handle straight cuts; a fine-tooth jigsaw blade manages curves and ceiling-box openings, cut from the face side to keep burrs hidden. File or deburr every cut edge and wear gloves — stamped steel edges are honestly sharp, and that is the number-one DIY complaint about the whole category. Ceiling fixtures, vents, and fan boxes get measured twice and cut before the panel goes up, never in place overhead.
Finishing determines longevity. Bare steel panels need every surface — including cut edges and the back side in humid rooms — primed with a solvent-based metal primer, then top-coated; sprayed application preserves the pattern’s crispness where brushing can pool in the stamping. Repaint cycles run decades, and dents from moving furniture upstairs simply get pressed back or accepted as patina. Maintenance in service is a dusting and, in kitchens, an annual wipe-down with a degreasing cleaner — grease films are the one enemy that dulls a painted metal ceiling fast over a range. Copper and brass panels offer a choice instead of a chore: clear-coat them at installation to freeze the bright finish, or leave them bare and let a decade of gradual patina do the decorating for free.
Is a Tin Ceiling Right for Your Room?
Pressed metal earns its keep where a ceiling is actually seen: dining rooms, kitchens, entries, home bars, and commercial spaces chasing character. It covers cracked plaster and popcorn without demolition, survives knocks that would crater drywall, and — painted properly — lasts generations; the original selling points from 1890 all still hold. Skip it in rooms needing acoustic quiet, and think twice before raw metallic finishes in small rooms, where the reflectivity can overwhelm. For everything in between, start with a sample panel ($10-$25 from any major maker), hold it overhead in the room’s own light, and let the ceiling audition for the part before you commit the whole cast.
Resale is the quiet bonus. A tin ceiling in a kitchen or dining room photographs like a renovation twice its price, and appraisers and buyers alike file it under “character” — the category that sells old houses. Few $1,500 projects change how a room feels from the moment you walk in; this one does, and it will still be doing it when the third owner repaints it a century from now.
Prefer to explore on your own?
See how new flooring looks in your actual room in seconds — free, no signup.
Try the free Floor Studio →