Wet room flooring must handle constant water exposure, provide slip resistance underfoot, and integrate with a waterproofing system that prevents moisture from reaching the building structure beneath. Unlike a standard bathroom where water stays mostly in the shower tray, a wet room has no tray or enclosure — the entire floor is the shower base, which makes material selection and installation far more critical.
This guide covers the best wet room flooring materials, drainage and gradient requirements, waterproofing (tanking), slip-resistance ratings, cost breakdowns, how wet rooms compare to standard bathrooms, and long-term maintenance.
What Is a Wet Room?
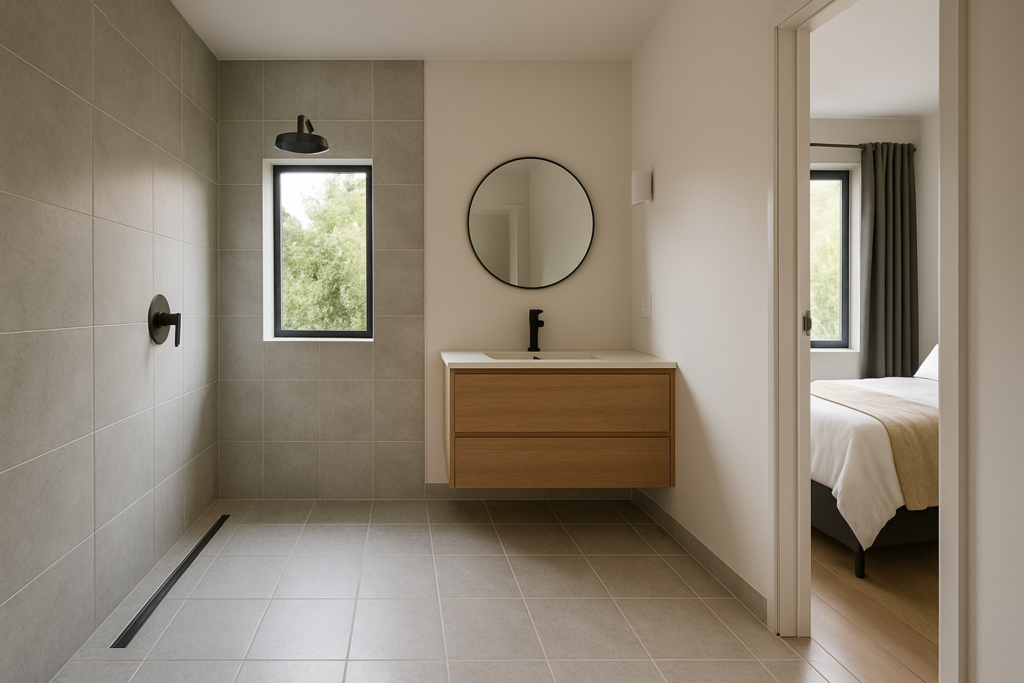
A wet room is a fully waterproofed bathroom where the shower area is open — there is no shower tray, no curb, and typically no full enclosure. The entire floor is tanked (waterproofed) and gently sloped toward a drain, allowing water to flow freely across the floor surface and drain away without containment.
Wet rooms originated in European and Asian bathroom design and have become increasingly popular in North American homes for their accessibility (no step-over curb), clean aesthetic (minimal visual barriers), and the perception of luxury they create even in compact spaces. They are also the gold standard for accessible and aging-in-place bathroom design because they eliminate trip hazards.
The critical difference between a wet room and a standard bathroom floor is that every square inch of the wet room floor must be waterproof and every surface must be rated for constant water contact. Standard bathroom floors only need to handle occasional splashes — wet room floors must handle sustained, direct water flow.
Best Wet Room Flooring Materials
Not every flooring material can survive the demands of a wet room. The following options are proven performers for wet room flooring applications.
Porcelain Tile
Porcelain tile is the most popular and versatile wet room flooring material. Its near-zero water absorption rate (less than 0.5%) makes it inherently waterproof, and it is available in virtually any color, pattern, and size. For wet rooms, small-format tiles (2×2 inch mosaics or 4×4 inch squares) are preferred because the additional grout lines improve grip and the small tiles follow the floor gradient more smoothly than large-format tiles.
Large-format porcelain tiles (12×24 or larger) can work in the dry areas of a wet room but are difficult to install on the sloped shower area without lippage (uneven edges). If you want a seamless look, use large tiles on the main floor and transition to mosaics in the shower zone.
Natural Stone
Natural stone — marble, slate, limestone, travertine, and granite — creates a luxury wet room aesthetic that porcelain cannot fully replicate. Slate and honed granite are the most practical choices due to their naturally textured surfaces and low porosity. Marble and limestone require sealing every 6 to 12 months because they are more porous and susceptible to water staining and etching.
Pebble stone (river rock) tiles are a popular wet room choice for the shower zone. The rounded stones provide excellent barefoot grip and a spa-like aesthetic. However, pebble floors are grout-intensive and harder to clean than flat tile.
Microcement
Microcement (also called micro-screed or tadelakt) creates a seamless, grout-free wet room floor with a modern, minimalist aesthetic. Applied as a thin coating over a prepared substrate, microcement is waterproofed with a topcoat sealer and can cover floors, walls, and even the ceiling for a fully unified look.
Microcement is ideal for homeowners who want zero grout lines and a contemporary industrial or spa feel. The tradeoff is that installation requires a skilled applicator, resealing is needed every 2 to 3 years, and the surface can be slippery when wet unless a non-slip additive is mixed into the topcoat.
Vinyl (Sheet and LVT)
Sheet vinyl is a budget-friendly wet room flooring option that provides a fully waterproof, seamless surface when properly installed with welded seams. Luxury vinyl tile (LVT) with waterproof click-lock construction can also work but requires careful attention to seam integrity in a wet room environment.
Vinyl is the most affordable wet room flooring option and the most comfortable underfoot due to its inherent cushioning. It is commonly used in accessible wet rooms, care facilities, and budget bathroom renovations. The main drawback is that vinyl does not have the premium look or durability of tile or stone.
Resin Flooring
Epoxy and polyurethane resin floors create a seamless, fully waterproof wet room surface with excellent chemical resistance. Resin floors are common in commercial wet rooms (gyms, spas, pool changing rooms) and are increasingly used in high-end residential wet rooms. They can be mixed with non-slip aggregates and are available in any color.
Resin flooring requires professional installation and a properly prepared substrate. Costs are higher than tile but the seamless, zero-maintenance surface appeals to homeowners who want a no-grout solution.
| Material | Water Absorption | Slip Resistance | Material Cost (per sq ft) | Grout Required? | Best For |
|---|---|---|---|---|---|
| Porcelain tile | < 0.5% | Good (textured) | $3 – $15 | Yes | Most wet rooms |
| Natural stone | 0.5% – 5% | Good (honed/textured) | $5 – $25 | Yes | Luxury wet rooms |
| Microcement | Sealed surface | Moderate (needs additive) | $10 – $20 | No | Seamless modern look |
| Sheet vinyl | 0% | Good (textured options) | $1 – $5 | No | Budget / accessible |
| Resin | 0% | Good (aggregate added) | $8 – $18 | No | Commercial / high-end |
Drainage and Gradient Requirements
Proper drainage is the most critical aspect of wet room flooring installation. Without the correct floor gradient, water will pool, create slip hazards, and eventually find its way through the waterproofing membrane.
Floor gradient: The wet room floor must slope toward the drain at a minimum gradient of 1:80 (approximately 1/8 inch per foot). This means for every 80 inches of horizontal distance, the floor drops 1 inch. The gradient should be steeper in the shower zone (1:60 is common) and can be gentler in the dry zone farthest from the showerhead.
Drain types: There are three main drain configurations for wet rooms.
- Center point drain — a round drain placed at the lowest point of the floor, typically in the center of the shower zone. The floor slopes toward it from all four sides, creating a shallow pyramid shape. This is the simplest installation but requires four-way slope cuts in the tile.
- Linear drain — a long, narrow drain channel installed along one wall (usually the wall farthest from the bathroom door). The floor slopes in a single direction toward the channel. Linear drains are more expensive but simplify tile installation because only a one-way slope is needed.
- Wall drain — a drain integrated into the wall at floor level. This is the most discreet option and allows for a completely flat, one-way-sloped floor. Wall drains are the most expensive and require specialized framing.
For shower tile installations, linear drains are the most popular choice in modern wet rooms because they allow large-format tiles to be laid with a single-plane slope, eliminating the complex cuts required for center-point drains.
Waterproofing (Tanking)
Tanking is the process of creating a continuous waterproof membrane beneath the wet room flooring and up the walls to prevent moisture from reaching the building structure. This is the most important step in any wet room build — if the tanking fails, moisture damage will follow.
Liquid-applied membranes (such as Laticrete Hydro Ban, Mapei Mapelastic AquaDefense, and RedGard) are painted or rolled onto the prepared subfloor and walls. They cure to form a flexible, waterproof coating. Two coats are standard, with reinforcement fabric embedded at corners, seams, and drain connections. Read our how to waterproof a shower guide for a detailed walkthrough.
Sheet membranes (such as Schluter DITRA and Wedi) are pre-formed waterproof sheets bonded to the subfloor with thinset. They provide a consistent, factory-controlled waterproof layer and are faster to install than liquid membranes. Sheet membranes are more expensive but reduce the risk of application error.
Tanking kits combine a pre-formed drain tray with integrated waterproofing that connects to the membrane. These kits simplify the most critical junction — the drain-to-membrane connection — and are the safest option for DIY wet room builds.
Wall tanking: The waterproof membrane must extend up the walls at least 6 inches above the highest expected water line. In most wet rooms, the entire wall surface within the shower zone is tanked from floor to ceiling. Outside the direct spray zone, tanking to a height of 4 feet is standard.
Slip Resistance Ratings
Slip resistance is a safety-critical consideration for wet room flooring. A wet, soapy floor surface is inherently slippery, so the flooring material must provide adequate grip to prevent falls.
Slip resistance is measured using several rating systems.
| Rating System | Minimum for Wet Rooms | Description |
|---|---|---|
| DCOF (Dynamic Coefficient of Friction) | ≥ 0.42 | U.S. standard. Measures friction on a wet surface. 0.42+ required for wet areas. |
| R-rating (DIN 51130) | R10 – R11 | European standard. R10 is minimum for wet barefoot areas; R11 recommended for shower zones. |
| P-rating (AS 4586) | P3 – P4 | Australian standard for wet barefoot areas. |
When selecting tile for a wet room, always check the manufacturer’s slip-resistance rating. Matte, textured, and bush-hammered finishes provide better grip than polished or glossy surfaces. Small mosaic tiles (1×1 or 2×2 inch) inherently provide good slip resistance because the dense grout lines create texture.
Cost of Wet Room Flooring
Wet room flooring costs more than standard bathroom flooring due to the waterproofing, drainage, and gradient work required in addition to the flooring material itself.
| Component | Cost Range |
|---|---|
| Waterproofing membrane (tanking) | $500 – $1,500 |
| Drain (point or linear) | $150 – $800 |
| Floor gradient build-up (screed/mortar) | $300 – $800 |
| Tile material | $3 – $25 per sq ft |
| Tile installation (wet room) | $10 – $20 per sq ft |
| Total (small wet room, 40–60 sq ft) | $2,500 – $6,000+ |
Professional installation is strongly recommended for wet rooms. A waterproofing failure can cause thousands of dollars in structural damage, mold remediation, and repair costs. The premium for professional installation is far less than the cost of fixing a failed DIY waterproofing job.
Wet Room vs Standard Bathroom
| Feature | Wet Room | Standard Bathroom |
|---|---|---|
| Shower containment | Open — no tray or curb | Shower tray or curbed enclosure |
| Waterproofing | Entire floor and walls tanked | Only shower area waterproofed |
| Accessibility | Step-free entry, wheelchair friendly | Curb or tray lip creates a barrier |
| Floor gradient | Required across entire floor | Only inside shower tray |
| Cost | Higher ($2,500 – $6,000+) | Lower ($1,000 – $3,000) |
| Aesthetic | Open, spacious, seamless | Enclosed, defined zones |
| Splash zone | Entire room gets wet | Water contained in shower |
| Maintenance | Entire floor needs cleaning | Only shower area needs intensive cleaning |
Wet Room Flooring Maintenance
Maintaining wet room flooring requires consistent attention because the entire floor surface is regularly exposed to water, soap, body oils, and mineral deposits.
- Squeegee after every use. A quick squeegee pass directs water toward the drain and prevents soap scum and mineral buildup. This 60-second habit is the single most effective maintenance practice for a wet room.
- Clean grout weekly. Wet room grout is constantly exposed to moisture and soap — the ideal environment for mold and mildew growth. Use a pH-neutral grout cleaner and a stiff brush weekly. Consider epoxy grout for new installations, as it resists mold better than cement-based grout.
- Seal natural stone every 6 to 12 months. If your wet room features marble, limestone, or travertine, reapply a penetrating sealer regularly to maintain water resistance and prevent staining.
- Inspect the drain monthly. Remove the drain cover, clean out hair and debris, and flush with hot water. A slow-draining wet room creates standing water that increases slip risk and accelerates mold growth.
- Ventilate aggressively. Run the exhaust fan during and for 30 minutes after every shower. If possible, leave the bathroom door open to improve air circulation. A wet room that does not dry out between uses will develop mold problems regardless of the flooring material.
- Reseal microcement every 2 to 3 years. Microcement wet room floors rely entirely on their topcoat sealer for waterproofing. Schedule resealing on the manufacturer’s recommended timeline — do not wait until you see signs of water absorption.
Frequently Asked Questions
Can you have a wet room upstairs?
Yes, with proper waterproofing. An upstairs wet room requires the same tanking system as a ground-floor wet room, plus additional attention to the subfloor structure. The subfloor must be rigid enough to prevent deflection (which can crack tiles and compromise the membrane), and the entire floor must be tanked with zero failure points. Professional installation is essential for upper-floor wet rooms.
Does a wet room add value to a home?
A well-built wet room can add value, particularly in luxury and accessible-design markets. In the UK and Europe, wet rooms are seen as a premium feature. In North America, they are increasingly desirable in master suites and aging-in-place renovations. A poorly built wet room, however, can be a liability that deters buyers.
What is the best tile size for a wet room floor?
Small-format tiles (1×1 to 4×4 inches) are best for the shower zone because they follow the floor gradient more easily and the additional grout lines improve slip resistance. Large-format tiles work in the dry zone of the wet room. Avoid tiles larger than 12×12 inches in the sloped shower area.
Can you use wood flooring in a wet room?
Solid wood is not recommended due to the constant water exposure. Teak and ipe decking can be used as a raised bath mat or platform in a wet room but should not be the primary bathroom flooring surface. Porcelain tiles that mimic the look of wood are a practical alternative for achieving a wood aesthetic in a wet room.
How long does wet room waterproofing last?
Properly applied liquid membranes and sheet membranes have a lifespan of 15 to 25+ years. The most common failure point is not the membrane itself but the junction between the membrane and the drain. Using manufacturer-matched drain connections and following installation specifications is critical for long-term performance.
Is a wet room suitable for a small bathroom?
Wet rooms actually work very well in small bathrooms. Eliminating the shower tray and enclosure removes visual barriers, making the space feel larger. A compact wet room as small as 35 square feet can be functional and attractive. The key is proper gradient and drainage to prevent water from reaching the toilet and vanity areas.
Prefer to explore on your own?
See how new flooring looks in your actual room in seconds — free, no signup.
Try the free Floor Studio →