An A-frame looks like the simplest house you can build: a floor, a row of triangles and a roof that comes down to the ground. That simplicity hides a structural trick. In a frame house framing, the rafters are the walls, so every pair carries roof weight, snow, wind and the floor connection at the same time. Get the rafter size, the ties and the base connection right and the shell goes up fast. Get any one of them wrong and the triangle spreads, racks or lifts.
Most A-frames are built from engineered plans, either a purchased plan set adapted by a local engineer or a custom design stamped for the site. Here you will see how the framing works, what each part does and the order a typical shell is built in, so you can read your plans, talk with your engineer and inspector, and know where the critical checkpoints are.
- How A Frame House Framing Works
- Foundation and Floor Deck Attachment
- Snow and Wind Load Sizing
- Tools, Materials and Safety Equipment
- Build Sequence With Engineered-Plan Checkpoints
- Lifting and Fall Protection
- Troubleshooting Common Framing Problems
- Cost Ranges
- When to Call a Licensed Professional
- Frequently Asked Questions
Building an A-frame cabin or house is a permitted project almost everywhere. Expect to submit plans, pass foundation, framing and final inspections, and size the structure for your local snow and wind loads.
How A Frame House Framing Works
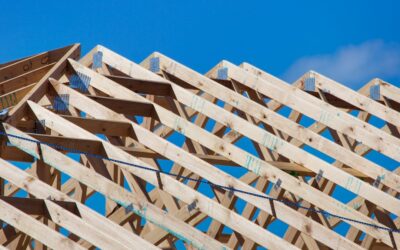
Picture each rafter pair as a tall letter A. Gravity loads (roof covering, snow, the upper floors hung from the rafters) push each rafter down and outward at its base. Left alone, the feet slide apart and the peak drops. Three elements stop that.
- Rafter pairs: the sloped members, often 2×10, 2×12 or engineered lumber, spaced 16 to 48 inches apart depending on design. Their size is set by span, slope, spacing and load.
- Ties: the horizontal members that hold the rafters together. A low tie (usually the floor deck or a ceiling joist at the base) resists the outward thrust. Collar ties higher up help resist uplift and keep pairs from separating in wind, but they do not stop spreading on their own.
- Ridge: where the rafter pairs meet. It may be a simple ridge board for alignment or a structural ridge beam that carries load to posts at each gable, which changes how much thrust the ties must handle.
The steep pitch, often between 45 and 60 degrees or more, sheds snow well and puts much of the load into the rafters as compression. That is why A-frames perform well in heavy-snow regions when the base connection is sound.
Foundation and Floor Deck Attachment
An A-frame concentrates its loads along two long lines: the rafter feet on each side. The foundation must carry those lines and resist both downward and outward forces. Common choices include a perimeter concrete foundation, a slab with thickened edges, or piers carrying beams under each side.
The floor deck usually acts as the main tie. Rafters bear on a sill plate or rim, and each one is fastened with metal connectors (rafter ties, hurricane ties or engineered seat connectors) that are listed for the uplift and shear loads on your plans. In high-wind areas, a continuous load path runs from the rafter connector down through the rim, sill and anchor bolts into the foundation. Skipping a single link in that chain is one of the most common inspection failures.
Pier foundations need extra care. Piers are good at carrying vertical load but can rotate under the outward thrust of the rafters unless the beams are braced or tied across. Your engineer may specify cross ties or a stiffer floor diaphragm.
Before any foundation digging, call 811 to have utility lines marked.
Snow and Wind Load Sizing
In a frame house framing, rafter size and spacing are not a rule of thumb; they come from loads. Your local building department publishes a ground snow load and a design wind speed for your area, and some sites need extra adjustments for elevation, exposure or drifting. In mountain areas, ground snow loads can be several times what a lowland site sees.
Wind is the other half. A tall A-frame presents a big sloped face, and on the leeward side wind creates suction that tries to lift the roof. Uplift is resisted by the connectors at the rafter feet and ridge and by the sheathing nailing pattern. Large glass gable walls add more wind load and often need their own engineered framing, such as posts and headers or a beam at the base of the glass.
If you buy a stock plan, have an engineer licensed in your state review it for your specific snow, wind and seismic values. A plan designed for a mild climate can be undersized for your lot.
Tools, Materials and Safety Equipment
- Engineered plans with rafter, tie, connector and nailing schedules
- Framing lumber or engineered rafters, sheathing and connectors exactly as specified
- A framing nailer and compressor, plus nails that match the schedule
- Circular saw, speed square, chalk line, long levels and a builder’s level or laser
- Temporary bracing lumber and stakes
- Scaffolding or staging, a personal fall arrest system with roof anchors, and guardrails at upper floor edges
- Hard hats, safety glasses, gloves and hearing protection
Build Sequence With Engineered-Plan Checkpoints
- Permit and plan review. Submit stamped plans. Checkpoint: confirm design snow, wind and seismic values match your site.
- Foundation. Excavate, form and pour footings below frost depth, with anchor bolts placed exactly where the plan shows. Checkpoint: foundation inspection before the pour.
- Floor deck. Install sills, beams, joists and subfloor. Square and level the deck carefully; any error is magnified at the peak. Checkpoint: verify rim and connector locations for every rafter.
- Build rafter pairs on the deck. Cut a pattern pair, test it, then gang-cut the rest. Assemble each pair flat with its collar tie and peak gusset or connector as specified.
- Raise the gable pair first. Tilt it up, plumb it and brace it in two directions to the deck and ground.
- Raise the remaining pairs. Set each one on its layout mark, fasten the feet with the specified connectors and tie it to the ridge and the previous pair with temporary braces.
- Sheathe and brace. Sheathing turns the row of triangles into a rigid shell. Follow the nailing schedule exactly. Checkpoint: framing inspection before insulation and cladding.
- Gable walls, lofts and openings. Frame the end walls, loft floors and any dormers per plan. Never cut or notch a rafter or tie that is not shown on the drawings.
Lifting and Fall Protection
A-frame rafter pairs are long, heavy and catch the wind like a sail. Small cabins can be tipped up by a crew with ropes and pike poles, but larger pairs or engineered rafters often need a crane or telehandler. Only a qualified operator should run lifting equipment, with a signal person, tag lines to control swing and nobody standing under a suspended load. Never raise pairs in gusty wind.
Most framing on an A-frame happens at height on a steep slope. Use scaffolding along the gables, install roof anchors early and wear a harness with a properly rated lifeline once you are working above about 6 feet. Ladders should be set at the correct angle on firm ground, extend 3 feet above the landing and be tied off. For anything above one story, a professional framing crew with fall protection training is the safer choice.
Troubleshooting Common Framing Problems
- Peak is sagging or rafter feet spreading: the base tie or connectors are inadequate. Stop and have the engineer evaluate before adding load.
- Pairs are out of plumb: brace them back to plumb before sheathing; sheathing locks in whatever shape the frame has.
- Ridge is wavy: pairs were not cut identically or the deck was out of level. Check the pattern and shim at the seats only as the plan allows.
- Inspector flags missing connectors: install the exact listed hardware with the full fastener count; substitutes need engineer approval.
Cost Ranges
A simple A-frame shell framed by an owner-builder can cost relatively little in lumber and hardware for a small cabin, but engineering, permits, foundation and crane time add up quickly. Framing labor from a contractor is often quoted per square foot and varies widely by region. Fully finished A-frame homes commonly land in the same per-square-foot range as other custom homes, often higher because of steep-roof labor and large glass walls.
When to Call a Licensed Professional
An engineer or architect licensed in your state should size the rafters, ties, connectors and foundation for your snow and wind loads, and your building department must issue a permit before work starts. A licensed general contractor or experienced framing crew should handle tall raises, crane lifts and work above one story. Electrical, plumbing and HVAC work must be done by licensed trades with their own permits and inspections. If you notice cracking at rafter feet, spreading walls or a sagging ridge on an existing A-frame, have a structural engineer inspect it before any repair.
Frequently Asked Questions
What size rafters does an A-frame need?
It depends on span, slope, spacing, snow and wind loads. Many small cabins use 2×10 or 2×12 rafters, but only engineered plans for your site can set the size.
Are collar ties enough to keep an A-frame from spreading?
No. Collar ties high up mainly resist uplift and separation. A low tie, usually the floor deck with proper connectors, resists outward thrust.
Do I need a permit to build an A-frame cabin?
Almost always. Most jurisdictions require stamped plans, foundation and framing inspections, and approval for any electrical, plumbing or heating work.
Can I build a simple A-frame house myself?
Owner-builders often frame small A-frames with help, but plans should be engineered, and crane lifts and high work are best left to trained crews.
Why do A-frames handle snow well?
The steep pitch sheds snow and puts much of the load into the rafters as compression, provided the rafter feet are tied and anchored correctly.