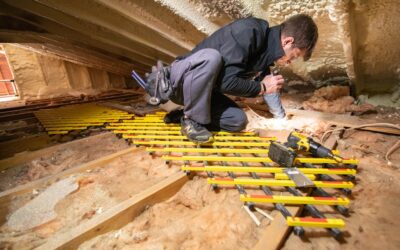
An attic that cannot breathe traps heat in summer, invites ice dams in winter, and can grow mold that rots the roof deck. The small, often overlooked components that keep the air moving are attic ventilation baffles, also called rafter vents or insulation baffles. They create a clear channel for outside air to flow from the soffit vents up into the attic, even when insulation is packed tight against the roofline. Understanding how they work will help you keep your roof and energy bills in check.
- What Attic Baffles Actually Do
- Signs Your Attic Needs Baffles
- Baffle Materials and Types
- What Baffles Cost
- Installing Attic Baffles Yourself
- Baffles Work Only With Balanced Ventilation
- Common Mistakes to Avoid
- The Payoff
- Baffles in New Construction vs. Retrofits
- How Baffles Fit Into Whole-Home Efficiency
What Attic Baffles Actually Do
A properly ventilated attic pulls cool, dry air in through vents at the eaves (the soffits) and pushes warm, moist air out through vents near the peak (ridge or gable vents). This continuous flow relies on an unobstructed path along the underside of the roof deck. The problem is that attic insulation, especially blown-in cellulose or fiberglass, naturally slumps down into the eaves and blocks the soffit vents entirely.
Baffles solve this by forming a rigid channel between the roof deck and the top of the insulation. Installed in the rafter bays directly above each soffit vent, they hold the insulation back and guarantee a clear one- to two-inch air gap so incoming air can rise into the attic. Without them, you can have expensive soffit and ridge vents that do nothing because insulation seals off the intake.
Signs Your Attic Needs Baffles
Several symptoms point to blocked or missing baffles:
- Ice dams forming along the eaves in winter, caused by attic heat melting snow that refreezes at the cold overhang.
- An attic that feels like an oven in summer, driving up cooling costs.
- Frost, condensation, or water stains on the underside of the roof sheathing.
- Musty odors or visible mold in the attic.
- Insulation visibly stuffed into the eaves when you look toward the soffits from inside the attic.
If you see daylight blocked at the soffits or insulation jammed against the roof deck at the edges, baffles are either missing or crushed.
Baffle Materials and Types
Baffles come in a few materials, each with tradeoffs:
- Expanded polystyrene (EPS) foam baffles are the most common, lightweight, and inexpensive, but they can crack if handled roughly and offer little insulation value themselves.
- Plastic or polypropylene baffles are more durable and rigid, resisting crushing during insulation installation.
- Rigid foam board baffles cut from insulating foam provide an added thermal break and are favored for high-performance and cold-climate builds.
- Cardboard/fiber baffles are the cheapest but least durable and can absorb moisture, so most pros avoid them.
Standard baffles are sized to fit 16-inch and 24-inch on-center rafter spacing, the two most common framing dimensions.
What Baffles Cost
Baffles themselves are cheap. Individual foam or plastic baffles run about $1 to $3 each, and a bundle covering a full attic edge might total $50 to $150 in materials. A typical home needs one baffle per rafter bay along every eave, which can add up to 30 to 60 baffles.
If you hire a contractor, expect $200 to $600 for baffle installation alone in an accessible attic, more if the work is combined with adding insulation or if access is tight. Because the materials are inexpensive, the labor to crawl the eaves is the real cost driver.
Installing Attic Baffles Yourself
This is a doable DIY project for anyone comfortable working in an attic, though it is hot, cramped, and itchy work. Wear a respirator, eye protection, gloves, and long sleeves, and step only on the joists or on a sheet of plywood laid across them, never on the drywall between joists.
- Start at the eaves and pull insulation back from the soffit vents so you can see the vent openings clearly.
- Position a baffle in each rafter bay so its lower end extends down past the top plate and over the soffit vent, ensuring the incoming air channel starts below the insulation line.
- Staple or nail the baffle to the roof deck or rafters along its edges, keeping the air channel open and unobstructed.
- Confirm the baffle extends high enough that when insulation is replaced or added, it will not spill over the top and block the channel.
- Replace or top up the insulation, making sure it does not crush the baffle or cover the soffit vent.
Baffles Work Only With Balanced Ventilation
Baffles are one part of a system. They protect the intake, but you also need adequate exhaust near the ridge and a balanced ratio of intake to exhaust. The common code guideline is one square foot of net free ventilation area for every 150 square feet of attic floor, split roughly evenly between intake (soffit) and exhaust (ridge or gable). Installing baffles without enough soffit or ridge venting only solves half the problem, so verify the whole system when you are up there.
Common Mistakes to Avoid
The most frequent error is installing baffles but then burying the soffit vents with insulation anyway, defeating the purpose. Keep insulation clear of the vent openings at the very bottom of the channel. Another mistake is spacing baffles only every few rafter bays; for full airflow, every bay above a soffit vent should have one. Homeowners also sometimes crush thin foam baffles while adding blown insulation, so use rigid plastic baffles if you will be blowing insulation afterward. Finally, do not forget to air-seal attic penetrations and the top plate before insulating, since baffles manage airflow but do not stop warm household air from leaking up into the attic.
The Payoff
Well-installed attic ventilation baffles keep the roof deck dry, extend the life of the shingles, reduce summer cooling loads, and dramatically cut the risk of ice dams in snowy climates. For a modest materials cost and a few hours of uncomfortable but straightforward work, they protect one of the most expensive components of your home.
Baffles in New Construction vs. Retrofits
Installing baffles is far easier during new construction or a roof replacement, when the rafter bays are open and accessible before insulation goes in. Builders staple baffles into every eave bay as a matter of course, and doing it then costs almost nothing in extra labor. Retrofitting baffles into an existing, insulated attic is the harder scenario, because you must crawl to the cramped eaves and pull back or temporarily remove insulation to reach the soffits. If you are already planning to add insulation to an under-insulated attic, that is the ideal moment to install baffles at the same time, since the insulation is being disturbed anyway. Combining the two jobs saves labor and guarantees the new insulation does not re-block the vents.
How Baffles Fit Into Whole-Home Efficiency
Proper attic ventilation works hand in hand with air sealing and insulation to control energy costs and moisture. The sequence matters: first air-seal the ceiling plane so warm, humid household air cannot leak into the attic, then insulate to the recommended level for your climate zone (often R-49 to R-60 in cold regions), and use baffles to keep that insulation from choking the soffit vents. Skipping any step undermines the others. A well-sealed, well-insulated, well-ventilated attic stays close to outdoor temperature in winter, which prevents the roof-deck warming that melts snow and causes ice dams, and it sheds summer heat that would otherwise radiate down into the living space and drive up cooling bills.
If your attic runs hot, forms ice dams, or shows condensation, checking and fixing the baffles is a high-value first step. Pull the insulation back, confirm every soffit-vent bay has a clear channel, pair the intake with adequate ridge exhaust, and your attic will finally breathe the way it was designed to.