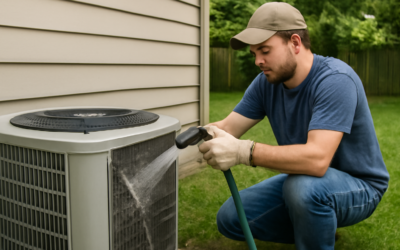
A dirty coil is the quietest money-waster in your home. A layer of grime just 1/100th of an inch thick on a heat pump coil can cut efficiency by 20 percent or more, forcing the compressor to run longer, driving your power bill up, and shortening the unit’s life. Cleaning heat pump coils is one of the highest-return maintenance tasks you can do yourself, usually taking under an hour with a garden hose and a can of foaming cleaner. This guide walks you through both the outdoor condenser coil and the indoor evaporator coil, the right products to use, and the mistakes that bend fins or damage the system.
Why Clean Coils Matter So Much
A heat pump works by moving heat across its two coils. The outdoor coil dumps or absorbs heat depending on the season, and the indoor coil does the opposite. When either coil is coated with dust, pollen, grass clippings, pet hair, or greasy kitchen film, that insulating layer blocks the heat transfer the whole system depends on.
The consequences stack up fast. The compressor runs hotter and longer, refrigerant pressures climb, energy use rises, and comfort drops. In extreme cases a badly fouled coil causes the compressor to overheat and fail, a $1,500 to $3,000 repair that a $15 can of coil cleaner would have prevented. Clean coils are cheap insurance.
Tools and Supplies You Will Need
Gather everything before you start so you are not walking away from an open unit.
- Coil cleaner: a no-rinse foaming coil cleaner or a self-rinsing formula; choose a non-acid, non-caustic product safe for aluminum fins.
- Garden hose with a gentle spray nozzle, never a pressure washer.
- Soft-bristle brush or a fin brush for loose debris.
- Fin comb to straighten bent aluminum fins.
- Screwdriver or nut driver to remove the top grille or access panels.
- Shop vacuum, gloves, and safety glasses.
For the indoor coil, a mild detergent or a purpose-made evaporator coil cleaner works. Avoid household bleach and harsh degreasers, which corrode the thin aluminum and copper.
Cut the Power First
Never clean coils on a live unit. Switch off the heat pump at the thermostat, then pull the disconnect at the outdoor unit or flip the dedicated breaker in your panel. Confirm the fan is fully stopped before you remove any panels. Water, electricity, and spinning fan blades are a bad combination, and this single step is non-negotiable for your safety.
Give the unit a moment to sit after shutdown, then verify it is dead by trying to start it at the thermostat and hearing nothing. Only then should you open it up.
Cleaning the Outdoor Condenser Coil
Start by clearing the area around the unit: pull weeds, trim back shrubs to maintain at least 18 to 24 inches of clearance, and pick up leaves and grass. Remove the top grille or fan shroud if your model allows, lifting the fan carefully without stressing its wires so you can reach the coil from inside.
Vacuum or brush off loose debris first, working gently along the direction of the fins so you do not flatten them. Apply the foaming coil cleaner to the coil surface and let it dwell for the time on the label, usually 5 to 10 minutes, as it lifts embedded grime. Then rinse from the inside out with a gentle hose stream so you push dirt back out the way it came, not deeper into the coil. Keep water off the electrical components. Let everything dry before you reassemble and restore power.
Cleaning the Indoor Evaporator Coil
The indoor coil sits in the air handler or the indoor head of a mini-split and is harder to reach. On a central system, remove the access panel over the coil, which is often held by a few screws or clips. On a ductless head, remove the front cover and, on many models, the filters and a cover panel to expose the finned coil.
Because this coil drains into a condensate pan, use a no-rinse evaporator coil cleaner that foams and drips into the pan rather than a formula that needs hosing. Spray it evenly, let it dwell, and let it drain. While you are in there, clean the condensate pan and clear the drain line, since a clogged drain causes water damage and musty odors. Wipe the pan, and pour a cup of vinegar or a pan tablet down the drain to keep algae from blocking it.
Straighten the Fins
Aluminum fins bend easily from hail, weed trimmers, or a careless hose blast, and bent fins choke airflow just like dirt does. A fin comb, a cheap tool with teeth spaced to match common fin densities, straightens them in minutes. Slide it into a clean section to gauge the spacing, then draw it gently through the bent area to comb the fins back parallel.
Work slowly and with light pressure. The fins are thin and tear if you force the comb, so a careful pass beats an aggressive one. Even restoring a small crushed patch measurably improves airflow across that section of coil.
How Often and Common Mistakes
Clean the outdoor coil at least once a year, ideally in spring before cooling season, and more often if you have heavy pollen, cottonwood, pets, or a dusty rural setting. Inspect the indoor coil annually and clean it when you see buildup. Change or wash filters every one to three months, because a clean filter is the first line of defense that keeps the evaporator coil clean in the first place.
The biggest mistakes are easy to avoid. Never use a pressure washer, which flattens fins and can drive water into the compressor windings. Skip acidic or caustic cleaners that corrode aluminum. Do not bend the refrigerant lines while reaching around them, and always let the unit dry fully before restoring power. Done right, cleaning heat pump coils takes an hour and pays you back every month in a lower bill and a longer-lived system.
Choosing the Right Coil Cleaner
The product you spray matters as much as the technique, and the aisle offers a confusing range. For the outdoor condenser coil, a foaming coil cleaner is ideal because the foam clings to the vertical fins long enough to dissolve grime before it drains. Look specifically for a non-acid, alkaline or pH-neutral formula labeled safe for aluminum, since the acid-based “brightener” cleaners meant for industrial condensers can eat thin residential fins over time.
Self-rinsing or no-rinse cleaners are the right pick for the indoor evaporator coil, where you cannot easily hose things down and the runoff must drain into the condensate pan. In a pinch, a mild solution of dish soap and warm water works on light dust, but avoid household bleach, oven cleaner, and strong degreasers entirely; they corrode the coil and can damage the aluminum fins and copper tubing. Always read the dwell time on the label and follow it, because rushing the rinse leaves residue that attracts dirt faster next time.
When You Need a Professional
Homeowner cleaning handles surface grime, but some situations call for an HVAC technician. If the coil is packed with years of buildup, if you find oily residue that suggests a refrigerant leak, or if performance has not improved after a thorough cleaning, a pro can chemically clean the coil, check the refrigerant charge, and inspect the compressor. Deep cleaning a badly fouled indoor coil sometimes requires pulling it, which is a job for someone with recovery equipment.
Watch for warning signs that the coils are overdue for attention: longer run times, weaker airflow from the vents, higher energy bills, ice forming on the outdoor unit in cooling mode, or the system struggling to hold temperature on a mild day. Any of these can point to a fouled coil restricting heat transfer, and catching it early prevents the compressor stress that leads to expensive failures.
A professional maintenance visit, typically $100 to $200, usually includes a full coil cleaning along with checking pressures, electrical connections, and the condensate drain. Pairing your own twice-yearly surface cleaning with an annual professional tune-up is the sweet spot: you keep the coils clear between visits, and the technician catches the deeper issues you cannot see. That combination keeps efficiency high, extends the compressor’s life, and protects the warranty, which many manufacturers tie to documented annual maintenance.