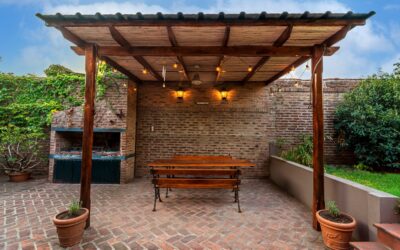
Building a DIY pergola is one of the most rewarding backyard projects you can tackle. A pergola adds architectural interest, provides partial shade, defines outdoor living spaces, and increases your home’s value. Best of all, a basic pergola is well within the skill level of most handy homeowners with basic tools.
Part of our Decks & Outdoor guide — explore the full guide →
This comprehensive guide walks you through every step of building a pergola, from planning and materials to the final installation. We include cost breakdowns, design variations, and expert tips to ensure your project turns out beautifully.
Planning Your DIY Pergola
Proper planning prevents costly mistakes. Before buying a single board, work through these considerations:
Location
Choose a location that enhances your outdoor living space. Common placements include over a patio, along a walkway, adjacent to the house, or as a freestanding structure in the yard. Consider sun direction: a pergola with east-west rafters provides more midday shade than one with north-south rafters.
Size
The most popular DIY pergola size is 10 x 12 feet, which comfortably covers a dining table with seating or a small lounge area. Measure your intended furniture layout and add 2-3 feet on each side for comfortable clearance.
Permits
Most municipalities require a building permit for pergolas, especially those attached to a house or exceeding a certain size. Check with your local building department before starting. Permit costs typically range from $50-$300.
Utility Lines
Call 811 (the national “Call Before You Dig” number) to have underground utility lines marked before digging post holes. This is free and legally required in most states.
| Pergola Size | Best For | Posts Needed | Approximate Cost (wood) |
|---|---|---|---|
| 8 x 8 ft | Small seating area | 4 | $500-$1,000 |
| 10 x 12 ft | Dining area, most popular | 4-6 | $800-$1,500 |
| 12 x 16 ft | Large entertaining space | 6 | $1,200-$2,500 |
| 14 x 20 ft | Full outdoor living room | 6-8 | $2,000-$4,000 |
Materials Comparison
The material you choose for your DIY pergola affects cost, durability, appearance, and maintenance requirements:
Pressure-Treated Pine
The most affordable option. Pressure-treated lumber resists rot and insects and is widely available. It can be stained or painted after drying for 3-6 months. The main drawbacks are its tendency to warp and check (crack) as it dries and its green-tinted appearance when new.
Cedar
Western red cedar is naturally rot-resistant, insect-resistant, and beautiful. It weathers to an attractive silver-grey if left untreated or can be stained to maintain its warm reddish-brown color. Cedar costs more than pressure-treated lumber but requires less chemical treatment.
Redwood
Redwood offers premium beauty and natural durability. Its rich color and straight grain make it the most visually appealing wood option. However, it is expensive and increasingly difficult to source sustainably.
Composite / PVC
Composite and PVC pergola materials are virtually maintenance-free and never rot, warp, or need painting. They cost significantly more upfront but eliminate ongoing maintenance. Some kits come pre-cut with all hardware included.
Aluminum
Aluminum pergola kits are lightweight, rust-proof, and often feature adjustable louvers for variable shade. They are the most expensive option but offer the longest lifespan and the least maintenance.
| Material | Cost per Post | Lifespan | Maintenance | DIY Difficulty |
|---|---|---|---|---|
| Pressure-treated pine | $15-$30 | 15-20 years | Stain every 2-3 years | Easy |
| Cedar | $30-$60 | 20-30 years | Seal every 2-3 years | Easy |
| Redwood | $50-$100 | 25-35 years | Seal every 2-3 years | Easy |
| Composite | $80-$150 | 25-50 years | Occasional cleaning | Moderate |
| Aluminum | $100-$200 | 30-50+ years | Minimal | Moderate |
Tools You Will Need
Most homeowners already own many of these tools. Here is the complete list for a standard DIY pergola build:
Essential Tools
- Circular saw or miter saw
- Drill/driver with impact capability
- Post hole digger or power auger
- Level (4-foot and torpedo)
- Speed square and framing square
- Tape measure (25-foot minimum)
- Clamps (at least 4)
- Socket wrench set
- Ladder (8-foot minimum)
- Safety glasses and ear protection
Optional But Helpful
- Jigsaw (for decorative rafter tail cuts)
- Router (for decorative edge profiles)
- Laser level (for precise post alignment)
- Reciprocating saw (for cutting posts to height)
Cost Breakdown
Here is a detailed cost breakdown for a standard 10 x 12-foot DIY pergola using different materials:
| Component | Pressure-Treated | Cedar | Composite Kit |
|---|---|---|---|
| Posts (4x 6x6x10) | $60-$120 | $120-$240 | Included |
| Beams (2x 2x10x12) | $40-$80 | $80-$160 | Included |
| Rafters (8-10x 2x6x10) | $80-$160 | $160-$320 | Included |
| Top slats (10-15x 2x2x12) | $30-$60 | $60-$120 | Included |
| Concrete (8-12 bags) | $40-$60 | $40-$60 | $40-$60 |
| Hardware (brackets, bolts, screws) | $50-$100 | $50-$100 | Included |
| Post bases / anchors | $40-$80 | $40-$80 | Included |
| Stain / sealant | $40-$60 | $40-$60 | $0 |
| Total | $380-$720 | $590-$1,140 | $2,000-$4,000 |
Compare these DIY costs to professional installation, which runs $3,000-$8,000 for a similar-sized pergola. Building it yourself saves $2,000-$6,000.
Step-by-Step Build Instructions
Follow these steps to build a standard freestanding DIY pergola:
Step 1: Lay Out the Post Locations
Mark your four (or more) post locations using stakes and string. Use the 3-4-5 triangle method to ensure perfect 90-degree corners: measure 3 feet along one string and 4 feet along the perpendicular string; the diagonal between those points should be exactly 5 feet.
Step 2: Dig Post Holes
Dig holes 12 inches in diameter and at least 36 inches deep (below the frost line in cold climates). Add 4-6 inches of gravel at the bottom of each hole for drainage. Use a post hole digger or rent a power auger for easier digging.
Step 3: Set the Posts
Place each 6×6 post in its hole and check for plumb (perfectly vertical) on two adjacent sides using a level. Brace each post with temporary 2×4 supports screwed to stakes in the ground. Fill holes with concrete mix, sloping the top away from the post for drainage. Allow concrete to cure for 48-72 hours.
Step 4: Cut Posts to Height
Use a laser level or a string level to mark all posts at the same height (typically 8-9 feet for the top of the post). Cut each post with a reciprocating saw or circular saw. For an attached pergola, the house-side posts should be higher to create a slight slope away from the house.
Step 5: Install the Beams
Set the double 2×10 beams on top of the posts, extending 12-18 inches past each outside post for a decorative overhang. Secure with structural lag screws or through-bolts. Cut decorative ends on the beam overhangs if desired (curved, angled, or scalloped).
Step 6: Install the Rafters
Set the 2×6 rafters perpendicular to the beams, spaced 16-24 inches apart. Notch the rafters where they sit on the beams using a circular saw and chisel for a secure, clean joint. Secure with structural screws or rafter ties. Extend rafters 12-18 inches past the beams for visual appeal.
Step 7: Add Top Slats (Optional)
Install 2×2 or 1×2 slats perpendicular to the rafters for additional shade. Space them 3-6 inches apart depending on how much shade you want. Secure with stainless steel screws.
Step 8: Finish & Seal
Sand any rough edges, fill visible screw holes if desired, and apply your chosen stain or sealant. See the finishing section below for detailed guidance.
Design Ideas & Variations
Customize your DIY pergola with these popular additions:
- Climbing plants: Wisteria, jasmine, climbing roses, and grape vines transform a pergola into a living structure over 1-2 growing seasons
- Retractable canopy: Add a retractable fabric shade for on-demand full sun protection
- String lights: Outdoor string lights draped between rafters create a magical evening ambiance
- Privacy curtains: Outdoor curtains on tension rods between posts add privacy and wind protection
- Ceiling fan: A wet-rated outdoor ceiling fan provides air circulation and extends comfortable use during warm months
- Built-in planters: Planter boxes at the base of posts add greenery and visual interest
A pergola near a natural pool creates a shaded relaxation area that complements the organic pool aesthetic perfectly.
Ground Surface & Flooring Options
The surface under your DIY pergola sets the tone for the entire space. Here are the best options:
Patio Pavers
Concrete, brick, or stone pavers create a durable, attractive surface. They handle furniture weight, weather, and foot traffic with minimal maintenance. Install on a compacted gravel and sand base for proper drainage.
Stamped Concrete
Poured concrete stamped with stone or tile patterns offers durability with a decorative look. It requires professional installation but lasts decades. Add a non-slip texture for safety in wet conditions.
Outdoor Tile
Porcelain and natural stone tile bring indoor elegance outdoors. Choose frost-rated tile with a textured surface for outdoor use. Porcelain pavers (2 cm thick) can be installed directly on gravel without mortar.
Composite Decking
If your pergola is an extension of an existing deck, composite decking provides a seamless transition. It resists moisture, fading, and splinters.
Gravel
Pea gravel or crushed stone is the most affordable pergola surface. It drains instantly, is easy to install, and has a casual, natural appearance. Use landscape fabric underneath to prevent weed growth and a steel edge border to keep gravel contained.
| Surface | Cost (per sq ft) | Durability | Maintenance | Style |
|---|---|---|---|---|
| Pavers | $5-$15 | 25-50 years | Low | Classic |
| Stamped concrete | $8-$18 | 25-30 years | Moderate | Versatile |
| Outdoor tile | $6-$20 | 20-40 years | Low | Elegant |
| Composite deck | $8-$15 | 25-50 years | Low | Modern |
| Gravel | $1-$3 | 5-10 years | Low-Moderate | Casual |
Finishing & Weatherproofing
Properly finishing your DIY pergola extends its lifespan by years and keeps it looking great:
Staining
Semi-transparent stain is the most popular finish for wood pergolas. It penetrates the wood, provides UV protection, and lets the natural grain show through. Apply within 3-6 months of construction (or immediately for cedar and redwood). Use the same high-quality application techniques you would use for any exterior wood project.
Painting
Solid-color paint hides wood grain but provides maximum UV and moisture protection. White and black are the most popular pergola paint colors. Use exterior-grade acrylic latex paint over a primer coat.
Clear Sealant
If you want to maintain the natural wood color without adding pigment, a clear UV-blocking sealant protects against moisture and sun damage. Reapply annually for best results.
Recoating Schedule
- Semi-transparent stain: Reapply every 2-3 years
- Solid stain / paint: Reapply every 3-5 years
- Clear sealant: Reapply every 1-2 years
- Composite / vinyl: No recoating needed
Frequently Asked Questions
How long does it take to build a DIY pergola?
A basic 10 x 12-foot freestanding pergola takes most homeowners 2-3 weekends to complete. The first weekend covers post holes and setting posts. After the concrete cures (48-72 hours), the second weekend covers beams, rafters, and slats. The third weekend handles finishing and staining.
Do I need a permit to build a pergola?
Most areas require a permit for structures over a certain size, typically 100-200 square feet. Even if your pergola falls under the size threshold, check local codes for setback requirements and height limits. Permits typically cost $50-$300 and protect you from fines and issues when selling your home.
How deep should pergola posts be?
Pergola posts should be set at least 36 inches deep, or below the frost line in your area, whichever is deeper. In cold climates, the frost line can be 42-60 inches deep. Posts that are not set below the frost line can heave out of the ground during freeze-thaw cycles.
Can I attach a pergola to my house?
Yes. An attached pergola uses a ledger board bolted to the house wall in place of one set of posts and beams. This requires lag bolting through the siding into the house framing and installing proper flashing to prevent water intrusion. Attached pergolas always require a building permit.
What is the best wood for a DIY pergola?
Cedar is the best overall wood for a DIY pergola, offering natural rot resistance, beauty, and workability at a moderate price point. Pressure-treated pine is the best budget option, and redwood is the premium choice. All three are readily available at most lumber yards and home improvement stores.
How much shade does a pergola provide?
A standard open-rafter pergola provides approximately 25-50% shade, depending on rafter spacing and the time of day. Adding top slats increases shade to 50-70%. For full shade coverage, add a retractable canopy, shade sail, or plant climbing vines that will eventually cover the structure.
Last updated: March 2026