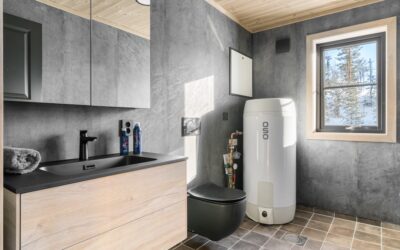
The single biggest surprise homeowners hit during an electric tankless water heater installation is the electrical demand. A whole-home unit like the Rheem RTEX-27 or the Stiebel Eltron Tempra 29 Plus can pull 27 to 29 kilowatts, which means three or four double-pole 40-amp breakers and a 200-amp main panel with headroom to spare. Skip that math and you will trip breakers every time someone showers while the dishwasher runs. This guide walks through the real requirements, the tools, and the sequence that separates a clean job from an expensive callback.
- Why Sizing the Electrical Load Comes First
- Choosing the Right Unit for Your Climate
- Where to Locate the Unit
- Tools and Materials You Will Need
- Step-by-Step Installation Sequence
- Permits, Code, and Inspections
- Installation Costs and Hiring a Pro
- Common Mistakes That Cause Callbacks
- Maintenance to Protect Your Investment
- Final Checklist Before You Walk Away
Why Sizing the Electrical Load Comes First
Before you touch a pipe, calculate your amperage. Electric tankless units convert watts directly into hot water, so a 27 kW model at 240 volts draws roughly 112.5 amps. Divide that across three 40-amp circuits, each fed by 8-gauge copper, and you are already committing a large chunk of a residential panel. Homes with electric ranges, dryers, and central air often cannot absorb another 100-plus amps without a service upgrade.
Run a load calculation using the National Electrical Code Article 220 method, or have an electrician do it. If your panel is 100 or 150 amps, budget $1,500 to $4,000 for a service upgrade before the heater even arrives. This is the number that quietly doubles many project totals, and it is why a proper electric tankless water heater installation starts at the breaker box, not the plumbing.
Choosing the Right Unit for Your Climate
Groundwater temperature drives everything. In Florida, incoming water might sit at 72°F, so a modest 18 kW unit delivers 4 gallons per minute at a comfortable 105°F. In Minnesota, that same water can arrive at 40°F, cutting the same unit’s output nearly in half. Cold-climate homes need the 27 to 36 kW class to run two fixtures at once.
- Point-of-use (small): EcoSmart ECO 11, 13 kW, feeds a single bathroom, around $250.
- Mid-size: Rheem RTEX-24, 24 kW, handles two fixtures in warm climates, roughly $500.
- Whole-home: Stiebel Eltron Tempra 29 Plus, 28.8 kW, covers a full family in cold zones, near $800.
Match the unit’s gallons-per-minute rating to your peak demand. Add up simultaneous fixtures: a shower at 2.0 GPM plus a kitchen sink at 1.5 GPM means you need at least 3.5 GPM at your local temperature rise.
Temperature rise is the number that quietly makes or breaks satisfaction. It is the gap between your incoming groundwater and your target output, usually 105°F to 120°F. A unit rated for 8 GPM in a lab test at a modest 40°F rise may only deliver half that in a Midwestern winter when the rise climbs to 70°F. Always read the manufacturer’s GPM-at-rise chart, not just the headline flow number on the box, or you will install a heater that disappoints in January.
Where to Locate the Unit
Placement is a decision you make once and live with for two decades, so weigh it carefully. The ideal spot sits close to both the electrical panel and the fixtures that use the most hot water, which shortens wire runs and cuts the delay before hot water reaches the tap. Every extra foot of pipe between the heater and the shower means more cold water to purge and more heat lost along the way.
Mount the unit on an interior wall in a heated space whenever possible. Electric tankless heaters are compact, roughly 15 by 20 inches, so they fit inside a closet, a utility room, or even under a counter. Leave the manufacturer’s specified clearance around the unit for service access, and never entomb it behind drywall where you cannot reach the terminal block or the isolation valves.
Tools and Materials You Will Need
Gather everything before you shut off the water. A stalled job with the main valve closed is a miserable way to spend a Saturday.
- Voltage tester and a clamp meter to confirm the circuits are dead.
- 8-gauge and 10-gauge THHN wire, sized to each model’s spec sheet.
- Appropriately rated double-pole breakers (often two to four 40-amp).
- 3/4-inch copper, PEX, or CPVC and matching fittings for the water connections.
- Two service valves with a pressure-relief port for future descaling.
- Pipe thread sealant, a torch or PEX crimper, and a stud finder for mounting.
Step-by-Step Installation Sequence
Work in a logical order so you never backtrack. Mount, wire, plumb, then test.
Start by killing power at the main and shutting the cold-water supply. Remove the old tank if you are replacing one, and drain it completely; a full 50-gallon tank weighs over 400 pounds, so open a hot tap to break the vacuum before you drag it out. Mount the tankless unit on a solid interior wall near your electrical panel and existing plumbing to minimize wire and pipe runs.
Land the electrical next. Run each circuit from a dedicated breaker to the unit’s terminal block, matching colors and torquing the lugs to the labeled spec, usually around 40 inch-pounds. Then connect the water: cold to the inlet, hot to the outlet, with an isolation valve on each side. Purge air by opening a hot fixture for a full minute before you restore power. Energize the breakers last, then check the digital display for fault codes.
Take your time on the wiring terminations, because a loose lug is the most common cause of a nuisance shutdown weeks later. Strip each conductor to the length the terminal block calls for, seat it fully, and torque to spec with a screwdriver rather than a drill. A single strand of copper poking out of a lug can arc and trip the breaker under load, sending you back up the ladder to chase a fault that a careful termination would have prevented entirely.
Permits, Code, and Inspections
Nearly every jurisdiction requires an electrical permit for this work, and many require a plumbing permit too. The inspector will look for proper wire gauge, correct breaker sizing, a bonded ground, and accessible shutoffs. Expect permit fees of $100 to $350 depending on your city. Pulling the permit protects you at resale and keeps your homeowner’s insurance valid if a fault ever causes damage.
Do not bury the unit inside a finished wall or a cramped closet without clearance. Manufacturers specify minimum front clearance for service access, and inspectors enforce it.
Installation Costs and Hiring a Pro
A DIY-capable homeowner with electrical experience can complete the plumbing and mounting for the price of the unit plus $150 to $400 in materials. Hiring out the full job typically runs $800 to $1,500 in labor, and more if a panel upgrade is involved. Total installed cost for a whole-home electric model commonly lands between $1,200 and $3,000.
If you have never pulled 8-gauge wire or worked in a live panel, hire a licensed electrician for that portion and handle the plumbing yourself to trim the bill. That hybrid approach saves money without gambling on the most dangerous part of the job.
Common Mistakes That Cause Callbacks
Undersizing the wire is the classic error. An 8-gauge conductor is required for many 40-amp circuits, and dropping to 10-gauge creates a fire hazard that will fail inspection. Another frequent miss is forgetting the service valves, which turns routine descaling into a plumbing project every year.
Hard water is the silent killer of these units. If your water tests above 7 grains per gallon, add a scale filter or plan to flush the heat exchanger with white vinegar annually. A well-executed electric tankless water heater installation that includes isolation valves and a softener will run cleanly for 15 to 20 years, far outlasting the 10-to-12-year life of a standard tank.
Another quiet mistake is placing the unit too far from the point of use to save on wiring, then discovering a long wait for hot water at the shower. The electric run is only part of the equation; the plumbing run costs you comfort every single day. Balance both distances rather than optimizing for the electrician’s convenience alone.
Maintenance to Protect Your Investment
A tankless heater rewards a small amount of annual care with a long, trouble-free life. Once a year, close the isolation valves, connect a small pump and a bucket of white vinegar to the service ports, and circulate the vinegar through the heat exchanger for 45 minutes to dissolve mineral scale. This single ritual is the difference between a unit that lasts eight years and one that lasts twenty.
Clean the inlet screen filter at the same time, since sediment collects there and chokes flow. Check the terminal connections for any discoloration that signals heat from a loose lug, and confirm the unit still holds its set temperature under load. If you have a whole-home softener, verify it is regenerating properly, because a lapsed softener lets scale return fast. Homeowners who skip descaling are the ones calling for a heat-exchanger replacement years before the warranty runs out.
Final Checklist Before You Walk Away
Confirm no leaks at every fitting, verify the display shows a stable set temperature, and run hot water at two fixtures to test capacity. Label the breakers clearly in the panel, and hand the homeowner the descaling instructions. Set the temperature to 120°F to balance scald protection with bacteria control, and register the unit for its warranty, which often runs 10 years on the heat exchanger. Do those things and your installation will be quiet, efficient, and trouble-free for years.