Most people picture wainscoting as painted beadboard or raised wood panels, but faux stone wainscoting gives a lower wall the heft of a fieldstone or ledgestone wall without the weight, the mortar or the masonry bill. Lightweight panels go up over existing drywall with adhesive and screws, and a typical 30 to 40 inch band can be finished in a weekend. The look works especially well in mudrooms, basements, entry halls, bars and stair walls where the lower wall takes the most abuse.
The short answer for most homeowners: choose molded polyurethane panels for interior rooms on a budget, choose thin real-stone veneer panels when you want authentic texture and can handle the dust and weight, and always finish the top edge with a cap or ledger trim so the panel ends look intentional. We also cover how each panel type behaves, how to install a faux stone wainscot cleanly, what it costs and where it is a poor fit.
- What Faux Stone Wainscoting Is and How It Differs From a Backsplash
- Panel Types Compared
- Tools and Materials
- How to Install Faux Stone Wainscot Panels Over Drywall
- Safety When Cutting Faux Stone Panels
- Cap Options and Design Ideas
- Where Faux Stone Wainscot Works and Where It Doesn't
- Troubleshooting Common Problems
- Cost of Faux Stone Wainscoting
- When to Call a Pro
- Frequently Asked Questions
What Faux Stone Wainscoting Is and How It Differs From a Backsplash
Faux stone wainscoting is a horizontal band of simulated stone covering the lower third of a wall, usually 32 to 42 inches high, capped with a trim piece. A faux stone backsplash covers the short strip between a countertop and upper cabinets, which means it sees grease, water splashes and heat. Wainscot panels see a different kind of wear: scuffed shoes, bumped furniture, vacuum cleaners, wet boots and dog tails. That changes what matters. Impact resistance and a solid top cap matter more on a wainscot, while cleanability and heat clearance matter more behind a range.
Height also changes the visual math. A tall stone band can make a small room feel heavy, while a band that is too short looks like an oversized baseboard. A common rule of thumb is roughly one third of the wall height, so about 32 inches on an 8 foot wall and 36 to 40 inches on a 9 foot wall. In stairwells, many installers run the band parallel to the stair nosings so the top line stays a consistent distance above the treads.
Panel Types Compared
Three broad product families show up under the faux stone label. Each one has a different weight, texture and installation feel.
| Panel type | Weight and feel | Best for |
|---|---|---|
| Molded polyurethane | Very light, cuts with a saw, slight hollow sound when tapped | Basements, entries, bars, budget projects |
| Thin real-stone veneer panels | Heavier, true stone surface, cold to the touch | Fireplace walls, high-end entries, wine rooms |
| Manufactured stone veneer (cast concrete) | Heavy individual pieces set in mortar | Full masonry looks, often with lath and scratch coat |
Molded polyurethane panels
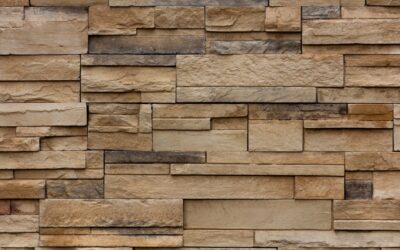
These are the most popular faux stone panels for wainscot work. They are cast from real stone molds, painted with layered color and sold in interlocking sheets often around 2 by 4 feet. Because they weigh only a few pounds each, they glue and screw directly over drywall. Quality varies widely: better panels have deeper relief, varied color within each stone and interlocking edges that hide the seams. Cheaper panels show repeating patterns and a plastic sheen under raking light.
Thin real-stone veneer panels
These use actual slate, quartzite or limestone sliced thin and bonded to a backing or assembled into staggered ledger panels. The texture and color are genuine, and they hold up very well to bumps. They are heavier, so fastening and adhesive choices become more important, and cutting them creates real stone dust that needs serious protection.
Manufactured stone veneer
Cast concrete stone pieces are a true masonry job with metal lath, a scratch coat and mortar. They can make a dramatic wainscot, but the weight, the wet work and the moisture management put them in a different category from panel systems. For most interior wainscots, panels are the practical choice.
Tools and Materials
- Faux stone panels plus matching corner pieces and a top cap or ledger trim
- Construction adhesive rated for foam or polyurethane products (check the panel instructions for solvent compatibility)
- Coarse-thread screws or panel fasteners long enough to reach studs, plus a stud finder
- Fine-tooth handsaw, jigsaw or miter saw for polyurethane; a wet saw or diamond blade with water feed for real stone
- 4 foot level, laser line or chalk line, tape measure, pencil
- Color-matched caulk or touch-up paint for seams and screw heads
- Dust mask or respirator, safety glasses, hearing protection and work gloves
How to Install Faux Stone Wainscot Panels Over Drywall
Every brand has its own clip, adhesive and fastening rules, so read the panel instructions first. The general sequence looks like this.
- Check the wall. Look for damp spots, peeling paint, soft drywall or a musty smell. Fix any moisture source before covering the wall, because panels will hide a slow leak until it becomes a mold problem.
- Remove baseboards and outlet covers. Turn off the breaker for any outlet in the wainscot zone and confirm power is off with a non-contact voltage tester before removing cover plates. You will likely need box extenders so the outlets sit flush with the new surface.
- Mark studs and a level top line. Snap a level line at your chosen height. Floors are rarely level, so work from the top line down and plan to hide any gap at the floor with baseboard.
- Dry-fit the first row. Start at an outside corner or the most visible end and lay panels along the floor to plan where cuts will land. Avoid ending a run with a sliver less than a few inches wide.
- Apply adhesive. Run beads of construction adhesive on the panel back in the pattern the instructions specify, usually a perimeter bead plus a zigzag through the middle.
- Set and fasten into studs. Press the panel to the wall, check level, then drive screws through the panel into studs in the recessed mortar joints where they are easy to hide. Adhesive alone over painted drywall is not enough for heavier panels.
- Interlock and continue. Slide the next panel into the joint so the stone pattern carries across the seam. Stagger vertical seams if the system allows it.
- Turn corners and cap the top. Use the matching corner pieces for outside corners. Install the ledger or cap trim along the top line to cover cut edges and give the band a finished shelf.
- Touch up. Fill screw heads and seams with color-matched caulk or the touch-up kit, then reinstall baseboard and outlet covers.
Safety When Cutting Faux Stone Panels
Cutting polyurethane panels creates fine plastic dust and chips that irritate eyes and lungs. Wear safety glasses and a well-fitting dust mask, cut outdoors or in a garage with the door open, and vacuum with a shop vacuum rather than sweeping. A fine-tooth blade gives cleaner edges and less dust than a coarse framing blade.
Real stone veneer is a more serious hazard. Cutting, grinding or drilling natural stone releases crystalline silica dust, which can cause permanent lung disease. Use a wet saw or a diamond blade with continuous water feed, wear an N95 or better yet a P100 respirator, keep bystanders away and clean up with a HEPA-filtered vacuum instead of a broom or compressed air. Never dry-cut real stone indoors.
Cap Options and Design Ideas
The cap is what separates a polished wainscot from a wall that looks half finished. Most panel systems sell a matching stone ledger that creates a narrow shelf, which is useful for small frames or as a visual break. A painted wood chair-rail molding also works well and ties the stone band into nearby trim. In a rustic room, a rough-sawn timber cap reads as a mantel ledge. In a modern space, a slim metal edge trim keeps the top line crisp.
Color pairing matters more than people expect. Gray stacked stone pairs well with white or warm gray paint above. Tan and brown fieldstone looks best with creamy whites, sage greens or muted blues. Keep the floor and the stone in different value ranges so the two surfaces do not blend into one dark mass.
Where Faux Stone Wainscot Works and Where It Doesn’t
Good fits include basement family rooms, mudrooms, entry halls, home bars, wine nooks, stair walls, covered porches rated for the product and game rooms. These spaces benefit from a durable, textured lower wall and do not involve constant water exposure.
Be cautious in full bathrooms and laundry rooms. Splashing and humidity can get behind panels at seams and edges. If you use faux stone wainscoting in a bathroom, keep it away from the shower and tub, seal every edge with caulk, run the exhaust fan and confirm the product is rated for damp rooms. Behind wood stoves and fireplaces, follow the clearance rules for the appliance; polyurethane is not a heat shield, and only noncombustible materials belong in the required clearance zone.
In older homes, plan before you disturb anything. If the house was built before 1978, test the existing paint for lead before sanding or removing trim. Plaster or joint compound from before the 1980s may contain asbestos, so test before cutting into it for outlet boxes.
Troubleshooting Common Problems
- Visible seams: Seams often show when the wall is out of plumb. Shim behind the panel at low spots and fill the joint with color-matched caulk, then dab on touch-up paint.
- Panels pulling away: Usually a sign of adhesive on a dusty or glossy surface, or too few screws. Re-fasten into studs and scuff glossy paint before gluing.
- Repeating pattern: Rotate or flip panels where the system allows and mix boxes before you start.
- Bubbled or warped panels: Often caused by solvent-based adhesive that is not compatible with foam, or by direct heat. Replace affected panels and use the recommended adhesive.
- Musty smell later: Remove a panel to check for moisture. Fix the source first; any mold growth larger than about 10 square feet calls for a remediation pro.
Cost of Faux Stone Wainscoting
Costs vary with panel quality, the height of the band and how many corners and outlets you have. As general ranges, molded polyurethane panels often run from the low single digits to the low teens per square foot, while thin real-stone veneer panels typically cost noticeably more per square foot plus heavier fasteners. Corners and cap trim add to the material bill, so price them separately. Professional installation commonly adds a similar amount again per square foot, with higher labor in rooms full of outlets, windows and corners. A 40 foot run at 36 inches high is about 120 square feet, which is a manageable weekend project for a confident DIYer using polyurethane panels.
When to Call a Pro
Hire help if you are installing heavy real-stone veneer, building a mortar-set manufactured stone wainscot, working around a fireplace or stove, or dealing with walls that show water damage. Call a licensed electrician if outlets need relocating or new boxes are required. A pro also makes sense for long stairwell runs where angled cuts and a consistent top line are hard to achieve alone.
Frequently Asked Questions
Can faux stone wainscoting go directly over drywall?
Yes. Most polyurethane panels are designed to go over sound, dry drywall with construction adhesive and screws driven into studs. The wall should be clean, flat and free of moisture problems before you start.
How high should a faux stone wainscot be?
A common guideline is about one third of the wall height, which works out to roughly 32 inches on an 8 foot wall and 36 to 40 inches on a 9 foot wall. Match nearby window sills or furniture heights when possible.
Is faux stone wainscoting good for basements?
It is one of the best uses, as long as the basement walls are dry. Test for moisture first and fix any leaks, because panels hide water until it causes mold.
Do I need special protection when cutting stone panels?
For polyurethane, wear a dust mask and safety glasses. For real stone veneer, cut wet and wear an N95 or P100 respirator, because stone dust contains crystalline silica.
Can I paint faux stone panels?
Many polyurethane panels accept acrylic touch-up paint, and some homeowners recolor them with layered washes. Test on an offcut first, and avoid solvent-based products unless the panel maker approves them.