Most homeowners assume a furnace should be wrapped like a water heater, but that is a mistake that can void a warranty or start a fire. Done correctly, furnace insulation targets the ductwork, the supply plenum, and the surrounding closet walls, not the burner or the cabinet itself. The goal is to keep conditioned air from bleeding heat into an unconditioned attic or crawlspace before it ever reaches your rooms. Get the locations right and you can trim 10 to 20 percent off the heat that a poorly sealed system loses. Get them wrong and you choke combustion airflow.
- What You Should Never Insulate
- Insulating the Supply Plenum
- Sealing and Wrapping the Ductwork
- The Furnace Closet or Mechanical Room
- Choosing the Right Insulation Material
- Controlling Condensation and Moisture
- When to Call a Pro Versus DIY
- Quick Reference Checklist
- Common Mistakes That Cost You
- Insulating the Return Side
What You Should Never Insulate
The furnace cabinet is engineered with its own internal heat shielding, and the exterior sheet metal is designed to run warm. Wrapping the cabinet in a fiberglass blanket traps heat against components that need to shed it, and it can obscure the data plate, the flame sensor housing, and the flue connections. On any gas or oil unit, you also risk restricting the combustion air the burner draws in.
Keep all insulation at least the manufacturer’s stated clearance to combustibles, which is typically 1 to 6 inches around the flue pipe and drafthood. Single-wall flue pipe needs 6 inches of air gap to any combustible material. Never pack insulation against a B-vent, and never cover the burner compartment, the blower access panel, or the electrical junction box. If you cannot read the model plate after you finish, you have covered too much.
Insulating the Supply Plenum
The supply plenum is the large sheet-metal box mounted directly on top of the furnace, and it is one of the biggest heat-loss points in the whole system. Bare galvanized steel radiates heat aggressively, especially in an attic or unheated basement. Wrapping the plenum with foil-faced fiberglass duct wrap rated R-6 or R-8 pays for itself quickly.
Use a wrap that is 1.5 to 2 inches thick with a foil vapor barrier facing out. Cut it to fit each panel, compress it as little as possible, and secure it with foil HVAC tape and outward-clinching tie wire or nylon straps every 12 inches. Compressing the wrap flat destroys its R-value, so let it stay lofted. Keep the wrap a few inches back from the top of the furnace cabinet where the plenum meets the heat exchanger area.
Sealing and Wrapping the Ductwork
Before you add any wrap, seal the seams. Duct mastic is the workhorse here. Brush a heavy coat over every joint, seam, and boot connection, embedding fiberglass mesh tape on gaps wider than 1/8 inch. Contrary to its name, cloth-backed “duct tape” fails within a couple of years as the adhesive dries out. Use mastic or foil tape rated UL 181 instead.
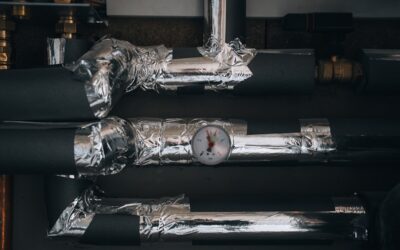
- Round metal ducts: Foil-faced fiberglass wrap, R-6 minimum, spiral-wrapped with a 2-inch overlap.
- Rectangular trunk lines: R-8 batt wrap in attics, secured with straps and foil tape.
- Flex duct: Buy it pre-insulated at R-6 or R-8; support it every 4 feet so it never sags or kinks.
In an unconditioned attic, code in most climate zones now requires supply ducts at R-8. In conditioned space, R-6 is usually acceptable. Check your local energy code, because a failed inspection means pulling the wrap back off.
The Furnace Closet or Mechanical Room
If your furnace sits in a closet against an exterior wall or in an attached garage, the walls and ceiling of that space deserve attention. Insulate the closet’s exterior-facing walls to the same R-13 to R-21 you would use elsewhere, and air-seal the top plate where wiring and flue penetrations pass through. A furnace in a cold garage works harder every cycle.
That said, a fuel-burning furnace needs combustion and dilution air. Do not seal a combustion-air louver or grille. If your closet relies on louvered doors for air, keep those louvers clear. High-efficiency sealed-combustion furnaces pull air through a dedicated PVC intake pipe and are more forgiving, but an older 80 percent furnace draws air from the room around it.
Choosing the Right Insulation Material
Foil-faced fiberglass duct wrap is the standard choice for plenums and metal ducts because it is inexpensive, easy to cut, and the foil acts as a vapor barrier. Mineral wool is worth the upgrade near flue pipes and in the mechanical room because it is noncombustible and holds up to higher temperatures without off-gassing.
For rigid surfaces and tight geometry, foil-faced rigid fiberglass boards or closed-cell spray foam can seal awkward transitions, but keep spray foam well away from any hot flue surface. Avoid open-cell foam and untreated foam board anywhere near combustion components. A roll of quality R-8 duct wrap runs about $1.50 to $3 per square foot, and a gallon of duct mastic covers roughly 100 linear feet of seams for under $25.
Controlling Condensation and Moisture
Uninsulated cold-air returns and air-conditioning supply ducts sweat in humid weather, and that condensation drips onto ceilings, rusts sheet metal, and grows mold. The foil facing on your duct wrap is the vapor barrier, so it must face the warm, humid side and every seam must be taped airtight. A pinhole gap lets moist air reach the cold metal underneath and defeats the whole assembly.
In a humid crawlspace or attic, this matters as much for cooling season as for heating. If you run a single duct system year-round, insulate and vapor-seal it as if it will always carry cold air, because for half the year it will.
When to Call a Pro Versus DIY
Wrapping accessible ductwork and a plenum is a reasonable weekend project for a confident DIYer, and the materials for an average system total $150 to $400. What you should not DIY is anything touching the combustion side: the flue, the heat exchanger, or the gas train. If your ducts run through finished walls, or if you suspect leaks you cannot reach, a contractor with a duct-blaster can test and seal the system properly, typically for $300 to $700.
Think of furnace insulation as three separate jobs: seal the leaks with mastic, wrap the plenum and ducts to code R-value, and insulate the surrounding room without ever blocking combustion air. Handle those in order, respect every clearance on the data plate, and your system will move more of the heat you paid for into the rooms where you actually feel it.
Quick Reference Checklist
Before you close up the mechanical room, walk the whole system once more. Confirm the flue clearances, verify nothing covers the model plate or access panels, and press-check every strap so the wrap stays lofted rather than crushed.
- Seams sealed with UL 181 mastic or foil tape, not cloth duct tape.
- Plenum wrapped at R-6 to R-8, foil facing out.
- Attic supply ducts at R-8, conditioned-space ducts at R-6 minimum.
- Flue and B-vent clearances preserved, no insulation touching hot pipe.
- Combustion-air louvers and grilles left fully open.
That short list separates a system that quietly saves you money from one that runs hot, sweats in summer, or fails inspection. Furnace insulation is less about smothering the equipment and more about guiding your conditioned air cleanly from the burner to your living space.
Common Mistakes That Cost You
The error that shows up most often is wrapping the furnace cabinet itself, which traps heat, hides the data plate, and can restrict combustion air. Close behind is crushing the duct wrap tight to make it look neat, which halves the R-value the batt was rated to deliver. Both feel like good work at the time and quietly undermine the whole job.
Another frequent miss is insulating the ducts but never sealing the seams first, so you end up with a well-wrapped leak. Cloth-backed duct tape belongs nowhere on this project; its adhesive dries and lets go within a couple of seasons, which is why building codes and manufacturers call for UL 181 foil tape or mastic. Finally, homeowners in humid climates sometimes install the vapor barrier facing the wrong way, letting moist air reach the cold metal and condense inside the wrap.
Insulating the Return Side
Supply ducts get most of the attention, but the return side matters too, especially in summer. Cold-air returns running through a hot attic pick up heat and pull in dusty attic air through every unsealed seam, which both wastes energy and dirties your filter faster. Seal the return trunk and boots with mastic just as you do the supply side, then wrap any return duct in unconditioned space to at least R-6.
Pay attention to the filter cabinet and the return plenum at the air handler, which are common leak points where negative pressure sucks in attic or crawlspace air. A tight, insulated return keeps the whole system cleaner and lets the blower move the air it was sized to move, rather than fighting leaks and restrictions along the way.