Nearly every concrete garage slab in America cracks — concrete shrinks about 1/16 inch per 10 feet as it cures, and something has to give. The good news is that most of what you see is cosmetic, and garage floor crack repair is a genuinely achievable weekend project with the right filler and prep. The critical skill is telling harmless shrinkage cracks apart from the small minority that signal settlement, heaving, or structural movement, because filling those with caulk just hides a problem that gets more expensive every year. This guide walks through diagnosis first, then the repair methods, products, and costs for each situation.
Part of our Epoxy, Concrete & Garage Floors guide — explore the full guide →
Step One: Diagnose Before You Repair
Look at three things: width, displacement, and pattern. Hairline shrinkage cracks — under about 1/8 inch wide, roughly straight or gently meandering, with both sides of the crack flush at the same height — are normal aging. They often radiate from interior corners, columns, or the slab’s control joints, and they typically stop growing within the first couple of years after the pour.
Different story if you see any of the following: one side of the crack sitting higher than the other (vertical displacement), cracks wider than 1/4 inch or visibly widening season to season, a slab section that has tilted or sunk, doors on the garage or adjoining rooms that have started binding, or a raised hump running across the floor. Those patterns suggest soil settlement, frost heave, expansive clay, or washout under the slab. A wet crack that stays damp, or white powdery efflorescence along its length, points to water moving beneath the concrete — also worth investigating rather than cosmetically sealing.
If you’re running out of room even with a clean garage floor, a backyard shed takes the overflow — seasonal gear, tools, lawn equipment. And if you’re parking outside while the garage doubles as a workshop, a carport keeps your car covered without needing a second garage.
We may earn a commission when you purchase through our links.
When to Call a Structural Engineer
If your crack shows displacement, ongoing movement, or accompanies foundation symptoms like stair-step cracks in the garage walls, spend $300 to $600 on an independent structural engineer’s evaluation before hiring any repair contractor. An engineer sells you a diagnosis, not a repair, so their incentive is honest assessment; a foundation company diagnosing your slab for free is also pricing its own work. For genuinely settled slabs, the fixes are polyurethane foam injection (slab jacking) at roughly $5 to $25 per square foot of affected area, mudjacking at somewhat less, or full slab replacement at $6 to $12 per square foot. None of that is DIY, and none of it should start without knowing why the slab moved.
DIY Repair for Cosmetic Cracks: Choosing a Filler
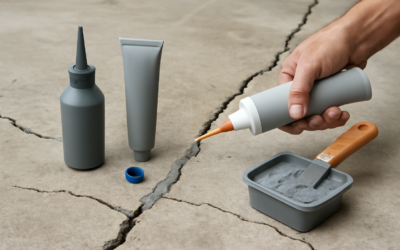
For stable, flush hairline-to-1/4-inch cracks, three product families dominate, and each has a lane:
- Polyurethane concrete crack sealant (caulk-tube): The easiest option. Self-tooling, stays slightly flexible, gray to match concrete, about $8 to $15 per tube. Best for control joints and cracks that may see minor seasonal movement. Not sandable, so it leaves a slightly rubbery bead.
- Two-part epoxy crack filler: Rigid, strong, sandable, and the right base if you plan to coat the floor later. Kits run $20 to $50. Epoxy bonds structurally to clean concrete but will re-crack if the slab moves.
- Fast-set polyurea/polyurethane hybrid fillers: The pro favorite for garage floors. Cure in 30 to 60 minutes even in cold garages, can be shaved flush with a razor scraper, and accept coatings the same day. Expect $25 to $60 per kit or dual cartridge.
Skip pre-mixed latex “concrete patch” in squeeze bottles for anything beyond hairlines — it shrinks, cracks, and pops out under tires within a season or two.
How to Repair a Crack the Right Way
Preparation determines whether the repair lasts two years or twenty. Here is the sequence pros use:
- Chase the crack. Widen it slightly with an angle grinder and crack-chasing diamond wheel, or at minimum scrape it with a wire brush, to give filler clean vertical walls to grip. A 1/4-inch-wide, 1/2-inch-deep groove is ideal.
- Clean aggressively. Vacuum the crack, then blow it out. Any dust left behind becomes a bond-breaking layer.
- Fill deep cracks in stages. For cracks deeper than 1/2 inch, press dry silica sand or foam backer rod into the depth first so the filler forms a proper plug instead of draining into the void.
- Apply the filler slightly proud. Overfill by a hair; polyurea and epoxy can be shaved or sanded flush after cure, while polyurethane caulk should be tooled smooth immediately.
- Broadcast sand for texture (optional). Dusting the wet filler with fine sand helps it blend with a broom-finished slab and adds traction.
Total materials for a typical two- or three-crack garage: $40 to $100. Time: two to three hours plus cure.
Spalling, Pitting, and Surface Damage
Cracks often come with companions — pitted spots from de-icing salt, flaking surface (spalling), and popped-out chips. These need a resurfacing product rather than a crack filler. Polymer-modified cement resurfacers spread with a squeegee at $30 to $50 per bag and handle large shallow areas; for deeper divots, a trowelable concrete patch with bonding agent works better. Feather the edges, keep the patch damp-cured per the bag instructions, and expect color variation — patched concrete never perfectly matches, which is one honest argument for a full-floor coating afterward.
Coating the Floor After Repairs
Crack repair is the natural first step of a garage floor upgrade, and fillers behave differently under coatings. If an epoxy or polyaspartic coating is in your plan, use a rigid, sandable filler (epoxy or polyurea) so the coating bonds across the repair, and shave it flush — coatings telegraph every bump. A DIY epoxy kit for a two-car garage runs $150 to $400; professional polyaspartic systems run $5 to $9 per square foot installed. One caution: coatings bridge hairlines but cannot restrain a moving crack. If a crack re-opens through your new coating within a year, that is the slab telling you the movement question was never answered — which loops back to the engineer conversation.
Preventing the Next Crack
You cannot stop concrete from being concrete, but you can remove the accelerants. Keep gutter downspouts discharging at least 4 to 6 feet away from the garage footprint, and maintain grade sloping away from the slab, because water cycling under the edge is the top cause of settlement and frost heave. Rinse de-icing salt drips off the floor in winter rather than letting brine sit and eat the surface. Honor the control joints — they exist to concentrate cracking in straight, planned lines — and re-seal them with polyurethane caulk when the original filler fails. A $10 tube of caulk every few years is the cheapest slab insurance you can buy.
Bottom Line
Flush, stable, narrow cracks: clean them, fill them with a quality polyurea or epoxy filler, and move on with your weekend for well under $100. Displaced, widening, or pattern cracks: spend the money on a structural engineer before anyone sells you a fix. Sorting your crack into the right category is 90 percent of getting garage floor crack repair right — the caulk gun part is easy.