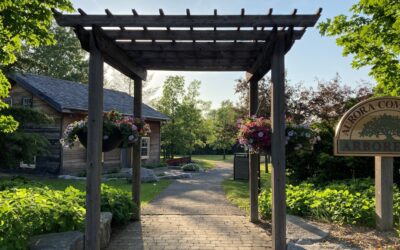
A free-standing pergola sits like an island in the yard with four corner posts and a roof grid above. Cut that island in half, attach the open side to the house, and you have something different and often more practical. A half pergola uses the house wall to support one side, so you only need two outboard posts and a ledger board against the building. The result is more shade where you actually use the patio, less lumber to buy, and a structure that reads as part of the home rather than an afterthought in the yard. Below are the design options, cost ranges, structural details, and materials that make a half pergola last 20 plus years.
Part of our Decks & Outdoor guide — explore the full guide →
Why a Half Pergola Often Beats a Full One
Three practical advantages explain why this style has surged in popularity since 2022.
- About 35 to 45 percent less lumber and hardware than a full freestanding pergola
- Two fewer footings to dig, saving a full day of work in rocky or hard soil
- Better wind resistance because two sides are anchored to the building
- Cleaner sightline from inside the kitchen or living room out to the yard
- Easier to wire for outdoor lighting since power can run through the house wall
The trade-off is that a half pergola only works if your house has a workable wall, meaning enough open siding area without windows or doors blocking the ledger run, and structurally adequate framing behind that wall to carry the load.
Typical Sizes and Costs
Most residential half pergolas land in one of three footprints based on how much patio space they cover.
- 10 by 12 ft cedar with 6×6 posts: $2,400 to $4,200 in materials, $5,500 to $8,500 installed
- 12 by 16 ft pressure-treated with 6×6 posts and 2×10 beams: $3,000 to $5,500 in materials, $7,000 to $11,500 installed
- 14 by 20 ft aluminum or steel kit (Yardistry or Sojag): $4,800 to $7,200, plus install
DIY-ing the project cuts cost by 50 to 60 percent if you own a circular saw, a 1/2 inch drill, and a post-hole digger. Plan two weekends for an experienced DIYer, three if it is your first major outdoor build.
Choosing Materials
Three material families dominate the market, each with real trade-offs.
Cedar
Western red cedar is the traditional choice. It is naturally rot-resistant, takes stain or oil well, and weathers to a silvery gray if left untreated. Expect $1,200 to $1,800 in lumber for a 12×16 build. Cedar lasts 18 to 25 years with annual oiling, less if left bare in a wet climate.
Pressure-Treated Pine
Standard ground-contact rated pressure-treated southern yellow pine costs about 40 percent less than cedar and lasts nearly as long if you stain it every two years. The downside is the lumber tends to twist and check more aggressively as it dries, so buy boards that have been stored properly and let them acclimate for two weeks before building.
Aluminum and Steel Kits
Brands like Pergola Kits USA, StruXure, and Yardistry sell prefabricated metal kits that bolt together in a weekend. The aluminum frames stay maintenance-free for decades, never warp, and accept retractable louvered roofs for full rain coverage. The premium runs 25 to 60 percent over wood for the base structure but jumps significantly with louvered options.
Post Size and Footings
For a half pergola up to 16 feet of run along the outboard beam, two 6×6 posts on opposite corners are the minimum. Anything larger needs intermediate posts every 10 to 12 feet. The 4×4 posts you see at big-box stores are too small for spans over 8 feet, since they sag visibly in the first summer.
Set each post on a sonotube footing extending below frost line. Use a Simpson ABU66Z standoff post base to keep the wood elevated 1 inch above the concrete, which prevents capillary moisture from wicking into the post end grain. That single hardware detail doubles the life of any wood post.
The Ledger Attachment
This is where most half pergolas fail or leak. The ledger is the horizontal board bolted against the house that carries half the pergola weight. Done wrong, it pulls away from the wall or rots the sheathing behind it.
- Strip the siding back to bare sheathing for the full ledger width plus 2 inches on each side
- Apply Grace Vycor flashing tape across the full sheathing area
- Install a pressure-treated 2×10 or 2×12 ledger with Simpson SDWS 1/2 inch by 5 inch structural screws every 16 inches, staggered top and bottom
- Cover the top edge with a piece of Z-flashing that tucks behind the siding above
- Caulk the screw heads and any seams with DAP Dynaflex Ultra
Drive screws into framing, not just sheathing. Stud finders or careful tapping locate the wall studs. Missed studs are the number one cause of pergola failure within five years.
Beam and Rafter Layout
The beam runs front to back, from house ledger to outboard post. Standard 2×10 doubled creates a 3-inch by 9.25-inch beam strong enough to span 14 to 16 feet. Drop rafters across the top, spaced 16 to 24 inches on center, with notched bird’s-mouth cuts so they sit flat on the beams.
For the top lattice, traditional pergolas use 2×2 stringers spaced 4 to 6 inches apart. Closer spacing creates more shade. If you want full sun coverage, run the slats edgewise and orient them perpendicular to the afternoon sun angle in your latitude.
Adding Shade or a Solid Roof
An open pergola throws about 30 to 50 percent shade. Most owners want more, especially on west-facing patios. Options include retractable canopy panels from ShadeFX or Coolaroo that slide on stainless cables, climbing wisteria or grape vines for a living roof (allow three to four years to fill in), or a fully louvered aluminum roof if you went with a metal kit.
For full waterproofing, replace the top lattice with corrugated polycarbonate panels like Suntuf Solar Gray. This converts the half pergola into a true rain shelter while still letting filtered light through.
Permit and Code Considerations
Most jurisdictions require a permit for any attached outdoor structure over 200 sq ft. Check with the local building department before digging. The submittal usually needs a site plan with setbacks, post layout, beam and rafter sizes, and the ledger attachment detail. Permits run $80 to $250 for the average residential half pergola.
An unpermitted attached structure can complicate a home sale, especially in California, New York, and Texas where appraisers flag unrecorded additions. Spend the small permit cost upfront and keep the inspection sign-off in your records.
Finishing Touches
Once the structure is up, the details turn a basic pergola into an outdoor room. Wrap the posts with 1×6 cedar boards for a thicker columnar look, add wet-rated string lights or recessed downlights on a dimmer, hang outdoor curtain panels on stainless cable for adjustable privacy, and consider a $250 propane patio heater for shoulder seasons. A well-built half pergola becomes the spot where the family actually spends summer evenings, which is the entire point of building one.