I’ve installed a lot of butcher block over the years, and nothing stops a client in their tracks like a herringbone top. A herringbone butcher block takes the same maple, walnut, or oak staves you’d find in a standard countertop and arranges them in that classic zigzag V-pattern you’ve seen on parquet floors and high-end backsplashes. The result reads as furniture, not just a work surface. It also costs more, behaves a little differently with seasonal movement, and demands a fabricator who knows what they’re doing. Here’s everything I tell homeowners before they commit.
Part of our Countertops guide — explore the full guide →
- What Makes a Herringbone Pattern Different
- Wood Species That Work Best
- What Herringbone Butcher Block Costs
- End-Grain Herringbone: The Premium Option
- Sealing: Oil or Film Finish
- Daily Care and Long-Term Maintenance
- Is Herringbone Worth It?
- Chevron Butcher Block: How It Is Built and When to Choose It
What Makes a Herringbone Pattern Different
A standard edge-grain butcher block runs long parallel staves the full length of the counter. Herringbone breaks those staves into short rectangles — usually 2 to 4 inches wide and 8 to 16 inches long — and sets each one at 90 degrees to its neighbor, staggered so the ends meet at the corners rather than the midpoints. That’s what separates true herringbone from chevron, where the ends are miter-cut at 45 degrees and meet in a continuous point. Herringbone gives you a broken zigzag; chevron gives you clean arrows. Both are gorgeous, but herringbone hides small alignment imperfections better, which is why I steer most clients toward it.
Because every piece is short, a herringbone top contains far more glue joints than a conventional slab — often three to five times as many. Done right, that’s a strength: modern PVA and polyurethane wood glues create bonds stronger than the surrounding wood fibers, and the alternating grain direction actually makes the panel more dimensionally stable than long parallel staves. Done wrong, with sloppy clamping or wet lumber, you get hairline gaps that telegraph within the first heating season. This is not a category where you want the cheapest fabricator.
Wood Species That Work Best
Any species used for conventional butcher block works in herringbone, but the pattern shows off some woods better than others.
- Hard maple is the classic. Its tight, pale grain lets the pattern itself be the star, and at 1,450 on the Janka scale it shrugs off daily kitchen abuse.
- Walnut is the current favorite in my market. The chocolate tones vary stave to stave, so the herringbone pattern gets a subtle checkerboard shimmer. Softer than maple (1,010 Janka), so expect dents if you’re rough on it.
- White oak gives you visible cathedral grain in each block, which makes the zigzag pop from across the room. Very good moisture resistance thanks to closed tyloses in the pores.
- Cherry darkens beautifully with UV exposure, but that means a cutting board left in one spot for six months leaves a light shadow. I warn every cherry client about this.
- Mixed species — maple and walnut alternating — doubles down on the pattern. It’s bold. Make sure you’ll still love it in ten years.
What Herringbone Butcher Block Costs
Expect a 30 to 60 percent premium over a standard edge-grain top in the same species. The labor lives in the layout, the extra milling, and the glue-up time. Here’s what I’m seeing for material alone, per square foot, from reputable US fabricators in 2026:
| Species | Standard Edge-Grain | Herringbone |
|---|---|---|
| Hard maple | $35–$60 | $55–$95 |
| White oak | $45–$75 | $70–$115 |
| Walnut | $60–$100 | $95–$150 |
| Cherry | $50–$80 | $75–$120 |
Fabrication of sink cutouts, edge profiles, and finished ends adds $200 to $600 per top, and professional installation runs $8 to $18 per square foot depending on your market and how many seams the layout needs. A typical 7-foot island in walnut herringbone lands between $2,800 and $4,500 installed. Compare that to $1,400 to $2,200 for the same island in standard walnut block, and you can see the pattern is a real line item, not a rounding error.
Budget alternative: several big-box suppliers now sell prefabricated acacia herringbone panels in 4-, 6-, and 8-foot lengths for $18 to $30 per square foot. The glue-ups are decent, but the staves are thinner (usually 1 inch versus 1.5), the acacia color variation is aggressive, and the factory finish needs to be sanded off if you want a food-safe oil surface. For a laundry room or coffee bar, they’re a fine value. For a showpiece kitchen island, spend up.
End-Grain Herringbone: The Premium Option
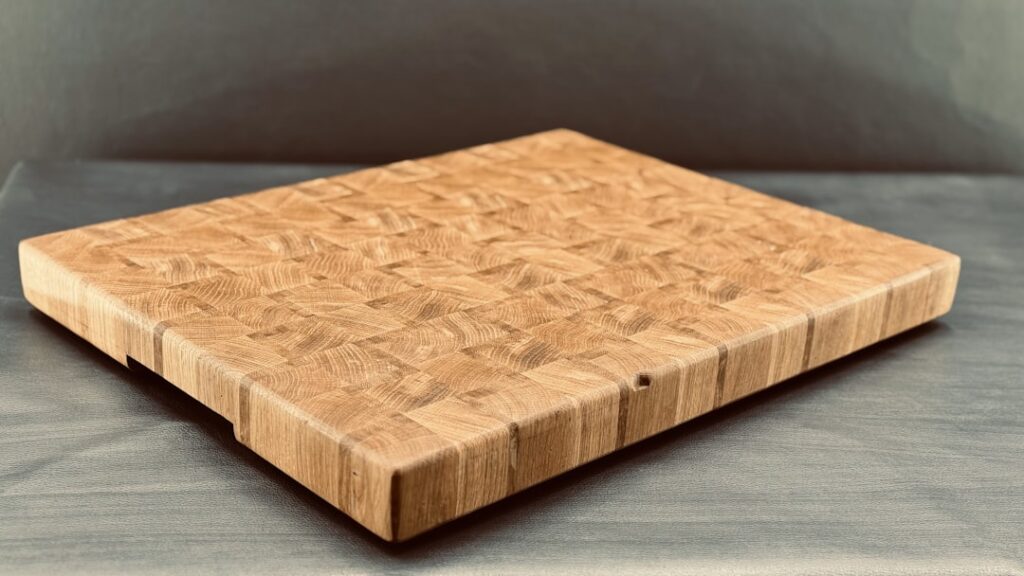
Most herringbone tops are edge-grain — you’re looking at the side of each stave. End-grain herringbone flips the blocks so the cut ends face up, giving you that classic chopping-block surface where knife edges slip between the wood fibers instead of severing them. It’s the kindest surface for knives and the most self-healing, but the checkerboard of open end grain drinks oil like a sponge and costs another 40 to 80 percent on top of edge-grain herringbone pricing. I only spec it for dedicated chopping stations, never for a full kitchen run with a sink in it. End grain and standing water are enemies.
Sealing: Oil or Film Finish
You have two roads, and they don’t mix.
Food-safe oil
Mineral oil, or better, an oil-wax blend or polymerizing product like pure tung or a hardwax oil rated for food contact. Oil soaks in, leaves the wood matte and touchable, and lets you prep food directly on the surface. The tradeoff is maintenance: monthly oiling for the first year, then quarterly. Water rings and mustard stains are possible but sand out easily. On a herringbone top, oil is my default because it lets you spot-repair a single damaged block without refinishing the whole counter.
Film finish
Waterlox, marine spar varnish, or a two-part conversion varnish builds a waterproof shell. Around sinks it’s the safer call, and maintenance drops to nearly zero. But you can’t cut on it, deep scratches require stripping the whole top, and a thick gloss film flattens the tactile appeal that made you choose wood in the first place. If you go film, ask for a satin or matte sheen — it photographs and lives far better than gloss.
Daily Care and Long-Term Maintenance
Herringbone care is standard butcher block care with one wrinkle: all those extra joints mean standing water has more seams to find. My rules for clients:
- Wipe spills within minutes, not hours. Water is the enemy; everything else is cosmetic.
- Use a separate cutting board for raw meat, even on an oiled top. It’s about sanitation workflow, not the wood.
- Scrub with mild dish soap and a barely damp cloth, then dry immediately. Never flood the surface.
- Once a month, check the joints near the sink with a fingernail. If you feel a ridge opening up, re-oil or re-seal that zone before winter heating season widens it.
- Sand out dents and stains with 120-grit, feather with 180, re-oil. On herringbone, sand with the grain of each individual block as best you can — a random-orbit sander makes this painless.
Expect the top to move. Wood expands and contracts across the grain with humidity swings, and although the alternating herringbone layout cancels out much of that movement, your installer still needs to fasten the top with slotted brackets or figure-eight clips, never rigid screws through the slab. I’ve been called to look at cracked tops exactly twice, and both were screwed down hard through the center with no allowance for movement.
Is Herringbone Worth It?
If the counter is a background surface — perimeter runs under upper cabinets, a pantry worktop — save your money and buy standard edge-grain. The pattern earns its premium where it’s seen: islands, peninsulas, coffee bars, waterfall ends, and open-shelving walls where the counter is effectively the room’s largest piece of furniture. One well-lit herringbone island in walnut does more for a kitchen than $4,000 of almost anything else I install, and unlike stone, when it’s scratched and tired in fifteen years, a weekend of sanding and oiling makes it new again. Choose a fabricator who can show you a finished herringbone top in person, insist on kiln-dried stock at 6 to 8 percent moisture content, and put the pattern where people will actually see it. That’s how you get your money’s worth out of this one.
Chevron Butcher Block: How It Is Built and When to Choose It
Chevron and herringbone are often confused, but they are built differently in the shop, and those construction differences affect cost, strength and how the top should be laid out in your kitchen. A chevron butcher block uses staves with angled, mitered ends that meet in a continuous point, creating a crisp arrow pattern rather than a broken zigzag. If that sharper look appeals to you, a few details are worth understanding before you order.
Mitered Joints Need Reinforcement
Every piece in a chevron top is cut at an angle on both ends, commonly 45 degrees, though some makers use shallower angles for a longer, sleeker point. Those angled ends expose partial end grain, which absorbs glue and does not bond as strongly as long-grain to long-grain joints. Quality fabricators compensate by adding splines, dowels or biscuits across the miters, or by gluing pieces into rows that are then joined along a straight long-grain center line. Ask how the miters are reinforced. A top built with plain glued miters and no backing is more likely to open hairline gaps at the points as the seasons change.
Material Waste and Cost
Because each stave loses wood to angled cuts, chevron uses more raw lumber than a standard edge-grain top, and the precise cutting adds shop time. Expect chevron butcher block to sit at or above the price of herringbone in the same species. Precision matters more too: chevron points must line up exactly down the center line, so even a small error is visible, while herringbone hides minor misalignment better. Ask to see a finished piece from the fabricator and look closely at how cleanly the points meet.
Layout Direction and Placement
The arrow shape gives chevron a strong sense of direction, so decide where the points should aim. On an island, running the points along the length draws the eye through the room and toward a focal wall or window. Running them across the depth creates a series of short arrows that reads busier. Keep the center line square to the cabinets and centered on the island, since an off-center point line is noticeable from every angle. On perimeter runs with a sink or cooktop cutout, discuss how the openings will interrupt the pattern before the top is built.
Finishing and Oily Rag Safety
Sanding a chevron top means working across changing grain directions at every miter, so a random-orbit sander and progressive grits help avoid cross-grain scratches. For food prep surfaces, choose a finish labeled food-safe once cured, and wait the full cure time before use. Rags soaked in drying oils such as linseed, tung or hardwax oil can heat up and ignite on their own. Lay them flat outdoors to dry or store them in a sealed metal container filled with water before disposal. With solid joinery and proper care, a chevron butcher block makes a striking centerpiece.
Prefer to explore on your own?
See how new flooring looks in your actual room in seconds — free, no signup.
Try the free Floor Studio →