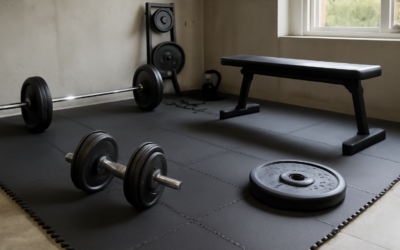
Drop a single 45-pound plate on a bare oak floor and you will hear the crack before you see the dent. Installing home gym flooring over hardwood is the difference between a workout space you enjoy for years and a floor refinishing bill that runs $3 to $8 per square foot. Hardwood is beautiful, but it was never engineered to absorb the shock of dumbbells, a loaded barbell, or a treadmill vibrating at 6 miles per hour. The good news is that protecting it is straightforward once you understand what actually damages the wood and how each flooring option addresses it.
- Why Hardwood Needs Protection in a Home Gym
- Best Flooring Options to Lay Over Hardwood
- Add a Moisture Barrier First
- Build a Dedicated Lifting Platform
- Protect Against Point Loads and Scratches
- How Much Weight Can Hardwood Handle?
- Installation Tips That Save Your Floor
- When You Should Not Cover Hardwood at All
- The Bottom Line
Why Hardwood Needs Protection in a Home Gym
Three forces work against your floor in a gym setting. Impact from dropped weights compresses the wood fibers and leaves permanent dents. Point loads from bench legs, rack feet, and machine bases concentrate hundreds of pounds onto a few square inches. And moisture from sweat, spilled water bottles, or humid basements swells the boards and lifts the finish over time.
A quarter-inch of the wrong material does almost nothing against a dropped kettlebell. You need a system matched to your training. Someone doing light yoga and resistance bands has very different requirements than a lifter running deadlifts three days a week. Match the floor to the heaviest thing you plan to drop.
Once the floor can handle the impact, it’s time to fill the space. A solid storage box keeps bands, gloves, and smaller gear organized between sessions.
We may earn a commission when you purchase through our links.
Best Flooring Options to Lay Over Hardwood
You do not have to commit to one product. Most home gyms use a combination, with heavier protection under the platform and lighter mats elsewhere.
Rubber Gym Tiles
Interlocking rubber tiles are the workhorse of home gyms. Standard thickness runs from 3/8 inch for general use up to 3/4 inch or even 1 inch for dedicated lifting areas. Expect to pay $2 to $5 per square foot for basic tiles and $6 to $9 for premium recycled-rubber options. They lie loose over the hardwood, so no glue or nails touch the wood, and you can pull them up when you sell the house.
Horse Stall Mats
The budget favorite. A 4-by-6-foot stall mat is 3/4 inch thick, weighs around 100 pounds, and costs roughly $50 to $65 at farm supply stores. That works out to about $2 per square foot for serious impact protection. They off-gas a rubber smell for a week or two, so air them out in a garage first.
Foam Interlocking Tiles
EVA foam puzzle tiles cost $0.80 to $2 per square foot and cushion joints for bodyweight work, stretching, and yoga. They are not rated for dropped weights. A 45-pound dumbbell will tear straight through foam and dent the hardwood underneath, so keep foam to the cardio and mobility zones.
Carpet Tiles and Padded Rolls
For treadmills, ellipticals, and stationary bikes, a dense low-pile carpet tile or a rolled rubber runner reduces vibration noise and catches machine feet without adding much height. Pair it with felt pads under each foot for extra insurance.
Add a Moisture Barrier First
This step gets skipped and it is the one that quietly ruins floors. Sweat and condensation collect under rubber mats where you cannot see them, and hardwood trapped against damp rubber will cup and discolor. Before laying anything, roll out a thin 6-mil polyethylene sheet or a breathable felt underlayment across the hardwood.
Do not fully seal the wood against the subfloor if you are in a humid basement; you want the moisture to have somewhere to go. In most above-grade rooms, a felt gym-mat underlayment at around $0.30 per square foot is the safer choice because it wicks moisture and adds a little sound deadening.
Build a Dedicated Lifting Platform
If you deadlift or clean, build a platform rather than relying on mats alone. A classic DIY platform is 8 feet by 4 feet: two layers of 3/4-inch plywood or OSB laid perpendicular, topped with a horse stall mat in the center where the bar lands, and hardwood or rubber on the outer strips where the plates rest. Total material cost is usually $120 to $180.
The platform spreads the load across the entire footprint instead of driving it into a few boards, and the stacked plywood absorbs and distributes drop energy. Set it directly on your moisture barrier, not screwed into the hardwood. Its own weight, roughly 200 pounds, keeps it from shifting.
Protect Against Point Loads and Scratches
Racks, benches, and machines do damage even when nothing is dropped. A power rack with 300 pounds loaded concentrates enormous pressure on four small feet. Slide rubber or high-density crumb pads under every contact point, or better, set the rack on a full sheet of rubber flooring.
- Use non-marking rubber feet or 1/4-inch rubber squares under rack and bench legs.
- Never drag equipment across hardwood — lift it or use furniture sliders.
- Add adhesive felt pads to dumbbell rack bases and any metal edges.
- Keep chalk and metal shavings swept up; grit acts like sandpaper underfoot.
How Much Weight Can Hardwood Handle?
Standard 3/4-inch solid oak over a properly framed floor easily supports the static load of home gym equipment; a loaded rack and a lifter together are well within residential floor ratings of about 40 pounds per square foot live load. The concern is never the floor collapsing. It is surface damage and, in older homes, floor joists that flex enough to make heavy machines bounce.
If your gym is on a second story and you feel the floor move, position the heaviest equipment along a wall directly above a joist or, ideally, near a load-bearing wall where the framing is stiffest. A basement slab is always the best location if you have the option.
Installation Tips That Save Your Floor
Getting the layout right the first time prevents a lot of headaches. Work through it in this order:
- Clean and dry the hardwood completely, then vacuum every speck of grit.
- Roll out your moisture barrier or felt underlayment wall to wall.
- Lay heavy rubber tiles or stall mats in the lifting zone first.
- Fill cardio and stretching zones with foam or carpet tiles.
- Leave a 1/4-inch gap at the walls so mats can expand without buckling.
- Set equipment in place last, with pads under every foot.
One more pro tip: give new rubber a couple of weeks and good ventilation before you close up the room. The smell fades, and you avoid trapping off-gassing against the wood finish.
When You Should Not Cover Hardwood at All
If your training is genuinely light — bands, bodyweight, light dumbbells under 20 pounds — a good area rug with a felt pad may be all you need, and it keeps the room looking like a living space. Reserve the full rubber build-out for real strength training. There is no reason to bury a beautiful floor under an inch of rubber if you will never drop a weight on it.
The Bottom Line
Protecting hardwood in a home gym comes down to matching the material to your training and never letting moisture sit against the wood. For serious lifting, layer a moisture barrier, a plywood-and-stall-mat platform, and 3/4-inch rubber tiles. For lighter workouts, foam or carpet tiles over a felt underlayment do the job. Done right, home gym flooring over hardwood lets you train hard at home while keeping the floor underneath in refinish-worthy condition for the day you decide to reclaim the room.
Prefer to explore on your own?
See how new flooring looks in your actual room in seconds — free, no signup.
Try the free Floor Studio →