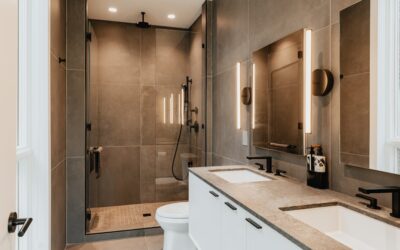
If you are budgeting a bathroom remodel, one of the first questions you will ask is how much to tile a shower from start to finish. The honest answer is that it depends, on the size of the enclosure, the tile you pick, the waterproofing system, and your local labor rates. Still, you can build a reliable estimate once you understand the moving parts.
Part of our Bathroom Remodeling & Flooring guide — explore the full guide →
This guide breaks the project into materials, labor, and the hidden costs people forget, then walks through realistic ranges so you can plan with confidence. Treat every figure here as a planning estimate, not a quote.
What Drives the Total Cost
Two showers of the same size can cost wildly different amounts. The biggest variables are the tile itself, the complexity of the layout, and the waterproofing method behind the tile. A simple subway running-bond surround in ceramic costs a fraction of a floor-to-ceiling marble installation with a niche, bench, and herringbone accent band.
Geography matters too. Labor in a major metro area can run double what a rural contractor charges. The condition of what is behind your old tile, especially if there is water damage, can also swing the budget once demolition begins.
Measuring Your Shower’s Square Footage
Before pricing anything, calculate how much tile you actually need. Measure each wall’s height and width, multiply for square footage, and add the floor if you are tiling it.
- Measure each wall: height times width in feet equals square feet per wall.
- Add the walls together for total wall area.
- Add the shower floor (length times width) if tiling it.
- Subtract large openings like the door, but keep it simple.
- Add 10 to 15 percent for cuts, waste, and future repairs.
A typical alcove shower with three walls at about 60 inches wide and tiled to roughly 6 feet high lands somewhere around 80 to 100 square feet of wall tile, plus the floor.
Tile Material Costs
Tile pricing spans a huge range. Here are general per-square-foot estimates for the tile alone:
- Basic ceramic: roughly 1 to 5 dollars per square foot.
- Porcelain: roughly 3 to 10 dollars per square foot.
- Natural stone (marble, travertine): roughly 7 to 25 dollars per square foot.
- Glass and mosaic accents: often 10 to 40 dollars per square foot.
Do not forget the supporting materials. Thin-set mortar, grout, waterproofing membrane or backer board, sealer, trim pieces, and a drain or curb can add several hundred dollars to even a modest shower.
Labor Costs for Tiling a Shower
Labor is usually the largest line item. Professional tile installation commonly runs about 10 to 25 dollars per square foot, with intricate patterns, small mosaics, and stone pushing toward the high end because they take longer to set and cut. Many tile setters price showers as a full job rather than strictly per square foot, since the waterproofing, niche, and floor pan involve specialized work.
Expect to pay more if your contractor also handles demolition of the old shower, plumbing adjustments, or repairs to damaged framing. These are worth doing right, because a shower that leaks behind the tile causes expensive structural problems later.
Realistic Total Project Estimates
Putting it together, here is how a typical tiled shower might shake out. These are broad ranges meant for planning:
- Budget ceramic surround, simple layout: roughly 1,500 to 3,000 dollars.
- Mid-range porcelain with a niche and tiled floor: roughly 3,000 to 6,000 dollars.
- High-end stone, custom patterns, bench and niche: roughly 6,000 to 12,000 dollars or more.
The spread is wide because a small ceramic refresh and a large custom stone enclosure are genuinely different projects. Getting two or three itemized bids is the only way to pin down your number.
Hidden Costs People Forget
Surprises usually come from what you cannot see until demolition starts. Budget a cushion for these common extras:
- Waterproofing membrane or backer board behind the tile.
- A new shower pan, drain, or curb if the old one is failing.
- Repairs to studs or subfloor if there is hidden water damage.
- Plumbing valve or fixture upgrades while the wall is open.
- Permits, where local code requires them.
I tell homeowners to set aside an extra 10 to 20 percent contingency. On a remodel, the wall almost always hides at least one surprise.
DIY vs. Hiring a Pro
Tiling a shower is one of the more demanding DIY projects because waterproofing has zero margin for error. A handy homeowner can absolutely tile a surround, but the membrane, pan slope, and corners must be perfect, or water finds its way into the framing. If you go the DIY route, you save the labor portion but take on the risk.
For a full shower with a custom pan, hiring a licensed, experienced tile installer is money well spent. Ask to see photos of past showers, confirm the waterproofing system they use, and make sure the bid follows manufacturer specifications for the membrane and mortar.
How Tile Choice Swings the Budget
It is worth understanding just how much the tile itself moves the needle. Larger tiles, like 12-by-24-inch porcelain, go up faster and cost less in labor than small mosaics, which require painstaking alignment. A penny-round or 1-inch mosaic floor can double the setting time of a simple large-format floor, and that time shows up in your bill.
Natural stone adds cost beyond the material price too. Marble and travertine need sealing, careful handling, and slower cuts, all of which raise labor. If you love the look of stone but not the price, a porcelain that mimics marble gives you most of the aesthetic at a fraction of the cost and upkeep. Spending strategically here, splurging on a small accent rather than the whole shower, keeps the project beautiful without blowing the budget.
Getting the Best Value
You do not have to spend the most to get a great result. Choose a durable porcelain in a larger format to reduce grout lines and labor, use a few pricier accent tiles as a feature rather than tiling the whole shower in them, and prioritize the waterproofing over flashy finishes. A well-built shower in modest tile outlasts a beautiful one that was rushed.
Knowing how much to tile a shower comes down to measuring carefully, understanding material and labor ranges, and budgeting for the things behind the wall. Plan for the full scope, get itemized bids, and you will avoid the sticker shock that catches so many homeowners mid-project.
Prefer to explore on your own?
See how new flooring looks in your actual room in seconds — free, no signup.
Try the free Floor Studio →