Replacing a worn or discolored light switch is one of the most approachable electrical jobs a homeowner can tackle, yet a surprising number of people call an electrician for a 20-minute fix. Learning how to connect a light switch correctly comes down to three principles: cut the power, match each wire to the right terminal, and tighten every connection until it cannot move. Do those, and you will have a switch that works cleanly and safely for decades. This guide walks through the standard single-pole switch, the type controlling most lights in your home.
- Gather Your Tools First
- Step 1: Shut Off the Power
- Step 2: Study the Existing Connections
- Step 3: Understand the Terminals
- Step 4: Prepare the Wires
- Step 5: Connect the Switch
- Step 6: Fold the Wires and Mount the Switch
- Step 7: Restore Power and Test
- Choosing the Right Replacement Switch
- Troubleshooting and Safety Notes
Gather Your Tools First
Keeping the right tools within reach means you never have to leave an open box unattended. You will need a non-contact voltage tester, a flathead and Phillips screwdriver, wire strippers, needle-nose pliers, and possibly a pack of wire nuts. A headlamp helps once the breaker is off and the room goes dark. Buy a quality switch rather than the cheapest model — a $4 spec-grade switch has far better screw terminals than a $1 builder-grade unit and will outlast it many times over.
Step 1: Shut Off the Power
Go to your electrical panel and switch off the breaker feeding the light. Return to the switch, remove the cover plate, and hold a non-contact voltage tester near the wires. It should stay silent. Then unscrew the switch from the box, pull it forward, and test again directly on the terminals to be absolutely certain the circuit is dead. Never rely on the wall switch position alone — only the tester confirms it is safe.
Step 2: Study the Existing Connections
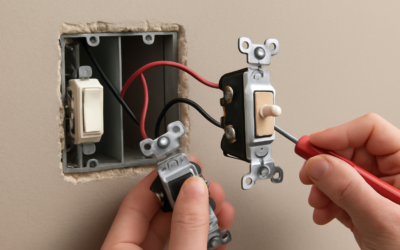
Before disconnecting anything, note how the old switch is wired. On a single-pole switch you will typically find two black (or one black and one re-marked white) hot wires on the brass screws and a green or bare copper ground on the green screw. Snap a photo with your phone. This picture is your insurance policy — if you get confused later, you can wire the new switch exactly like the old one.
Step 3: Understand the Terminals
A single-pole switch has a small number of connection points, each with a purpose:
- Two brass screws: These carry the hot wire. One takes power coming from the panel; the other sends switched power to the light. On a basic single-pole switch, either brass screw works for either hot wire.
- Green screw: The ground. It connects to the bare copper or green wire and to the metal box.
- The neutral (white) wires: On most single-pole setups these bundle together with a wire nut and do not attach to the switch at all.
Step 4: Prepare the Wires
Disconnect the old switch. Inspect the exposed copper — if it is nicked, corroded, or blackened, clip it back and strip a fresh 3/4 inch of insulation. Clean, straight wire ends make a solid connection. Bend each hot wire into a small hook that will wrap around a terminal screw in the direction the screw tightens, which is clockwise. This way, snugging the screw pulls the wire tighter instead of pushing it out.
Step 5: Connect the Switch
Now the core of the job. Follow this order for a clean, safe connection:
- Hook the first hot wire around one brass screw and tighten firmly with your screwdriver.
- Hook the second hot wire around the other brass screw and tighten.
- Attach the ground wire to the green screw; if the box is metal, add a short pigtail so the box is grounded too.
- Tug each wire gently to confirm none pull loose.
Skip the push-in “back-stab” holes on the back of the switch even if your switch has them. Screw terminals grip far more reliably and are the main reason a switch lasts for years without arcing.
Step 6: Fold the Wires and Mount the Switch
Carefully fold the wires accordion-style back into the box so nothing gets pinched. Push the switch in, keeping it upright, and drive the mounting screws into the box. A small level helps you set it perfectly straight before the plate goes on. Attach the cover plate last.
Step 7: Restore Power and Test
Head back to the panel and switch the breaker on. Flip your new switch — the light should respond instantly with no flicker or buzz. Let it run for a few minutes and then touch the plate; it should stay cool. A warm switch or any crackling sound means a loose connection, so shut the breaker off and retighten every screw.
Choosing the Right Replacement Switch
Not all switches are the same, and picking the right one makes the job easier and the result better. Toggle switches are the classic, cheapest option, while rocker (decora) switches offer a wider, more modern paddle that many homeowners prefer. If you want to control light levels, a dimmer switch replaces a standard single-pole switch in the same footprint — just confirm the dimmer is rated for your bulb type, since many older dimmers flicker with LED bulbs unless labeled LED-compatible. For spec-grade reliability, look for a switch rated at 15 or 20 amps with a “commercial” or “spec grade” label; its screw terminals and internal contacts far outlast builder-grade units. Check the amp rating against your circuit as well — a 20-amp circuit calls for a 20-amp-rated switch. Spending an extra couple of dollars on a quality switch means you will not be back in the same box within a few years.
Troubleshooting and Safety Notes
If the light does not come on, first confirm the bulb works and the breaker is on. A dead switch after correct wiring is rare, but a faulty new unit does happen occasionally. For three-way switches — where two switches control one light — the wiring differs and involves traveler wires, so do not assume the single-pole method applies. And if you ever open a box and find aluminum wiring, cloth insulation, or a tangle you cannot decode, stop and call a licensed electrician. Knowing how to connect a light switch is a genuinely useful skill, but respecting the limits of a DIY repair is part of doing it well.