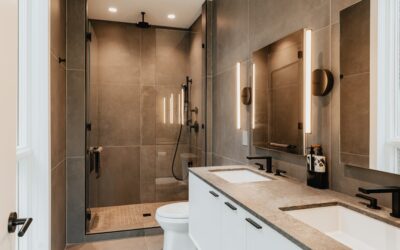
The most common failure in installing a steam shower is not the generator. It is the enclosure. A regular shower only gets wet on the surface, but steam pushes warm, saturated air into every grout joint, screw hole and gap at the ceiling. If the walls and ceiling are not built as a sealed, vapor-proof box, moisture ends up in the framing and mold follows within a year or two.
Part of our Bathroom Remodeling & Flooring guide — explore the full guide →
Plan the job in this order: pick a generator location with service access, have a licensed electrician run a dedicated circuit, have a plumber supply water and a drain line to the generator, build a fully sealed vapor-proof enclosure with a sloped ceiling, set the steam head low and away from seating, then tile and install a floor-to-ceiling sealed door. Most of the work is standard tile shower construction done to a stricter standard.
- Planning Before Installing a Steam Shower
- Step 1: Choose the Generator Location
- Step 2: Electrical and Plumbing Rough-In
- Step 3: Build a Vapor-Proof Enclosure
- Step 4: Place the Steam Head and Controls
- Step 5: Tile the Enclosure
- Step 6: Install a Sealed Door
- Steam Shower Tub Combination Options
- Scald and Mold Safety
- Troubleshooting Common Problems
- Cost Ranges
- When to Call a Licensed Professional
- Frequently Asked Questions
We cover each stage, including a steam shower tub combination, plus tile choices, costs and when to call licensed trades.
Planning Before Installing a Steam Shower
Start with the enclosure size. Steam generators are rated by the cubic footage they can fill, and that rating changes with wall materials. Measure length, width and height, multiply to get cubic feet, then follow the generator maker’s adjustment factors. Stone and solid tile walls absorb more heat than acrylic, so they typically call for a larger unit. A 4 by 5 foot shower with an 8 foot ceiling is 160 cubic feet before adjustments.
Keep the ceiling as low as practical. Many builders drop the ceiling to around 7 to 8 feet, because every extra foot of height adds volume the generator has to heat.
Tools and Materials
- Steam generator sized to the enclosure, with steam head and control
- Vapor-proof waterproofing membrane rated for steam rooms (sheet or liquid system with a low perm rating)
- Cement board or foam board substrate, fasteners and seam tape per the membrane system
- Sloped ceiling framing (blocking or a pre-sloped panel)
- Porcelain or ceramic tile, thinset rated for wet areas, and a stain-resistant grout
- Floor-to-ceiling glass door with a transom or full seal
- Pipe for the steam line (usually copper), insulation for the steam line
Step 1: Choose the Generator Location
The generator is a small box, often about the size of a carry-on bag. It must sit outside the shower, within the maximum steam-line distance in its manual, commonly 25 feet or less. Common spots are a vanity cabinet, a linen closet, an attic above the bath (if conditions permit) or a basement below.
- Leave access for service, draining and descaling. Never seal it behind drywall.
- Keep it level and away from freezing temperatures.
- Plan for a drain or safety pan beneath it as the manual requires.
- Keep the steam line as short as possible with a steady slope back toward the generator or the steam head per instructions, so condensation drains.
Step 2: Electrical and Plumbing Rough-In
Steam generators run on 240V and need a dedicated circuit sized to the unit, often in the 30 to 60 amp range depending on the model. This is licensed electrician work, with a permit in most areas. The control panel inside the shower and any wiring to it follow the maker’s low-voltage cable routing. The line-voltage supply is separate.
If you are opening walls near existing wiring, turn off the breaker and confirm power is off with a non-contact voltage tester before cutting or touching anything. Never probe or measure voltage on a live circuit. Bathroom receptacles near the shower need GFCI protection, and any lighting inside the enclosure must be rated for wet, steam locations.
On the plumbing side, a cold water line (some models accept hot) feeds the generator through a shutoff valve. Many units also need a drain connection for their automatic drain or a safety relief valve. Shut off the water and relieve pressure before cutting into lines. Supply, drain and relief connections should meet local plumbing code, and a licensed plumber is the right call if you are unsure.
Step 3: Build a Vapor-Proof Enclosure
This is the step that matters most when installing a steam shower, and it separates a steam enclosure from a regular one. The waterproofing must be vapor-proof, not just water-resistant.
- Frame the walls and ceiling solid. Add blocking for the bench, the door hardware and any grab bars.
- Slope the ceiling. Pitch it about 1 to 2 inches per foot toward a wall or away from seating so condensation runs down the walls instead of dripping on your head.
- Install substrate. Hang cement board or foam board on walls and ceiling per the membrane system’s instructions.
- Apply the membrane continuously. Run it over walls, ceiling, bench and pan, overlapping or taping every seam and corner. Seal every penetration: steam head, control, valves and niches.
- Flood test the pan. Plug the drain and fill the pan for at least 24 hours to check for leaks before tiling.
Do not add a separate plastic vapor retarder behind the board if your membrane is on the face. Two vapor barriers can trap moisture between them. Follow one tested system from start to finish.
Step 4: Place the Steam Head and Controls
Mount the steam head about 6 to 12 inches above the floor, per the manual, and away from the bench. Steam exits very hot, so place it where feet and legs will not be near it, and never directly across from seating. Some installers add a cover or deflector for extra protection.
The control panel goes inside the shower, usually around 4 to 5 feet high and away from the direct steam path. A second remote control outside the door is handy for preheating.
Step 5: Tile the Enclosure
Porcelain tile is the safest choice: it is dense, absorbs very little water and handles repeated heating well. Glazed ceramic works too. Natural stone can be used but is more porous and needs sealing, and some softer stones may etch or discolor with steam.
- Use large-format tiles on walls to reduce grout lines, and smaller mosaics on the floor for slip resistance.
- Choose a stain-resistant or epoxy grout that stands up to constant moisture.
- Use a flexible sealant, not grout, at changes of plane: wall to floor, wall to ceiling and inside corners.
- Slope the bench seat slightly toward the drain so water does not pool.
Step 6: Install a Sealed Door
The door must hold steam in. That usually means glass from the curb to the ceiling, either full height or with an operable transom panel above the door. Standard shower doors with a gap at the top will leak steam into the bathroom and waste generator capacity.
Look for tempered glass at least 3/8 inch thick, sweeps along the bottom and seals along the vertical edges. The door should swing outward for safety. Many owners add a small vent or transom they can open after use to let the enclosure dry.
Steam Shower Tub Combination Options
A steam shower tub combination adds a tub inside the enclosure. It needs the same sealed walls, ceiling and door, and the enclosure volume is larger, so size the generator accordingly. The tub apron, deck and surrounding walls must all fall inside the vapor-proof membrane. Prefabricated combo units with molded acrylic walls and a built-in steam generator are another option, and they install faster, though they still need the dedicated circuit and water line.
Scald and Mold Safety
- Keep the anti-scald settings on the control and generator as set by the maker. Do not bypass temperature limits.
- Set your water heater to a safe temperature and use an anti-scald shower valve for the regular shower head.
- Let the generator cool and relieve pressure per the manual before any maintenance or descaling.
- Run the bathroom exhaust fan during and after use, and leave the door or transom open afterward to dry the enclosure.
- If you find mold during a remodel, fix the moisture source first. Areas larger than about 10 square feet call for a mold remediation pro.
Safe Use
Follow the session time limits in the manual. Never use a steam shower alone after drinking alcohol. Check with a doctor before use if you are pregnant or have heart or blood-pressure conditions. Children should be supervised at all times.
Troubleshooting Common Problems
Not enough steam: The generator may be undersized for the enclosure, or steam escapes through a gap above the door. Seal the enclosure and check the sizing.
Dripping from the ceiling: The ceiling slope is too shallow or runs the wrong way.
Stains or loose tile outside the shower: Vapor is getting past the membrane. Stop using the shower and have the enclosure inspected.
Generator scale buildup: Hard water leaves minerals. Follow the descaling schedule, or install a water softener.
Cost Ranges
Converting an existing tile shower often runs a few thousand dollars for the generator, door and electrical work. A full custom steam shower with new framing, membrane, tile and glass commonly costs $8,000 to $20,000 or more depending on size and finishes. Generators alone range from roughly $1,000 to several thousand.
When to Call a Licensed Professional
When installing a steam shower, the 240V dedicated circuit must be installed by a licensed electrician, and most jurisdictions require a permit and inspection. Hire a licensed plumber for the supply line, drain and relief connections. Many homeowners also hire an experienced tile setter who has built steam enclosures before, since a flaw in the membrane is expensive to fix after tile goes up.
Frequently Asked Questions
Can I convert my existing shower into a steam shower?
Only if the walls and ceiling can be made vapor-proof and a full-height door can be installed. Many existing showers need the tile removed to add the proper membrane.
Where should the steam generator go?
Outside the shower, within the maker’s maximum steam-line distance, in an accessible spot such as a vanity, closet, attic or basement.
Why does a steam shower ceiling need a slope?
A sloped ceiling lets condensation run down the walls instead of dripping on the person using the shower.
What tile works best when installing a steam shower?
Porcelain is the top choice because it absorbs very little moisture. Glazed ceramic also works. Natural stone needs sealing and extra care.
Does a steam shower need its own circuit?
Yes. Generators typically need a dedicated 240V circuit sized to the unit, installed by a licensed electrician.