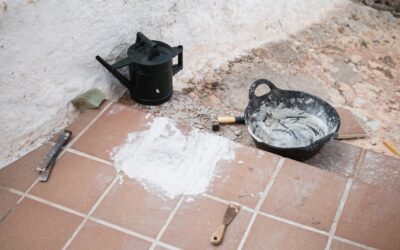
Pulling up tile is loud, dusty work, but on a concrete slab the tile is usually the easy part. The real labor is the thinset left behind, which has to come off if the new floor is going to lie flat. Knowing how to remove tile from concrete efficiently means breaking the first tile in the right spot, letting a rotary hammer do the heavy lifting and grinding the slab smooth without filling the house with silica dust.
Part of our Tile & Grout guide — explore the full guide →
The process in brief: clear the room and seal it off, test any old adhesive for asbestos, break out a starter tile, chisel the rest at a low angle with a rotary hammer or a hammer and chisel, scrape or grind the remaining thinset, then vacuum and check the slab for flatness. A typical 150 sq ft room takes one to two days for one person with a rental rotary hammer.
Ceramic and porcelain tile set in thinset on a slab is the most common scenario. Older vinyl tile glued down with black mastic is a different job with different hazards, and testing comes first.
How to Remove Tile From Concrete: Plan and Prepare
Start by deciding what the slab needs to look like for the new floor. Floating floors like laminate and luxury vinyl plank tolerate small ridges if the slab is flat to about 3/16 inch over 10 feet. Glue-down flooring, new tile and sheet vinyl need a much cleaner, smoother surface. That standard drives how much thinset removal you will do.
Remove baseboards, door casings that will be in the way and transition strips. Take doors off their hinges. Cover HVAC returns and registers with plastic and tape, and turn the system off while you work, so dust does not circulate through the ducts. Hang plastic sheeting over doorways with a zip door if possible.
Safety First: Silica Dust and Asbestos
Breaking and grinding tile, grout, thinset and concrete releases crystalline silica, which damages the lungs. Wear a properly fitted N95 at minimum and preferably a half-face respirator with P100 filters, plus eye protection, hearing protection, heavy gloves, long sleeves and sturdy boots. Mist the work area lightly with a spray bottle to keep dust down while chiseling, and use a grinder with a dust shroud connected to a HEPA-filtered vacuum. Clean with the HEPA vacuum, never by dry sweeping.
Older tile, the mastic beneath it and some adhesives used before the 1980s may contain asbestos. Black, tar-like cutback adhesive and 9 inch by 9 inch vinyl tiles are classic warning signs, but ceramic tile thinset is not risk-free in very old homes either. Send a sample to an accredited lab before you break or grind anything you are unsure about. If it tests positive, stop and hire a licensed abatement contractor. If any trim or walls near the floor were painted before 1978, test for lead before sanding or demolition as well.
Tools and Materials
- Rotary hammer (SDS-plus or SDS-max) with a 1.5 to 3 inch wide tile chisel bit and a flat chisel
- Small sledge or 3 lb hammer and a cold chisel for the starter tile and edges
- Long-handled floor scraper with replaceable blades
- Angle grinder with a diamond cup wheel and a dust shroud, or a rental floor grinder
- HEPA shop vacuum
- Respirator, safety glasses, hearing protection, knee pads and heavy gloves
- Contractor bags or a rented dumpster (tile is heavy; bags should be only half full)
- Spray bottle, plastic sheeting and tape
- Straightedge, 6 to 10 feet long, for checking flatness
Step-by-Step Tile Removal
1. Break the first tile
Choose a tile in the middle of a run or one that already sounds hollow when tapped. Strike its center with a small sledge to crack it, then chisel out the pieces. Once there is an open edge, every neighboring tile can be attacked from the side instead of from the top, which is far more effective.
2. Chisel at a low angle
Fit the rotary hammer with a wide tile bit and set it to hammer-only mode. Hold it at roughly a 30 degree angle, aim the blade at the thinset layer under the edge of the next tile and let the tool work. Do not lean your full weight on it; steady pressure lifts tiles in whole pieces or large shards. Hollow, poorly bonded tiles pop free. Well-bonded porcelain breaks into pieces, which is normal.
3. Clear as you go
Shovel broken tile into a heavy-duty bucket or half-filled bags every few square feet. Piles of shards are trip and cut hazards. Mist dust between passes.
4. Work the edges by hand
Along walls, cabinets and door jambs, switch to a hammer and cold chisel to avoid damaging drywall and toe kicks.
Removing Thinset From the Slab
After the tile is gone you will see ridges of thinset, often 1/8 to 1/4 inch tall. There are three ways to deal with them.
- Chisel and scrape. Run the rotary hammer with a flat or wide scaling chisel just above the slab surface to knock down ridges, then follow with a long-handled scraper. This is fast and dust-light but leaves a rough surface.
- Angle grinder with a diamond cup wheel. Grinds thinset nearly flush with the slab and leaves a clean profile. Always use a dust shroud and HEPA vacuum. It is slow on big rooms.
- Rental floor grinder. A walk-behind grinder with diamond segments and a dust extractor covers large areas quickly and leaves the slab ready for glue-down floors.
For floating floors, chiseling the high spots and scraping may be enough. For new tile or glue-down floors, grind until the slab is smooth and free of loose material. Small low spots can then be filled with a patching compound, and larger dips with a self-leveling underlayment.
Checking the Slab
Lay a long straightedge across the floor in several directions. Mark high spots with chalk for more grinding and low spots for patching. Look for cracks: hairline shrinkage cracks are normal, but cracks wider than 1/8 inch or with one side higher than the other suggest movement that should be evaluated before new flooring goes down. Vacuum thoroughly and damp-mop once to pick up fine dust before any primer or underlayment.
Troubleshooting
- Tiles break into tiny pieces. The bond is excellent. Lower the chisel angle and attack the thinset line, not the tile face.
- The chisel bounces off. Use a sharper or wider bit, or step up to a larger rotary hammer. Dull bits waste hours.
- There is a membrane under the tile. Uncoupling membranes or crack isolation sheets peel or scrape off after the tile is removed; the thinset under them comes up with a scraper.
- Black adhesive appears. Stop and test for asbestos before going further.
- Radiant heat cables in the floor. Electric heating mats are embedded in thinset. Turn off the breaker for the floor heat, confirm power is off with a non-contact voltage tester, and work carefully; the system will likely need replacement anyway.
Cost to Remove Tile From a Slab
Renting a rotary hammer typically costs $50 to $100 per day, and a walk-behind floor grinder with a dust extractor more. Chisel bits, diamond cup wheels and a respirator add $50 to $200. Disposal can be the surprise: tile and thinset are dense, so a 150 sq ft room can fill a small dumpster by weight. Professional tile removal often runs a few dollars per square foot, rising for well-bonded porcelain, large rooms with heavy grinding or asbestos abatement.
When to Call a Pro
Hire professionals if testing shows asbestos, if the space is large and dust control would be hard to manage, or if you find significant slab cracks or moisture problems. Contractors with industrial grinders and dust extraction can remove tile and prep a slab in a fraction of the time. For a single room with a healthy back and the right tools, though, learning how to remove tile from concrete yourself saves real money and leaves you in control of how flat the finished slab ends up.
Frequently Asked Questions
What is the fastest way to pull up tile from concrete?
A rotary hammer with a wide tile chisel bit, set to hammer-only mode and held at a low angle, is the fastest method. Start by breaking one tile in the middle to create an edge.
Do I have to remove all the thinset?
It depends on the new floor. Floating floors need the slab flat with ridges knocked down. Glue-down flooring and new tile need the slab ground smooth and clean.
Can I reuse the tiles I remove?
Rarely. Tiles bonded well to a slab usually crack during removal. Loose, hollow tiles may come up whole, but plan on new tile.
How do I control dust when grinding thinset?
Use a grinder with a dust shroud connected to a HEPA vacuum, seal off the room, turn off the HVAC system and wear a respirator with P100 filters.
How long does it take to remove tile from a concrete floor?
A 150 sq ft room usually takes one to two days for one person, including thinset removal. Large rooms or very well-bonded porcelain take longer.
Prefer to explore on your own?
See how new flooring looks in your actual room in seconds — free, no signup.
Try the free Floor Studio →