The inside shower is where good bathroom design either earns its keep or quietly fails. Everything that happens between the walls of the shower, from the slope of the floor to the height of the niche, decides whether the space stays watertight, easy to clean, and comfortable to use every day. Homeowners tend to obsess over tile color and fixtures while overlooking the unglamorous fundamentals like waterproofing and drainage. This guide covers both the function and the finish so your shower performs as well as it looks.
Part of our Bathroom Remodeling & Flooring guide — explore the full guide →
Start With Waterproofing, Not Tile
Tile is not waterproof. Grout absorbs moisture, and water that gets behind the tile is what rots framing and breeds mold. The waterproofing layer behind the tile is the system that actually keeps your wall cavity dry. Modern showers use either a sheet or liquid waterproofing membrane over the backer board, or a foam board system designed for showers. Whatever the method, every seam, corner, and penetration must be sealed.
The shower floor needs a sloped pan that directs water to the drain, generally about a quarter inch of fall per foot. Skip or shortcut this layer and no amount of premium tile will save you from a leak two years later.
Choosing Materials for the Walls and Floor
Inside a shower, materials face constant moisture, so durability and slip resistance matter as much as appearance. Here are the most common surfaces and how they hold up.
- Porcelain tile: The default choice. Dense, water-resistant, and available in countless looks including stone and wood imitations.
- Ceramic tile: More budget-friendly than porcelain and fine for walls, though slightly more porous.
- Natural stone: Marble and travertine look luxurious but are porous and require periodic sealing to resist staining.
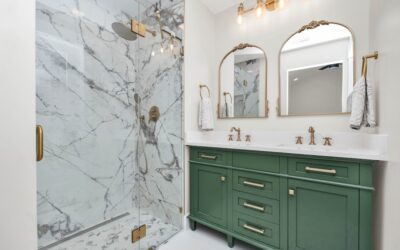
- Large-format slabs: Big porcelain panels minimize grout lines, which means less cleaning and fewer places for mildew to grow.
- Solid surface or acrylic: Seamless, easy to clean, and a practical alternative to tile for the budget-conscious.
For the floor specifically, choose a small mosaic tile or a textured surface. Smaller tiles mean more grout lines, which improve traction, and the COF (coefficient of friction) rating helps you compare slip resistance.
Smart Features Worth Building In
The best time to add convenience features is during construction, when they cost a fraction of a later retrofit. A recessed shampoo niche keeps bottles off the floor and is essentially free to add while the walls are open. Position it around chest height on a wall away from the direct spray. A built-in bench or seat adds comfort and accessibility, and a curbless entry creates a clean, modern look that also works for aging in place and wheelchair access.
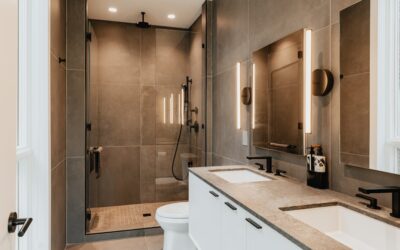
Consider a linear drain if you want large-format floor tile, since it allows the floor to slope in a single direction rather than to a central point. Think through these decisions before the tile goes up.
Fixtures and Controls
Plan your fixtures around how you actually shower. A fixed rain head feels luxurious but offers little control, so pairing it with a handheld sprayer gives you flexibility for rinsing, cleaning, and bathing kids or pets. A thermostatic or pressure-balancing valve prevents the temperature spikes that happen when someone flushes a toilet elsewhere in the house, a worthwhile upgrade for both comfort and safety.
Mount the valve and controls within easy reach of the entry so you can turn the water on and let it warm up without standing in the cold spray. Small ergonomic choices like this separate a thoughtfully designed shower from a merely functional one.
Glass, Curbs, and Enclosure Options
How you enclose the shower affects both the look and the practicality of the space. A frameless glass panel or door creates an open, airy feel and shows off your tile work, while keeping the bathroom visually larger. Framed enclosures cost less but read as more dated and collect grime in the frame tracks. A simple shower curtain remains the budget option, though it does little to contain spray in an open layout.
The curb decision matters too. A traditional curbed shower has a small lip that keeps water in, which is reliable and easy to waterproof. A curbless or zero-threshold entry looks sleek and improves accessibility, but it demands precise floor sloping and a robust waterproofing job to keep water inside the wet zone. If you want curbless, get it right at the rough-in stage, because correcting drainage afterward means tearing out the floor.
Sizing and Comfort Considerations
An inside shower should feel comfortable, not cramped. A common minimum footprint is around 36 by 36 inches, but a more comfortable shower runs 36 by 48 inches or larger, giving you room to move and bend without bumping the walls. If space allows, a 60-inch run lets you add a bench and a second showerhead. Plan the showerhead height for the tallest user, generally mounting it around 80 inches or higher so you are not ducking under the spray.
Think about where the controls sit relative to the door, and leave room for towel access just outside the enclosure. These small ergonomic details determine whether the shower feels luxurious or merely adequate every single morning.
Ventilation and Maintenance
An inside shower generates a lot of humidity, and trapped moisture leads to mildew on grout and ceilings. A properly sized exhaust fan vented to the outdoors, run during and for 20 to 30 minutes after each shower, is the single best defense against mold. Squeegeeing the walls after showering also dramatically reduces water spots and soap scum.
Reseal natural stone and grout on the recommended schedule, and address any cracked grout or failing caulk promptly. A small grout crack is cosmetic today but an entry point for water tomorrow. Wiping down the glass and rinsing the floor weekly keeps soap scum from building into a stubborn film that is much harder to remove later.
Final Thoughts
A successful inside shower is built from the inside out: waterproofing first, durable slip-resistant surfaces second, and thoughtful features and fixtures layered on top. Invest in the parts you cannot see, plan your niches, bench, controls, and enclosure before tiling, size the space for real comfort, and keep up with ventilation and sealing. Get the fundamentals right and you will enjoy a shower that stays beautiful and leak-free for the long haul.