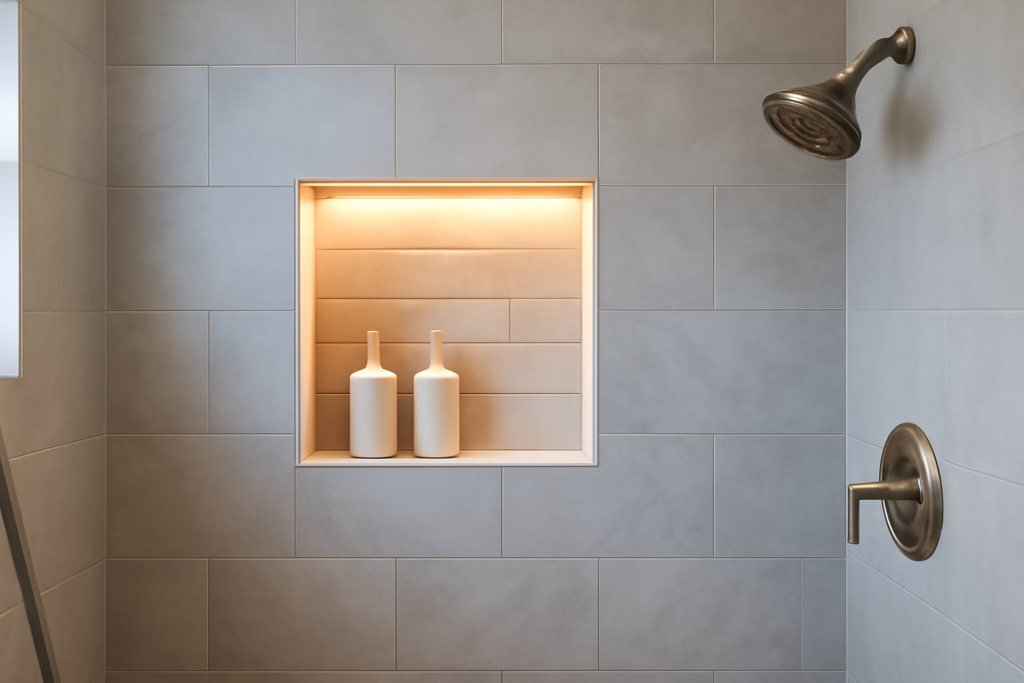
A recessed shower shelf is useful; add a soft glow to it and it becomes the detail people remember about your bathroom. A lighted shower niche integrates waterproof LED lighting into the recessed shelf, casting a warm, spa-like wash over the tile and making the niche both a functional storage spot and a design centerpiece. It’s a relatively small upgrade that punches far above its cost in visual impact, especially in a shower with beautiful stone or glass tile you want to highlight. But wet-location lighting demands the right products and careful electrical work. This guide covers the lighting options, waterproof ratings, wiring, costs, and how to plan one that’s both safe and stunning.
Part of our Bathroom Remodeling & Flooring guide — explore the full guide →
- Lighted Shower Niche: What It Actually Is
- LED Strip vs Puck Lights
- Waterproof Ratings You Must Not Skip
- Color Temperature and Controls
- What It Costs
- Installation and Wiring Basics
- Placement and Design Tips
- Troubleshooting and Long-Term Reliability
- Alternatives if You Can't Rewire
- Is a Lighted Niche Worth It?
Lighted Shower Niche: What It Actually Is
A lighted shower niche is a standard recessed wall niche with LED lighting built into it, most often a strip of waterproof LED tape mounted behind the front edge or along the top interior lip, so the light washes down over the shelf and your bottles without glaring into your eyes. The effect is a gentle, ambient glow that turns the niche into a lit feature, much like accent lighting in a display cabinet. Some designs also serve as subtle night lighting, so you can find your way in a dark bathroom. Because it lives inside a wet shower, every component must be rated for wet locations and installed to strict electrical safety standards, which is the main thing separating this from a decorative accent elsewhere in the house.
LED Strip vs Puck Lights
You have two main lighting approaches, each with strengths.
- LED strip (tape) lighting: A continuous flexible strip that produces an even, seamless line of light along the niche edge. It’s the most popular choice for the clean, uniform glow that reads as high-end. Mount it behind the front lip so the strip itself is hidden and only the light shows.
- Puck lights: Small round recessed spotlights that create distinct pools of light. Better for spotlighting a single object or when you want a few points of light rather than a continuous line.
For most homeowners chasing that soft, even, wraparound glow, hidden LED strip lighting is the go-to. Puck lights suit a niche where you want to highlight a decorative item. Whichever you choose, position the light source so it’s concealed and only the reflected glow is visible; a strip that stares back at you ruins the effect.
Waterproof Ratings You Must Not Skip
This is the non-negotiable part. Any lighting inside a shower must be rated for wet locations, and LED strips are graded by an IP (Ingress Protection) rating. For a shower niche, use a strip rated at least IP65, and IP67 or IP68 for areas that get direct water contact. An IP65 strip resists water jets; IP67 and IP68 withstand temporary or continuous submersion. Do not use standard indoor LED tape in a shower; it will corrode and fail, and it’s an electrical hazard. Along with a waterproof strip, use a low-voltage system (typically 12V or 24V DC via a transformer/driver) so the wiring inside the wet zone runs at safe low voltage. The transformer itself must be located outside the wet area, in a dry, accessible spot.
Color Temperature and Controls
The look depends heavily on the light color. For a warm, relaxing spa feel, choose LEDs around 2700K to 3000K (warm white); for a crisp, clean look that shows tile detail accurately, 3500K to 4000K works. Avoid cold blue-white light, which feels clinical in a bathing space. Color-changing RGB or tunable-white strips are available if you want to shift the mood, controlled by a remote or a smart-home app. Consider putting the niche light on its own switch or a dimmer, separate from the main shower lights, so you can use it as gentle ambient or night lighting. A dimmer in particular lets you dial the glow up for cleaning and down for a relaxing soak.
What It Costs
A lighted niche is affordable relative to its impact, though professional electrical work adds to it.
- Waterproof LED strip kit (IP67, with transformer): $30 to $120.
- Prefabricated lighted niche insert: $150 to $400.
- Electrician for wiring and switch/dimmer: $200 to $600, more if a new circuit or GFCI is needed.
- Tile and niche construction (if part of a larger job): varies with the overall shower.
If you’re already tiling a shower, adding the lighting during construction is far cheaper and cleaner than retrofitting later. Total added cost for the lighting element alone is often $250 to $800 installed, a modest sum for a standout feature.
Installation and Wiring Basics
Planning happens before tile goes up, because the wiring and strip must be integrated into the waterproofed niche. The general sequence: frame and waterproof the niche as usual, run low-voltage wiring from the strip location out to the transformer in a dry area, mount the IP-rated LED strip behind the front lip or top edge, connect through the transformer to a switch or dimmer, and then tile over everything so only the light-emitting edge shows. All connections must be made with waterproof connectors and kept out of standing water. Crucially, the circuit must be GFCI-protected, as required for bathroom wet locations, and line-voltage components (the transformer and switch) stay outside the shower enclosure. Given the combination of water and electricity, hiring a licensed electrician for the wiring is strongly recommended even if you handle the tile work yourself.
Placement and Design Tips
Location follows the same logic as any niche: put it on a side wall or the wall opposite the showerhead, at a comfortable chest height around 48 to 52 inches to the center, away from direct spray. For the lighting specifically, mounting the strip along the top inside edge lets the glow wash down over the contents naturally, while a front-lip mount grazes light across the back tile to emphasize its texture, ideal for showcasing stone or glass mosaic. Align the niche with your surrounding tile grout lines for a built-in look, and choose a back tile that reflects light nicely, since glossy or glass tile amplifies the glow beautifully.
Troubleshooting and Long-Term Reliability
A well-built lighted niche is nearly maintenance-free, but knowing the common failure points helps you build one that lasts and diagnose issues if they arise. The most frequent problem is water intrusion into a connector or a strip that wasn’t rated high enough, which causes flickering or a dead section. This is why the IP rating and waterproof connectors are non-negotiable, and why the transformer and any splices belong outside the wet zone in a dry, accessible spot. If a strip does fail, the fix is far easier when the driver and connections were made reachable, for instance in an adjacent vanity cabinet or an access panel, rather than buried behind tile. Choose a quality LED strip with a good lifespan rating (many are rated for 30,000 to 50,000 hours) so you’re not reopening the wall for years. Should the lights dim unevenly over time, it’s usually the driver rather than the strip, and a matched replacement driver restores them. Building in accessibility from the start is the single best insurance for a fixture that lives in a wet wall.
Alternatives if You Can’t Rewire
If your shower is already finished and tearing into tile isn’t practical, you still have options for adding light to a niche without hardwiring. Battery-powered, waterproof LED puck lights with adhesive or magnetic mounts can be placed inside an existing niche and recharged or have batteries swapped periodically; look for units specifically rated for damp or wet use. Rechargeable motion-activated versions turn on when you reach in, doubling as handy night lighting. These won’t match the seamless, hidden glow of an integrated strip installed during construction, and they require occasional recharging, but they deliver much of the ambiance for a fraction of the effort and cost, with zero electrical work. For renters or anyone not ready to remodel, a quality waterproof battery puck is a genuinely useful stopgap. When you do eventually redo the shower, that’s the time to build in a proper hardwired, IP-rated strip for the polished, permanent result.
Is a Lighted Niche Worth It?
For a comparatively small investment, a lighted shower niche delivers outsized visual payoff, turning a practical shelf into a spa-like focal point and adding both ambiance and subtle night lighting. The keys to doing it right are using properly IP-rated waterproof LED strips on a low-voltage, GFCI-protected circuit, choosing a flattering warm color temperature, hiding the light source so only the glow shows, and planning it into the shower build before tiling. Bring in a licensed electrician for the wiring given the wet environment. Handle those essentials, and you’ll gain a striking, functional feature that makes every shower feel a little more like a retreat, and one that guests notice the moment they step in.