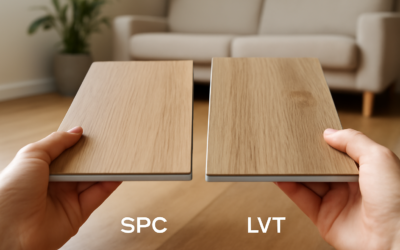
Luxury vinyl flooring installation is one of the most accessible flooring projects for homeowners willing to tackle it themselves. Whether you are working with click-lock planks, glue-down tiles, or loose-lay sheets, the process is straightforward when you understand the fundamentals of subfloor preparation, layout planning, and proper technique.
- Types of Luxury Vinyl Installation
- Tools and Materials
- Subfloor Preparation
- Click-Lock Installation: Step by Step
- Step 1: Acclimate
- Step 2: Install Underlayment (If Needed)
- Step 3: Plan the Layout
- Step 4: Install the First Row
- Step 5: Install Subsequent Rows
- Step 6: Cut Around Obstacles
- Step 7: Install the Last Row
- Step 8: Trim and Transitions
- Glue-Down Installation: Key Differences
- DIY vs. Professional Installation
- Common Installation Mistakes
- Installation Over Specific Subfloors
- Post-Installation Care
- Final Thoughts
This guide walks through every method of installing luxury vinyl flooring, from the initial subfloor inspection to the final trim work, with detailed instructions for both DIY installers and those hiring professionals.
Types of Luxury Vinyl Installation
Luxury vinyl flooring comes in three primary installation formats, each suited to different situations:
Click-Lock (Floating)
Click-lock is the most popular method for residential installations. Planks or tiles snap together via an interlocking tongue-and-groove mechanism and float over the subfloor without adhesive. The connected planks move as a single unit, accommodating minor expansion and contraction with the room’s temperature changes.
Best for: DIY installations, residential rooms, installations over existing hard flooring, basements, rooms with radiant heat
Glue-Down
Individual planks or tiles are adhered to the subfloor using a pressure-sensitive or full-spread vinyl adhesive. Glue-down creates a permanent, low-profile installation that does not move or shift under heavy traffic or rolling loads.
Best for: Commercial spaces, large open areas, rooms with heavy rolling traffic (office chairs, carts), bathrooms where maximum water protection is needed
Loose Lay
Loose-lay vinyl has a heavy backing or friction-grip underside that holds it in place by weight alone. No adhesive or locking mechanism is required. It is the easiest to install and the easiest to remove.
Best for: Rental properties, temporary installations, commercial spaces that need periodic flooring changes, areas over raised access flooring
Tools and Materials
Essential Tools
- Tape measure — for measuring the room and planks
- Utility knife with extra blades — the primary cutting tool for vinyl planks
- T-square or speed square — for marking straight cuts
- Tapping block and rubber mallet — for seating click-lock joints without damaging the locking mechanism
- Pull bar — for tapping the last plank in each row against the wall
- Spacers — 1/4-inch spacers maintain the expansion gap along walls
- Carpenter’s pencil — for marking cuts
- Chalk line — for snapping a straight starting line
- Knee pads — you will spend hours on your knees
Additional Tools for Specific Situations
- Jigsaw or oscillating multi-tool — for cutting around door frames and irregular shapes
- Undercut saw or oscillating tool — for trimming door casings so planks slide underneath
- Vinyl plank cutter — a tabletop guillotine cutter that makes fast, straight cuts without dust (rental available)
- Heat gun — for softening planks when making curved cuts or installing in cold conditions
- Notched trowel — required for spreading adhesive in glue-down installations
- Floor roller (75-100 lbs) — for pressing glue-down vinyl into the adhesive
Materials
- Underlayment — required for click-lock installation if the product does not have an attached pad. Choose a vinyl-compatible underlayment with a vapor barrier for concrete subfloors.
- Transition strips — T-molding, reducer strips, and end caps for doorways and floor-height changes
- Silicone caulk — for sealing expansion gaps in bathrooms and wet areas
- Quarter-round or shoe molding — to cover the expansion gap along walls
Subfloor Preparation
Subfloor prep is the foundation of every successful vinyl installation. No matter how expensive your vinyl flooring is, it will fail over a poorly prepared subfloor.
Concrete Subfloors
- Moisture test: Perform a calcium chloride test (ASTM F1869) or relative humidity test (ASTM F2170). Most vinyl manufacturers require less than 5 lbs per 1,000 sq ft per 24 hours (calcium chloride) or below 80% RH (in-situ probe).
- Level check: Lay a 10-foot straightedge across the floor and check for gaps. Variations greater than 3/16 inch must be corrected. Use self-leveling compound for low spots and a concrete grinder for high spots.
- Clean: Remove all paint, adhesive residue, curing compounds, and sealers. Sweep and vacuum thoroughly.
- Patch: Fill cracks, holes, and expansion joints with a cementitious floor patching compound. Allow patches to cure fully before installing.
Plywood Subfloors
- Thickness: Ensure the subfloor is at least 3/4 inch thick, securely fastened to joists with no bounce or deflection.
- Flatness: Sand high spots, especially at plywood seams. Fill low spots, seams, and screw holes with floor patching compound.
- Secure loose areas: Drive additional screws into joists to eliminate squeaks and movement.
- Clean: Vacuum all dust and debris. A clean surface is essential for adhesive bond (glue-down) or smooth feel (floating).
Over Existing Flooring
Vinyl can be installed over many existing hard floors:
- Existing vinyl: Yes, if it is smooth, firmly bonded, and in one layer only. Remove any loose or bubbling sections.
- Ceramic tile: Yes, if tiles are firmly set and level. Fill grout lines with floor leveling compound if they will telegraph through the new vinyl.
- Hardwood: Yes, if it is flat, stable, and securely nailed. Sand any raised edges and fill gaps.
- Carpet: No. Carpet must be removed completely, including the pad and tack strips.
- Laminate: Not recommended. The floating movement of laminate conflicts with the new installation. Remove the laminate first.
Click-Lock Installation: Step by Step
Step 1: Acclimate
Store the vinyl in the installation room for 48 hours at normal room temperature (65-85 degrees F). While rigid-core SPC vinyl is more dimensionally stable than laminate, acclimation allows the material to reach room temperature for easier handling and better locking engagement.
Step 2: Install Underlayment (If Needed)
If your vinyl does not have an attached pad, roll out the underlayment with the vapor barrier side down (against the subfloor). Butt seams together without overlapping and tape them with the manufacturer’s recommended tape. Do not use carpet pad or thick foam — vinyl requires thin, firm underlayment (1-3mm max).
If your vinyl has an attached pad, do not add additional underlayment. Double padding causes the floor to feel spongy and can compromise the locking mechanism.
Step 3: Plan the Layout
Measure the room width and divide by the plank width. If the last row will be less than 2 inches wide, trim the first row by half to ensure both the first and last rows are a reasonable width.
Snap a chalk line parallel to the starting wall to guide the first row. Even if the wall looks straight, it often is not — the chalk line keeps your first row true.
Step 4: Install the First Row
- Place 1/4-inch spacers against the starting wall
- Lay the first plank with the tongue side facing the wall, tight against the spacers
- Angle the short end of the second plank into the first plank’s end joint and press down to lock
- Continue across the row, cutting the last plank to fit with a utility knife (score and snap)
- Use the cut-off piece to start the next row (if it is at least 6 inches long)
Step 5: Install Subsequent Rows
- Angle the long side of the first plank in the second row into the first row’s groove at about 20-30 degrees
- Press down and forward to engage the lock — you should hear or feel a click
- Connect the next plank’s long side first, then tap the short end into the previous plank using a tapping block and mallet
- Stagger end joints by at least 6 inches (12 inches is even better) between adjacent rows
- Maintain spacers along all walls
Step 6: Cut Around Obstacles
- Door frames: Use an undercut saw or oscillating tool to trim the casing so the plank slides underneath. The trim should sit about 1/16 inch above the plank surface.
- Pipes: Drill a hole in the plank 1/2 inch larger than the pipe diameter. Cut a straight line from the hole to the plank edge, fit around the pipe, and glue the cut piece back with wood glue or PVC cement.
- Toilet flanges: Cut the plank to fit around the flange with a 1/4-inch gap. Silicone caulk seals the gap.
Step 7: Install the Last Row
Measure the gap between the second-to-last row and the wall at multiple points (walls are rarely perfectly parallel). Mark and cut each plank to width, accounting for the 1/4-inch expansion gap. Use a pull bar to tap the last row into the previous row’s groove.
Step 8: Trim and Transitions
Remove all spacers. Install baseboards, quarter-round, or shoe molding to cover the expansion gap. The trim attaches to the wall, not the floor — this allows the floor to expand and contract freely underneath.
Install transition strips at doorways and where the vinyl meets different flooring types. Use T-molding between floors of the same height and reducer strips between floors of different heights.
Glue-Down Installation: Key Differences
Glue-down installation follows similar layout and cutting principles but differs in the adhesive process:
- Spread adhesive: Using a notched trowel, spread vinyl adhesive over a workable section of the subfloor (typically 3-4 feet wide). Follow the manufacturer’s recommended trowel notch size.
- Let adhesive flash: Wait for the adhesive to become tacky before placing vinyl. This “flash time” varies from 15-45 minutes depending on the product and conditions. The adhesive should feel tacky to the touch but not transfer to your finger.
- Set the planks: Lay planks into the tacky adhesive, butting edges tightly together. Press firmly.
- Roll the floor: After installing each section, roll the area with a 75-100 lb floor roller to ensure full adhesive contact and eliminate air pockets.
- Clean excess adhesive: Wipe up any adhesive that squeezes between planks immediately with a damp cloth or the manufacturer’s recommended solvent.
Glue-down does not require expansion gaps because the adhesive anchors the floor and prevents expansion movement. However, follow the specific product’s installation instructions — some glue-down vinyls still specify a small perimeter gap.
DIY vs. Professional Installation
| Factor | DIY | Professional |
|---|---|---|
| Click-lock labor cost | $0 (your time) | $1.50 – $3.00 per sq ft |
| Glue-down labor cost | $0 (your time + adhesive) | $2.50 – $5.00 per sq ft |
| Time for 300 sq ft room | 6-10 hours (click-lock) | 3-5 hours |
| Subfloor prep | DIY (may need to rent grinder or buy leveling compound) | Included in estimate (usually) |
| Risk of error | Moderate — mistakes are repairable with click-lock | Low — experienced installers avoid common mistakes |
| Warranty | Material warranty only (some brands void warranty for DIY) | Material + labor warranty (typically 1-5 years on labor) |
When to DIY: Click-lock vinyl in standard rectangular rooms with straight walls and minimal obstacles. You have basic DIY experience and patience for prep work.
When to hire a pro: Glue-down installations, large open areas requiring many transitions, complex room shapes, commercial projects, or when the manufacturer’s warranty requires professional installation.
Common Installation Mistakes
- Skipping the moisture test on concrete: Moisture causes adhesive failure (glue-down) and mold growth (all methods). Always test before installing.
- Ignoring subfloor imperfections: Every bump, dip, and debris particle under vinyl will be visible or felt. Prep the subfloor thoroughly.
- Forcing click-lock joints: If a plank does not lock easily, something is misaligned. Forcing it damages the locking mechanism. Back up, realign, and try again.
- Not staggering end joints: Short staggers (under 6 inches) create visible patterns and weaken the floor structurally. Maintain at least 6 inches of offset.
- Forgetting the expansion gap: Click-lock vinyl must have a 1/4-inch gap at all walls, columns, and fixed objects. Without it, the floor buckles when it expands.
- Pinning the floor: Never screw trim or molding through the vinyl into the subfloor. This pins the floor and prevents expansion, causing buckling.
- Installing over carpet pad: Soft padding causes excessive flex in the locking joints, leading to gaps and failure. Remove all carpet and pad.
Installation Over Specific Subfloors
Over Concrete in Basements
Basement concrete requires a vapor barrier underlayment (or vinyl with an attached vapor barrier pad). Moisture testing is especially important below grade. LVP with an SPC core is the best choice for basements because its rigid, waterproof construction handles moisture better than WPC or flexible vinyl.
Over Radiant Heat
Most rigid-core luxury vinyl is compatible with radiant heating systems, but verify with the manufacturer. Key rules for radiant heat installation:
- Do not exceed the manufacturer’s maximum floor surface temperature (typically 80-85 degrees F)
- Use a thin underlayment that does not insulate excessively and block heat transfer
- Turn the heat on for 2 weeks before installation to dry the subfloor
- Reduce heat to 65 degrees during installation, then gradually increase over several days
Over Existing Tile
Installing over tile flooring avoids the messy, expensive process of tile removal. Ensure existing tiles are firmly bonded — tap each tile and listen for hollow sounds that indicate loose tiles. Level grout lines with floor patching compound if they are deeper than 1/8 inch. Click-lock vinyl works best over tile because it bridges minor surface irregularities better than glue-down.
Post-Installation Care
- Wait 24 hours before moving furniture back onto click-lock floors
- Wait 48-72 hours before heavy foot traffic on glue-down floors
- Place felt pads under all furniture legs immediately
- Do not wet-mop for at least 48 hours after installation
- Keep the room at normal living temperature during the first week
Final Thoughts
Luxury vinyl flooring installation is achievable for most DIY homeowners when working with click-lock products and following proper subfloor preparation. The investment in preparation time pays dividends in a floor that performs flawlessly for decades. For complex spaces or glue-down methods, professional installation ensures the job is done right and backed by a labor warranty.
Prefer to explore on your own?
See how new flooring looks in your actual room in seconds — free, no signup.
Try the free Floor Studio →