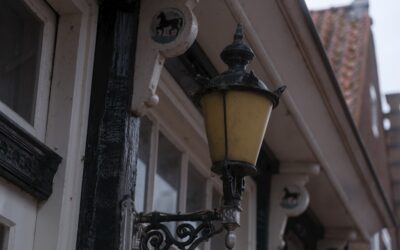
A single dated coach lamp can make an otherwise sharp exterior look twenty years old. Modern outdoor lighting fixtures pull in the opposite direction, using clean geometry, matte finishes, and warm LED output to sharpen a home’s curb appeal after dark. If you have already updated your siding, front door, or landscaping and the fixtures still feel like an afterthought, this guide walks through the styles, specs, and installation details that separate a real upgrade from a fixture that just fills the hole.
Part of our Windows & Doors guide — explore the full guide →
Lighting outside your home does three jobs at once: it makes the property safer to walk around, it deters intruders, and it defines the architectural lines you spent money on. Getting all three right means paying attention to more than looks.
- What Makes a Fixture "Modern"
- The Main Fixture Types and Where They Go
- Wattage, Lumens, and Color Temperature
- Wet, Damp, and the UL Rating You Actually Need
- Line Voltage vs. Low Voltage
- Smart Controls and Motion Sensing
- Planning a Cohesive Exterior Scheme
- Dark-Sky Considerations and Glare Control
- Installation Tips and Common Mistakes
- Maintenance for Years of Performance
- Budgeting Your Project
What Makes a Fixture “Modern”
Modern styling leans on straight lines, low-profile housings, and finishes like matte black, brushed nickel, powder-coated aluminum, and warm brass. Instead of the beveled glass and scrolled arms of traditional carriage lights, you get cylinders, rectangles, and flat down-light bars. Many contemporary sconces throw light both up and down through narrow slots, washing the wall in a crisp band rather than a soft glow.
Material matters as much as shape. Look for die-cast aluminum or 316-grade stainless steel bodies rather than thin stamped metal. A quality matte-black powder coat resists chalking and fading far better than a spray-painted finish, which starts to gray within two or three summers in direct sun.
The Main Fixture Types and Where They Go
Every exterior needs a mix, not a single style repeated everywhere. Here is how the common categories earn their spot:
- Wall sconces: Flank the garage, front door, and back patio door. Mount them 66 to 72 inches from the ground, centered on the door or slightly above the door handle line for entry lights.
- Down-light bars and up/down cylinders: Great for a graze effect on stone or fiber-cement siding, adding drama to a flat facade.
- Path lights: Space them 6 to 8 feet apart along walkways, staggered rather than lined up like a runway. Stems typically stand 18 to 24 inches tall.
- Post lanterns and pier mounts: Define driveways and fence lines with a modern square lantern instead of the old six-sided glass box.
- Flush-mount ceiling lights: For covered porches and soffits, low-profile disc fixtures give clean overhead light without hanging into headroom.
- Step and hardscape lights: Recessed into risers or retaining walls, these prevent trips without any visible glare.
Wattage, Lumens, and Color Temperature
Forget old incandescent wattage habits. With LED, you buy lumens for brightness and Kelvin for color. For a front entry sconce, 600 to 800 lumens lights the door and a package on the step without blasting your neighbors. Path lights only need 80 to 150 lumens each; anything brighter turns a walkway into an airport.
Color temperature is where a lot of homeowners go wrong. Stick to 2700K to 3000K for residential exteriors. That warm-white range flatters brick, wood, and skin tones. The 4000K and 5000K “daylight” bulbs read cold and commercial on a house and make white trim look blue at night. Aim for a Color Rendering Index (CRI) of 90 or higher so your landscaping colors still look true.
Wet, Damp, and the UL Rating You Actually Need
Buying the wrong rating is the fastest way to fry a fixture. Every listing gives a location label:
- Wet-rated: Direct rain and sprinkler contact. Required for open walls, posts, eaves without deep overhang, and any path or step light.
- Damp-rated: Protected from direct rain but exposed to humidity. Fine only for deep covered porches and soffits.
When in doubt, buy wet-rated. It costs a few dollars more and never fails an inspection. Look for a gasketed lens, stainless or coated hardware, and a listed rating from UL or ETL printed on the label. Coastal homeowners should upgrade to marine-grade 316 stainless and a salt-spray-tested finish, because standard aluminum pits within a year in salt air.
Line Voltage vs. Low Voltage
House-mounted sconces, post lanterns, and porch ceiling lights run on standard 120-volt line voltage and wire directly to your home’s circuits. If you are replacing an existing fixture, this is usually a one-for-one swap that a handy homeowner can finish in 30 to 45 minutes after shutting off the breaker.
Landscape path and accent lights typically run on a 12-volt low-voltage system fed by a transformer plugged into a GFCI outlet. Low voltage is safer to bury and easier to expand, and you can install it yourself without an electrician. A 150-watt transformer with a photocell and timer runs roughly $80 to $130 and powers 8 to 12 path lights comfortably. Never load a transformer past about 80 percent of its rating, or the far lights dim noticeably.
Smart Controls and Motion Sensing
Modern fixtures increasingly ship with integrated smart features. Dusk-to-dawn photocells are the simplest upgrade and cost almost nothing, turning lights on automatically at sundown. Motion-activated sconces near a side gate or garage add security and cut energy use, since they sit dark until something moves within 30 to 70 feet.
For full control, look for fixtures compatible with app-based systems or ones that accept a smart bulb. Just remember that many all-in-one integrated-LED fixtures cannot swap bulbs, so if the diode array fails in year eight, you replace the whole unit. Fixtures that accept a standard medium-base bulb give you more flexibility long term, even if integrated LEDs look sleeker.
Planning a Cohesive Exterior Scheme
Pick one finish and one color temperature and carry them across the whole property. A matte-black entry sconce, matte-black post lantern, and black path lights read as an intentional design; three different finishes read as random replacements over the years. Vary the fixture shape for function, but keep the metal and the light color consistent.
Layer the light the way a designer would. Combine general lighting at doors, accent up-lighting on a specimen tree or textured wall, and low task lighting along steps and paths. That three-layer approach gives depth instead of a few bright glare spots surrounded by darkness.
Dark-Sky Considerations and Glare Control
A growing number of communities and homeowners care about light pollution, and modern fixtures address it through shielding. A dark-sky-friendly fixture directs light downward where you need it rather than up into the night sky or sideways into a neighbor’s window. Look for full-cutoff or shielded designs, which is where many contemporary down-light bars and hooded sconces naturally excel.
Glare control matters for comfort as much as courtesy. A bare bright bulb in an open fixture creates harsh glare that actually makes it harder to see, because your eyes react to the bright point rather than the lit area. Fixtures with frosted lenses, recessed bulbs, or louvered shields spread a softer, more usable light. Some HOAs and municipalities now require shielded exterior lighting, so choosing full-cutoff fixtures from the start avoids a costly redo later.
Installation Tips and Common Mistakes
Swapping a line-voltage fixture is within reach for a handy homeowner, and doing it cleanly comes down to a few habits. Always cut power at the breaker and confirm it is off with a non-contact voltage tester before touching wires. When mounting, use a gasketed weatherproof exterior box and seal the top edge of the mounting plate against the wall with a bead of exterior silicone, leaving the bottom edge unsealed so any trapped moisture can drain.
The most common mistakes are worth avoiding:
- Skipping the gasket: A fixture mounted without its rubber gasket lets water into the box, eventually corroding connections.
- Sealing all four edges: Fully sealing a fixture traps condensation inside; leave the bottom open to weep.
- Wrong bulb color: Cool-white bulbs make a warm-toned home look cold; stick to 2700K-3000K.
- Undersized fixtures: Wall lanterns viewed from the street look smaller than in the store, so size up.
- Ignoring the rating: Using a damp-rated fixture in an exposed spot guarantees early failure.
For low-voltage landscape lighting, bury the cable at least 6 inches deep, keep the transformer plugged into a GFCI-protected outlet, and avoid loading it past about 80 percent of its wattage rating so the far lights stay bright.
Maintenance for Years of Performance
Modern outdoor fixtures ask little, but a small routine keeps them looking sharp. Wipe the lenses twice a year to clear pollen, dust, and cobwebs that dim the output, and check that mounting screws stay tight since exterior fixtures endure constant temperature swings. Inspect gaskets during those cleanings and replace any that have cracked or hardened, since a failed gasket is the leading cause of moisture reaching the socket.
In coastal areas, rinse salt off metal housings periodically and expect standard aluminum to need replacement sooner than marine-grade stainless. For path lights, straighten any that frost heave or a lawnmower has knocked askew, and clear mulch or soil that has piled against the base. A few minutes of attention twice a year is the difference between fixtures that look crisp for a decade and ones that gray, corrode, and dim within a few seasons.
Budgeting Your Project
Quality modern outdoor sconces run $40 to $150 each, with designer brands like Hinkley, Kichler, and Modern Forms landing $150 to $400. A solid low-voltage path light costs $25 to $60. For a typical single-family home, budgeting $600 to $1,500 in fixtures plus a low-voltage kit covers a full refresh. If you hire an electrician for line-voltage work, add $75 to $150 per fixture in labor.
Choosing the right modern outdoor lighting fixtures is less about chasing the trendiest shape and more about matching wet ratings, warm color temperature, and a single cohesive finish to your home. Do that, and the exterior you invested in during the day finally looks just as good once the sun goes down.