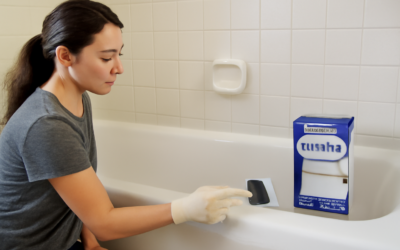
Replacing a worn-out bathtub costs $1,500 to $5,000 once you count demolition, plumbing, and new surround work, which is why coating the old tub is such a tempting shortcut. The Rust Oleum tub and tile refinishing kit lets you do exactly that for $30 to $50: a two-part epoxy-acrylic coating that bonds to porcelain, ceramic, and fiberglass and cures into a hard, glossy white finish. It genuinely works when applied correctly, and it genuinely fails, peeling in sheets, when the prep is rushed. This guide covers what is in the kit, the prep that decides the outcome, the serious ventilation requirements, and the honest lifespan you should expect.
Part of our Tile & Grout guide — explore the full guide →
What the Kit Is and What It Covers
Rust-Oleum sells the product under its Specialty Tub & Tile line in two main forms: a brush/roller-applied two-part kit (Part A activator and Part B base that you mix before use) and an aerosol spray version. The standard quart kit covers roughly 110 square feet in one coat, which in practice means one standard bathtub with the recommended two coats, or a tub plus some surrounding tile if you stretch it. Colors are limited, white, biscuit, and almond are the common ones, because the product is designed to renew, not redecorate.
Once mixed, the two parts begin reacting and the working pot life is limited to about six hours, so mix only when the surface is fully prepped and you are ready to coat. Suitable surfaces include porcelain and cast iron tubs, ceramic wall tile, and fiberglass; it is not intended for floors, countertops that see cutting and hot pans, or surfaces that flex.
Prep Is 80 Percent of This Job
Every peeling refinish you have ever seen in a rental failed at the prep stage, not the paint stage. Epoxy-acrylic needs a chemically clean, deglossed surface to bond, and a bathtub is coated in years of soap scum, body oil, and silicone residue that all repel coatings. Plan on two to three hours of prep for one tub:
- Strip the caulk completely. Cut out all silicone around the tub. The coating will not stick to silicone, and even fingerprint traces of it cause fisheyes.
- Scrub with an abrasive cleaner. Go over every inch with Comet or Ajax and a scrub pad, then rinse thoroughly.
- Remove mineral deposits. Treat the whole surface with a lime and calcium remover (a CLR-type product) so hard water film is gone, then rinse again.
- Sand everything. Wet-sand the entire surface with 400 then 600 grit wet/dry paper to degloss it. The tub should look uniformly dull.
- Repair chips. Fill chips and gouges with a tub repair filler, let it cure, and sand smooth; the coating is thin and telegraphs every flaw.
- Rinse, dry, and tack off. The surface must be bone dry and lint-free. Tape off fixtures and lay drop cloths, since drips are permanent.
If any step feels skippable, remember that redoing a failed refinish means stripping cured epoxy with aircraft-grade remover, a far worse job than the prep you avoided.
Ventilation and Safety: Do Not Take This Lightly
The fumes from this product are severe, far stronger than ordinary paint, and a typical bathroom is a small, enclosed box. Solvent vapors cause headaches, dizziness, and respiratory irritation, and they linger for days. Treat ventilation as a hard requirement:
- Wear a NIOSH-approved respirator with organic vapor cartridges ($30 to $45). A dust mask does nothing against solvent vapor.
- Create real airflow: open the bathroom window if there is one, run the exhaust fan continuously, and set a box fan pulling air out of the room, with makeup air coming from elsewhere in the house.
- Keep everyone else away: children, pregnant women, and pets should be out of the home during application and ideally for a day or two after. Birds are especially vulnerable to fumes.
- No flames: extinguish pilot lights nearby and do not smoke; the vapors are flammable.
- Wear chemical-resistant gloves and eye protection while mixing and applying.
Application: Getting a Smooth, Glossy Result
Work in a room between roughly 60 and 85°F with moderate humidity. Apply with a quality 4-inch foam roller for the broad surfaces and a fine brush for corners, keeping a wet edge and working in sections: back wall, sides, deck, then the basin. The coating self-levels well, so resist over-rolling; light, even passes prevent drips on vertical surfaces. Apply the second coat within the recoat window on the label, typically one to two hours after the first while it remains tacky-workable. Two thin coats beat one heavy one every time.
Cure time is where patience pays. The finish is dry to the touch in hours, but do not run water in the tub for a full three days. Re-caulk with fresh silicone only after the coating has cured, and give it the full cure period before regular use.
Honest Durability: What 3 to 5 Years Really Means
A carefully prepped DIY refinish typically looks good for three to five years before wear shows, first as dulling in the basin where water hits, then possibly thinning or peeling around the drain. Abrasive cleaners, bath mats with suction cups, and standing water all shorten that life. Compare the alternatives honestly:
- DIY kit: $30 to $50 plus about $60 in prep supplies and safety gear; 3 to 5 years of service; a weekend of work.
- Professional reglazing: $350 to $700; sprayed commercial coatings with acid-etch prep; commonly 10 to 15 years with care.
- Tub liner: $1,000 to $2,000; acrylic shell fitted over the tub; watch for trapped-water issues.
- Replacement: $1,500 to $5,000 depending on tile and plumbing work.
The kit makes the most sense on a tub that is ugly but sound, in a house you plan to sell or a bathroom awaiting a future full remodel. It is a refresh, not a restoration.
Caring for a Refinished Tub
Clean only with non-abrasive products, dish soap, or a foam bathroom cleaner and a soft sponge; abrasive powders will dull and eventually cut through the finish. Skip suction-cup mats entirely, since pulling them up can lift the coating; use a textured adhesive-free mat only if it is removed after each bath. Wipe the tub down after use so standing water and mineral deposits do not sit on the finish, and touch up small chips promptly with the aerosol version before water gets underneath.
The Bottom Line
Used with clear eyes, the rust oleum tub and tile refinishing kit is one of the best value plays in bathroom renovation: under $100 all-in to turn a stained, dated tub bright white again. The deal comes with conditions, meticulous prep, a real organic-vapor respirator with serious ventilation, three days without water, and a 3-to-5-year lifespan expectation. Meet those conditions and you buy years of presentable service for the cost of a dinner out; skip them and you will be scraping peeling epoxy off a tub that now needs professional help.
Prefer to explore on your own?
See how new flooring looks in your actual room in seconds — free, no signup.
Try the free Floor Studio →