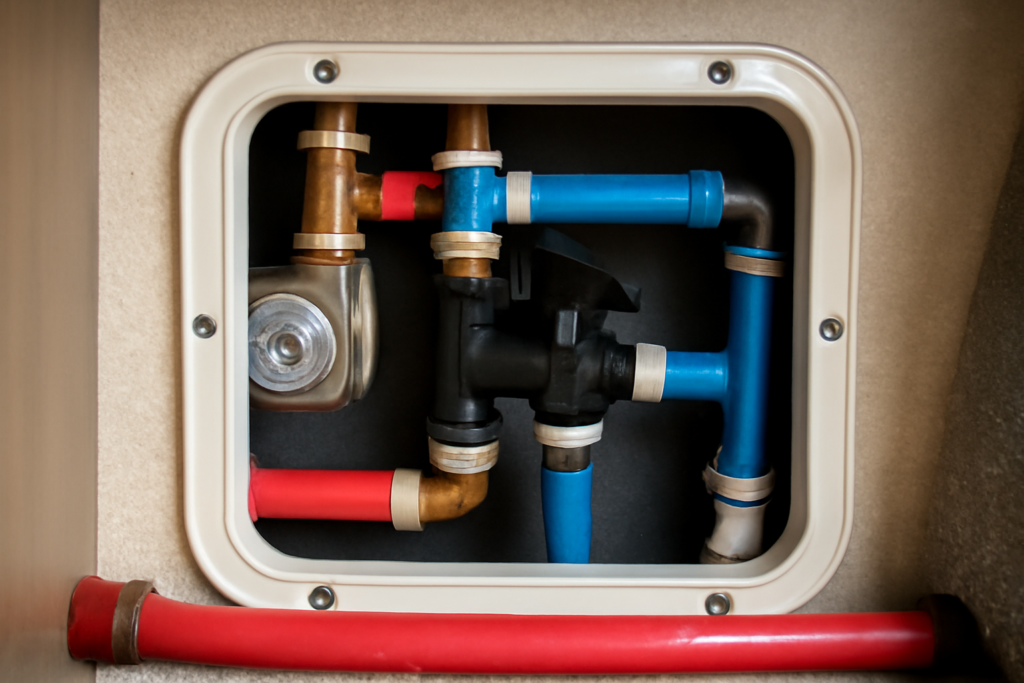
Every fall, RV owners who skip one small step end up dumping three to six gallons of pink antifreeze straight into a tank that should stay empty. The fix is a properly plumbed rv water heater bypass valve, a simple set of levers that reroutes your winterizing antifreeze around the water heater instead of through it. Installing or learning to use an rv water heater bypass valve saves money on antifreeze every season, prevents a diluted, ineffective mix in your lines, and shortens winterizing from an hour to about fifteen minutes. Here is how the system works and how to set it up correctly.
What an RV Water Heater Bypass Valve Does
Your RV’s water heater tank holds roughly 6 or 10 gallons. When you winterize by pumping RV antifreeze through the plumbing, that tank would normally fill with antifreeze first, wasting several gallons and diluting the concentration reaching your faucets and toilet valves.
A bypass valve system diverts the antifreeze around the tank entirely. The tank gets drained separately and left empty, while the valves send the pink fluid directly into the cold and hot water lines feeding the rest of the coach. Come spring, you reverse the valves, refill the tank, and the heater works normally again.
Single, Double, and Triple Valve Setups
Bypass kits come in three configurations, and knowing which you have determines the steps.
- Single-valve: one valve on a line connecting the cold inlet and hot outlet. It is the simplest but sometimes lets a little water sneak into the tank.
- Double-valve: two valves, one on the cold inlet and one on the hot outlet, giving cleaner isolation of the tank.
- Triple-valve: the most reliable, with a third valve on the bypass line itself for full isolation and zero mixing. This is the setup most techs recommend installing.
If your RV came without a factory bypass, a triple-valve kit costs about $15 to $35 and is the version worth installing for foolproof winterizing.
How to Use the Bypass to Winterize
Start with the water heater off and completely cool; never drain a hot tank. Then work through these steps in order.
- Turn off the water heater and let it cool for several hours if it was recently used.
- Relieve pressure by opening a hot faucet inside, then open the pressure relief valve on the tank.
- Remove the drain plug or anode rod and let all 6 to 10 gallons drain out.
- Reinstall the plug or anode rod and close the relief valve.
- Set the bypass valves to bypass position so flow skips the tank.
- Connect your antifreeze line to the pump siphon and pump pink antifreeze through each faucet until it runs pink.
Because the tank is isolated, all your antifreeze goes into the lines where it belongs. Most owners use only 2 to 3 gallons instead of 6 or more.
Work through the faucets in a logical order so you do not miss any. Start with the fixture farthest from the pump, usually the outside shower or the rear bath, then move forward through the kitchen sink, bathroom sink, shower, and toilet, running both hot and cold at each until pink flows steadily. Do not forget the low-point drains, the water heater relief valve, the ice maker line if equipped, and the washing machine hookups. Pour a cup of antifreeze directly down each drain to protect the P-traps, and add a splash to the toilet bowl and holding tanks.
Locating Your Valves
The bypass valves sit on the back side of the water heater, accessible from inside the RV, often behind a panel under a bed, in a closet, or beneath a dinette. The valves are usually red or blue plastic levers on PEX or CPVC lines running to the tank’s cold inlet and hot outlet.
In normal operating mode, the two valves on the inlet and outlet lines point in line with the pipe, open, and the bypass valve is closed. In bypass mode, you close the inlet and outlet valves and open the bypass line. Label them with a paint pen the first time so you never second-guess the positions.
If you cannot find the valves at all, your RV may have shipped without a bypass installed, which was common on older and entry-level units. Confirm by tracing the two water lines connecting to the back of the tank; if they run straight to the plumbing with no crossover line or levers between them, there is no bypass and you will want to add one before your first winter. Taking a photo of the valve cluster in both positions and taping it inside the access panel saves a lot of guesswork on a cold fall afternoon.
Installing a Bypass Kit
If your RV lacks a bypass, installation is a straightforward afternoon project. Shut off the water pump and city water, then drain the system. Locate the cold inlet and hot outlet lines at the back of the tank.
- Cut the inlet and outlet lines and install a tee and valve on each using PEX crimp rings or SharkBite push fittings.
- Run a bypass line between the two tees and install the third valve on it.
- Support the new plumbing so it does not vibrate loose while driving.
- Pressurize the system and check every joint for leaks before closing the access panel.
Budget about $20 to $40 in parts. A crimp tool costs more, so many owners choose push-fit fittings for a tool-free install.
Common Mistakes to Avoid
The biggest error is forgetting to switch the valves back to normal in spring, then turning on the water heater with an empty tank. Running the electric element or gas burner in a dry tank can burn out the heating element in minutes and crack the tank. Always refill the tank fully, confirm water flows from a hot faucet, then power the heater on.
Another frequent slip is leaving the tank full while pumping antifreeze because the valves were never set to bypass. If you notice you are burning through more than 3 gallons of antifreeze, stop and check your valve positions.
Troubleshooting a Leaking or Stuck Valve
Plastic bypass valves live a hard life, cycling once or twice a year and then sitting untouched, so they occasionally stick or seep. If a lever will not budge, do not force it and crack the body. Relieve system pressure first by opening a faucet, then work the handle gently back and forth. A drop of silicone plumbing lubricant on the stem often frees a stiff valve.
A valve that weeps at the stem or a fitting usually means a worn O-ring or a loosened connection from vibration on the road. Tighten crimp or push-fit connections, and if the valve body itself leaks, replace it; a new valve costs only a few dollars and is cheaper than the water damage a slow leak causes inside a cabinet. Inspect the whole bypass assembly each spring while the panel is open.
Bypass Systems and Tankless Water Heaters
Not every RV has a traditional tank. Some newer coaches use tankless or on-demand water heaters, and the bypass approach differs slightly. A tankless unit holds very little water internally, so there is no 6- or 10-gallon tank to isolate, but you still want antifreeze to reach and protect the internal passages and the small heat exchanger.
Check your specific unit’s manual, because some tankless models have a dedicated winterizing bypass and drain procedure, and pumping standard RV antifreeze through certain tankless heat exchangers is discouraged by the manufacturer. When in doubt, blowing the lines out with low-pressure compressed air, then adding antifreeze only to the traps and the P-traps, is a common alternative for tankless setups.
Spring De-Winterizing
Reversing the process is quick. Set the valves back to normal operating position, close the drain and reinstall the anode rod if you removed it, then run fresh water through the system to flush out the antifreeze. Sanitize the fresh water tank with a diluted bleach solution, roughly a quarter cup per 15 gallons, flush thoroughly, then refill and let the water heater tank fill completely before turning on the heat.
Master the bypass valve and winterizing stops being a dreaded chore. You spend less on antifreeze, protect your plumbing from freeze damage, and keep your water heater in good shape for many seasons on the road.