Sherwin Williams kitchen cabinet paint is what a lot of professional cabinet refinishers reach for when a homeowner wants a hard, factory-smooth finish that survives years of greasy hands, splashes, and slamming doors. Painting your cabinets is the single highest-impact update you can make short of replacing them, and the paint you choose determines whether that finish lasts a decade or chips within months.
Part of our Kitchen Remodeling guide — explore the full guide →
I’ve sprayed and brushed plenty of kitchens, and the difference between a durable result and a gummy, fingerprint-magnet mess comes down to picking the right product and prepping properly. Here’s how to do it right with Sherwin Williams.
The Two Products That Matter Most
Sherwin Williams makes several coatings, but for cabinets two rise to the top:
- Emerald Urethane Trim Enamel: a water-based urethane-modified acrylic that self-levels beautifully, dries hard, and resists yellowing. It’s the go-to for DIYers because it brushes and rolls well and cleans up with water.
- ProClassic Interior Acrylic Enamel: another strong water-based option, slightly more budget-friendly, with good leveling. A solid choice, though Emerald Urethane is the more durable of the two.
For a first-time cabinet project, Emerald Urethane Trim Enamel in a satin or semi-gloss sheen is the sweet spot. It gives that smooth, almost-sprayed look even with a brush and roller, and it cures rock-hard.
Choosing a Sheen
Sheen affects both looks and cleanability. For kitchen cabinets, satin and semi-gloss are the only two worth considering. Satin has a soft, low-luster glow that hides minor imperfections and reads modern. Semi-gloss is shinier, wipes down easiest, and shows every ding and brush mark, so it demands better prep. Most current kitchens lean satin for a refined, less plasticky finish.
Popular Colors That Work
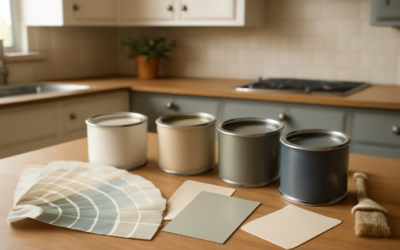
Sherwin Williams has an enormous palette, but a handful of colors dominate cabinet projects because they photograph well and age gracefully:
- Pure White (SW 7005): a clean, versatile white that isn’t stark, the most-used cabinet color
- Alabaster (SW 7008): a warm, creamy off-white that softens a kitchen
- Naval (SW 6244): a rich navy for a bold island or lower cabinets
- Repose Gray (SW 7015): a balanced greige that pairs with almost anything
- Tricorn Black (SW 6258): a true, deep black for a dramatic modern look
A common designer move is a warm white on the uppers with a deep navy or green on the lower cabinets and island. Order sample pots and test on a spare door in your actual kitchen light before committing.
Prep Is Ninety Percent of the Job
No paint, however good, sticks to grease and glossy factory finish. Prep is where cabinet jobs are won or lost:
- Remove doors, drawers, and hardware, labeling each so it goes back in the same spot.
- Degrease thoroughly with a strong cleaner like TSP substitute or a dedicated degreaser. Kitchens accumulate invisible cooking oils that ruin adhesion.
- Sand every surface with 150 to 220 grit to knock down the sheen and give the primer a tooth to grip. Wipe clean with a tack cloth.
- Fill any dents or grain you want smooth, then sand those spots again.
Skipping the degrease-and-scuff step is the number-one reason DIY cabinet paint peels. Don’t rush it.
Priming Matters
Cabinets almost always need a bonding primer, especially over oak, stained wood, or slick factory melamine. Sherwin Williams Extreme Bond Primer is designed exactly for these hard-to-coat surfaces and grips where standard primer would fail. For woods that bleed tannins, like oak or knotty pine, a stain-blocking primer prevents brown discoloration from ghosting through your white topcoat.
Prime one thin, even coat, let it dry, then sand lightly with 220 grit before the color goes on. That light sanding between coats is what creates the glassy final surface.
Application for a Smooth Finish
You don’t need a sprayer to get a professional look with Emerald Urethane, though a sprayer gives the finest result. For brush and roll:
- Use a high-quality synthetic brush and a smooth foam or microfiber mini roller
- Roll the flat panels, then immediately “tip off” by lightly dragging the brush through the wet paint to erase roller stipple
- Apply two to three thin coats rather than one thick one; thick coats sag and stay soft
- Let each coat dry per the label, usually 4 to 6 hours, and scuff-sand lightly between coats
Work in good light and keep a wet edge. Thin coats are the secret; patience here is what separates smooth from streaky.
Cure Time and First Use
Here’s the part people ignore and regret. Paint dries to the touch in hours but takes far longer to fully cure and reach maximum hardness. Emerald Urethane needs several days to a couple weeks to cure completely.
Reinstall doors gently after a day or two, but treat the finish carefully for the first two to three weeks. Avoid stacking items against fresh cabinet faces and don’t scrub them during that window. Rushing hard use before the cure sets is how an otherwise perfect job gets marred early.
Brush and Roll vs Spray
You’ll get the smoothest possible finish from a sprayer, but for most homeowners the brush-and-roll method with Emerald Urethane comes remarkably close and skips the masking marathon spraying requires. If you do spray, an HVLP or airless sprayer lays down a glass-smooth coat, but you must tent and mask the entire kitchen to contain overspray, which drifts onto everything.
For a first project, brush and roll the doors and drawer fronts on a flat surface like sawhorses in the garage, working horizontally so the self-leveling enamel flows out flat. Paint the cabinet boxes in place with the same technique. Reserve spraying for when you have a dedicated space and are comfortable with the extra prep.
Is It Worth It
Refinishing with Sherwin Williams kitchen cabinet paint costs a few hundred dollars in materials versus thousands for new cabinets, and the durable finish genuinely rivals factory quality when you prep and apply it correctly. Choose Emerald Urethane Trim Enamel in satin, prime with Extreme Bond over clean scuffed surfaces, lay down thin coats, and let it cure. Do that and your kitchen looks brand new for a fraction of a remodel’s price.