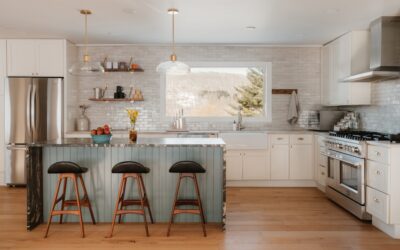
A thin brick backsplash kitchen brings warmth, texture, and character that flat tile simply can’t match. Whether you’re chasing a modern farmhouse look, an industrial loft vibe, or a cozy rustic cottage feel, real brick veneer on the wall behind your range or countertop is one of the most impactful design moves you can make in a kitchen.
The good news is you don’t need to be a mason or tear into your wall to get it. Thin brick, sometimes called brick veneer or brick tile, is genuine kiln-fired clay sliced to about 1/2 to 5/8 inch thick, so it installs much like tile. Having installed several of these, I’ll cover the brick types, what it costs, how to put it up, and how to seal it so it survives grease and splatter for decades.
What Is a Thin Brick Backsplash?
Thin brick is real brick, cut down to a slim profile so it can be adhered to a wall without the structural support a full brick requires. A standard modular brick is about 3-5/8 inches deep, while thin brick is typically just 1/2 to 3/4 inch thick, keeping the authentic face of fired clay while cutting the weight by roughly 80 percent.
For a kitchen backsplash, this is the perfect solution. You get the real color variation, texture, and durability of genuine brick, but it mounts to your existing drywall or cement board like tile using thinset mortar or construction adhesive. Corner pieces, called returns, wrap around exposed edges so the veneer looks like full-depth brick where it meets a window or the end of a run.
Types of Thin Brick for Kitchens
The style of brick you choose sets the entire tone of the room. Here are the main options:
- Traditional red clay brick: Classic warm red-orange tones with natural color variation. Timeless and works in farmhouse, colonial, and traditional kitchens.
- Whitewashed or painted brick: A German smear or limewash finish softens the look, brightens the space, and leans modern-farmhouse.
- Reclaimed/antique brick: Salvaged from old buildings, with worn edges and rich patina for authentic loft and industrial styles.
- Glazed or ceramic-look brick: A smooth, easy-to-clean glazed face, ideal directly behind a cooktop where grease is heaviest.
- Faux/manufactured brick panels: Molded concrete or polyurethane panels that mimic brick for less money and lighter weight, though less authentic up close.
For a working kitchen, I lean toward glazed or well-sealed clay brick behind the stove, since raw brick is porous and grabs grease. Whitewashed brick has been the runaway favorite in remodels lately because it delivers texture without darkening the space.
Pros of a Thin Brick Backsplash
There’s a reason designers keep specifying brick. The advantages hold up:
- Unmatched texture and warmth: Real brick adds depth and a handmade, timeless quality no printed surface replicates.
- Extremely durable: Fired clay resists heat, scratches, and impact, so it handles the abuse of a busy cooking zone.
- Lightweight vs. full brick: At around 1/2 inch thick, it mounts to standard walls without extra structural framing.
- Timeless resale appeal: Brick reads as a quality, permanent upgrade to buyers rather than a trendy finish that will date quickly.
- Design flexibility: Leave it natural, whitewash it, or paint it to match any evolving color scheme.
Cons and Considerations
Brick isn’t the right answer for every kitchen, and it pays to know the trade-offs. Cleaning is the biggest one. The porous, uneven surface traps grease and is harder to wipe than smooth tile, which is why sealing is non-negotiable behind a cooktop. Even sealed, a heavily used brick backsplash needs more attention than glass or ceramic.
Installation is more involved than peel and stick, requiring thinset or adhesive, spacers, grout or mortar joints, and a wet saw or angle grinder with a diamond blade for cuts. The mortar joints also create an uneven surface, so you can’t set small appliances flush against the wall the way you can with flat tile. Finally, dark or reclaimed brick can make a small kitchen feel closed in, which is why whitewashing is so popular in tighter spaces.
How to Install a Thin Brick Backsplash
This is a very doable weekend DIY project for a confident homeowner. Here’s the sequence:
- Prep the wall. Clean it, and for areas that see moisture, install cement backer board. On solid drywall in a dry zone, a quality construction adhesive works.
- Dry-lay your pattern. Plan a running bond or stacked layout and mark a level starting line. Account for corner return pieces at exposed edges.
- Apply the brick. Spread thinset with a 1/4-inch notched trowel or apply adhesive to each brick, then press each piece firmly, using spacers for consistent 3/8-inch joints.
- Cut as needed. Use a wet saw or an angle grinder with a diamond blade for outlets, edges, and the ends of rows.
- Grout the joints. Once set for 24 hours, pack a mortar or grout mix into the joints with a grout bag or tuck-pointing tool, then tool them smooth.
- Seal the surface. After grout cures, apply a penetrating masonry sealer, at least two coats behind the cooktop, to block grease and moisture.
Sealing is the step people skip and regret. Unsealed brick behind a stove absorbs cooking oil within weeks and turns dark and greasy. A good breathable masonry sealer keeps it cleanable for years.
Cost of a Thin Brick Backsplash Kitchen
Materials for thin brick run about $5 to $12 per square foot for the brick itself, plus adhesive, grout, and sealer. For a typical 30-square-foot kitchen backsplash, expect $200 to $450 in materials for a DIY job. If you hire a mason or tile setter, labor adds roughly $400 to $900, bringing an installed total to somewhere between $600 and $1,350.
Faux brick panels can lower the material cost to $3 to $6 per square foot and install faster, though they lack the authentic feel. Reclaimed and specialty bricks sit at the top of the range but deliver a look you can’t fake.
Design Ideas for a Thin Brick Kitchen Backsplash
A few ways to make the most of the material: run the brick full-height from countertop to the underside of the upper cabinets for maximum impact, or take it all the way to the ceiling behind an open range wall for a dramatic focal point. Pair whitewashed brick with black hardware and open wood shelving for the modern farmhouse look, or leave reclaimed brick raw against stainless appliances and concrete counters for an industrial edge.
Warm red brick complements white or cream Shaker cabinets beautifully, while a German smear finish softens the grout lines for a European cottage feel. Whatever direction you choose, a thin brick backsplash kitchen anchors the room with a texture that flat tile just can’t deliver, and it will still look right ten years from now.
Lighting matters more than most people expect with brick. Because the surface is uneven, raking light from under-cabinet LED strips exaggerates every shadow and highlight, which makes the texture pop after dark. If you’re installing new under-cabinet lighting, aim for a warm 2700K to 3000K color temperature, which flatters the red and amber tones in clay brick and keeps the room feeling cozy rather than clinical.
Final Thoughts
A thin brick backsplash brings authentic character, real durability, and lasting resale appeal to a kitchen, all without the weight or structural demands of full brick. It asks for a bit more installation effort and diligent sealing than tile or peel and stick, but the payoff is a warm, textured wall that feels custom and timeless. If you love the look, seal it well, plan your layout carefully, and enjoy a backsplash that stands out for all the right reasons.