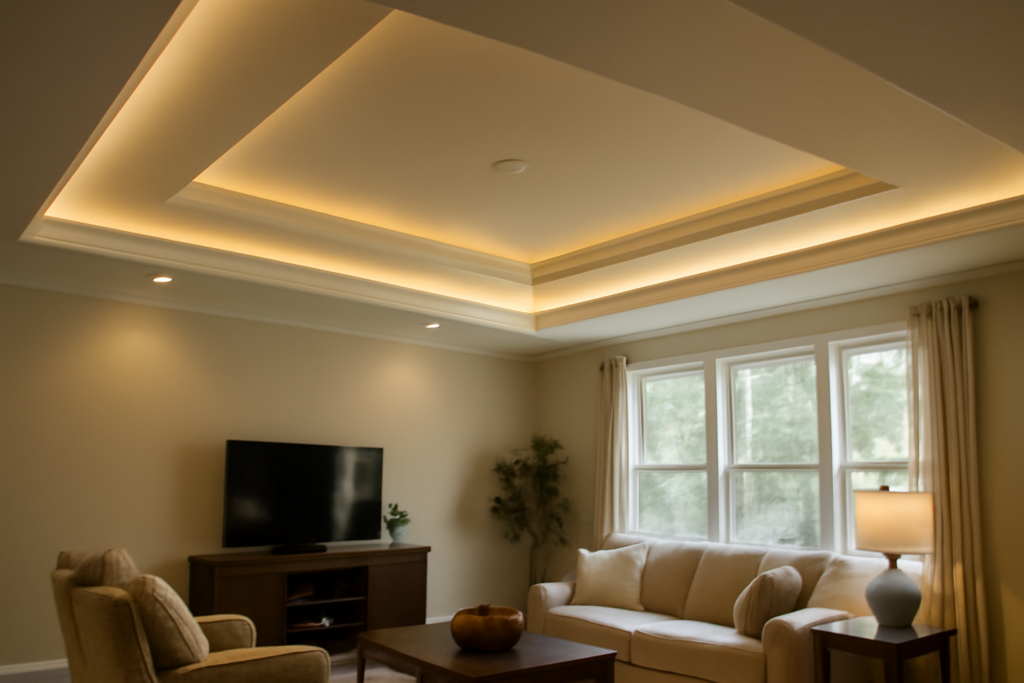
Most tray ceilings look flat after dark because the lighting was an afterthought, bolted on once the drywall was already finished. Good tray ceiling lighting turns that recessed panel into the softest light source in the room, washing the upper surface without a single visible bulb. The difference between a glowing ceiling and a stripy, spotty one usually comes down to three details: where the strip sits in the cove, how far it is from the ceiling plane, and which LED product you choose. Get those right and the room feels taller, calmer, and more finished.
- How Tray Ceiling Lighting Works and Why It Changes a Room
- Choosing LED Strip Lights for the Cove
- Getting the Geometry Right
- Layering Recessed and Decorative Fixtures
- Dimmers, Drivers, and Wiring Basics
- Tray Ceiling Lighting Costs
- Step-by-Step Cove Retrofit on an Existing Tray
- Design Mistakes to Avoid
- Best Rooms for Tray Ceiling Lighting
How Tray Ceiling Lighting Works and Why It Changes a Room
A tray ceiling is a center section raised 6 to 18 inches above the surrounding perimeter ceiling. That step creates a vertical face and, often, a ledge or crown molding lip where a light source can hide. When you place a linear light on that ledge and aim it upward, the light bounces off the raised panel and spreads across the room as indirect ambient light. No glare, no hot spots, and no shadows under your chin at the dinner table.
Indirect light is forgiving. It hides minor drywall waves, lifts dark paint colors, and makes an 8-foot room read closer to 9 feet. Designers often call this layer “cove lighting,” and in a bedroom or dining room it can replace a harsh center fixture for most evening use. You still need task light for reading or cooking, but the cove sets the mood.
There are two basic approaches. Uplighting hides the strip on the ledge and washes the raised ceiling. Downlighting places recessed cans or wafer lights in the perimeter ceiling or the tray face and throws light onto the floor and furniture. Most rooms that look professionally lit use both, controlled on separate dimmers.
Choosing LED Strip Lights for the Cove
LED tape is the default choice today, and for good reason. It runs cool, draws little power, and bends around corners. Not all tape performs the same, though, and cheap kits are the number one reason cove lighting looks blotchy.
Specs That Matter
- LED density: Look for 120 LEDs per meter or higher, or COB (chip-on-board) tape, which produces a continuous line with no visible dots. Lower-density 60/m tape shows scalloping on the ceiling when the cove is shallow.
- Output: 200 to 400 lumens per foot works for most residential coves. Go toward the high end if your raised ceiling is painted a mid-tone or darker color.
- Voltage: 24V tape handles longer runs than 12V before voltage drop dims the far end. A 24V run can typically go 16 to 32 feet from a single feed; beyond that, feed power from both ends or the middle.
- Color rendering: Choose CRI 90 or higher so wood tones, skin, and paint colors look natural.
- Color temperature: 2700K for bedrooms and living rooms, 3000K for kitchens and dining areas. Tunable white (2700K to 5000K) or RGBW tape adds flexibility for about 40 to 60 percent more cost.
Aluminum Channels
Always mount tape in an aluminum channel. The channel acts as a heat sink, extending LED life well past 30,000 hours, and a frosted diffuser lens smooths the light. Channels run about $3 to $8 per foot. Stick-on adhesive alone tends to fail within a few summers, especially in warm attics above the ceiling.
Getting the Geometry Right
Placement matters more than product. If the strip is too close to the upper ceiling, you get a bright band along the edge and a dark center. Too far down and the light never reaches the middle of the panel.
As a rule of thumb, keep the light source at least 4 to 6 inches below the raised ceiling plane and set it back 3 to 4 inches from the front lip of the ledge. Aim the strip slightly toward the room’s center, around 15 to 30 degrees off vertical, using an angled channel. That positioning lets the light fan out and blend across the surface.
The front lip or crown molding should be tall enough to hide the strip from someone sitting in the room. Stand in the doorway and sit in a chair near the wall; if you can see the diodes from either spot, raise the lip or lower the strip. A 3-inch to 4-inch lip usually does it for standard furniture heights.
Paint finish also affects results. Flat or matte white on the raised panel spreads light evenly. Eggshell or satin reflects the strip itself as a visible line, which defeats the purpose.
Layering Recessed and Decorative Fixtures
Cove light alone is ambient light. To make the room functional, add a second or third layer.
- Recessed wafer lights: Ultra-thin 4-inch or 6-inch LED wafers ($15 to $40 each) fit in the perimeter ceiling without needing housings. Space them roughly half the ceiling height apart; for an 8-foot ceiling that means about 4 feet between fixtures, and 2 to 3 feet from walls.
- Center fixture: A chandelier or pendant hung from the middle of the tray becomes the focal point. Size the diameter in inches by adding the room’s length and width in feet (a 12 by 14 room suits a 26-inch fixture). The raised ceiling gives extra clearance, so you can go slightly taller.
- Accent lights: Adjustable gimbal cans in the tray’s perimeter can highlight artwork or a headboard wall.
Put each layer on its own switch leg. A common setup is three dimmers in a multi-gang box: cove, recessed, and center fixture. Smart dimmers let you set scenes, such as cove at 30 percent for a movie or all layers at 100 percent for cleaning.
Dimmers, Drivers, and Wiring Basics
LED tape needs a low-voltage driver (power supply) that converts 120V household current to 12V or 24V DC. Size the driver at 20 percent above the tape’s total wattage. If you have 40 feet of tape at 4.4 watts per foot, that is 176 watts, so a 200-watt to 240-watt driver is right.
For dimming, match the driver to the dimmer. Magnetic low-voltage (MLV) or electronic low-voltage (ELV) drivers work with standard wall dimmers rated for those loads. Many newer installs use 0-10V drivers, which need a separate low-voltage control wire, or a Zigbee or Wi-Fi controller paired with a smart switch. Mismatched components cause flicker and buzzing, the most common complaint after install.
Locate the driver somewhere you can reach later: inside an accessible attic, in a closet ceiling, or in a remote driver box. Burying it in a sealed soffit with no access panel is a code problem and a maintenance headache. Class 2 low-voltage wiring on the tape side is fairly forgiving, but the 120V feed, junction boxes, and switch wiring must follow the National Electrical Code.
When to call a licensed electrician: If you need to run a new circuit, add a switch leg through finished walls, or install drivers in an attic, hire a licensed electrician. It usually costs $75 to $150 per hour, and many jurisdictions require a permit for new fixture circuits. DIY is reasonable for plugging tape into an existing switched receptacle or replacing tape in a channel that is already wired.
Tray Ceiling Lighting Costs
Budget depends on the length of the cove, the product grade, and how much new wiring is needed. For a typical 12 by 14 room with about 44 linear feet of cove:
| Item | DIY Cost | Installed Cost |
|---|---|---|
| LED tape (24V, CRI 90+) | $90 to $250 | Included |
| Aluminum channel and diffuser | $130 to $350 | Included |
| Driver and dimmer | $80 to $220 | Included |
| Recessed wafers (6) | $90 to $240 | $600 to $1,200 |
| Cove install, labor and wiring | Your time | $800 to $2,000 |
All in, most homeowners spend $400 to $900 on a DIY cove retrofit and $1,500 to $4,000 for a professionally installed, layered scheme. Adding a new tray ceiling during framing runs $1,500 to $5,000 before lighting, so if you are remodeling, plan the cove ledge at the same time rather than adding a surface-mounted molding afterward.
Step-by-Step Cove Retrofit on an Existing Tray
If your tray already has a crown molding lip or a flat ledge, retrofitting is a weekend project.
- Measure every side of the cove and add 6 inches for corners and trimming.
- Plan the power feed location. Ideally a switched receptacle or junction box sits in the attic above one corner, or you can bring wire up through the tray face.
- Test-fit the tape in a dark room before mounting. Hold a section on the ledge and look for dots or hot spots on the ceiling.
- Screw the aluminum channel to the ledge or the back of the crown molding with small pan-head screws every 18 inches.
- Cut tape only at marked cut points, press it into the channel, and use solderless connectors or solder for corners.
- Connect to the driver, confirm polarity, and test before snapping in the diffusers.
- Caulk any gaps in the molding and touch up paint so the ledge line reads clean.
If your tray has no ledge, you can build one with a piece of 1×4 or 1×6 poplar and a crown molding lip, or use a pre-made LED cove molding profile made from lightweight polyurethane. Those profiles run $8 to $20 per foot and mount with adhesive and finish nails.
Design Mistakes to Avoid
- Visible dots: Low-density tape in a shallow cove. Upgrade to COB tape or add a diffuser.
- Color mismatch: Mixing 3000K cove light with 4000K recessed cans makes the ceiling look yellow and the walls look blue. Keep every layer within 300K of each other.
- Dark corners: Leaving gaps where tape turns corners. Use corner connectors or overlap runs slightly.
- Glossy paint: Satin paint on the raised panel reflects a line of light. Repaint with flat ceiling paint.
- No dimmer: Full-brightness cove light at night feels like an office. Dimming down to 10 or 20 percent is where the effect shines.
- Ignoring flooring: Uplight bounces onto the floor as well. Glossy hardwood or polished tile will mirror the cove, while matte finishes absorb it. Consider your floor sheen when choosing output levels.
Best Rooms for Tray Ceiling Lighting
Bedrooms get the most benefit, because indirect light is relaxing and eliminates glare when you are lying down. Dining rooms pair cove light with a chandelier for a layered, restaurant-like glow. Living rooms use it as the main evening light, often with warm 2700K tape. Kitchens with tray ceilings can use cove lighting for ambiance, but you still need under-cabinet task lighting and recessed cans over work zones at 3000K to 3500K.
Bathrooms with tray ceilings are possible, but choose IP65-rated tape in a sealed channel, since steam will reach the cove. Keep drivers outside the bathroom where moisture cannot reach them.
Whatever the room, test your plan before committing. Tape a sample strip onto the ledge, turn off every other light, and look at it from the spots where you actually sit. Ten minutes of testing saves you from a costly redo and makes sure your tray ceiling looks like it was designed, not decorated.