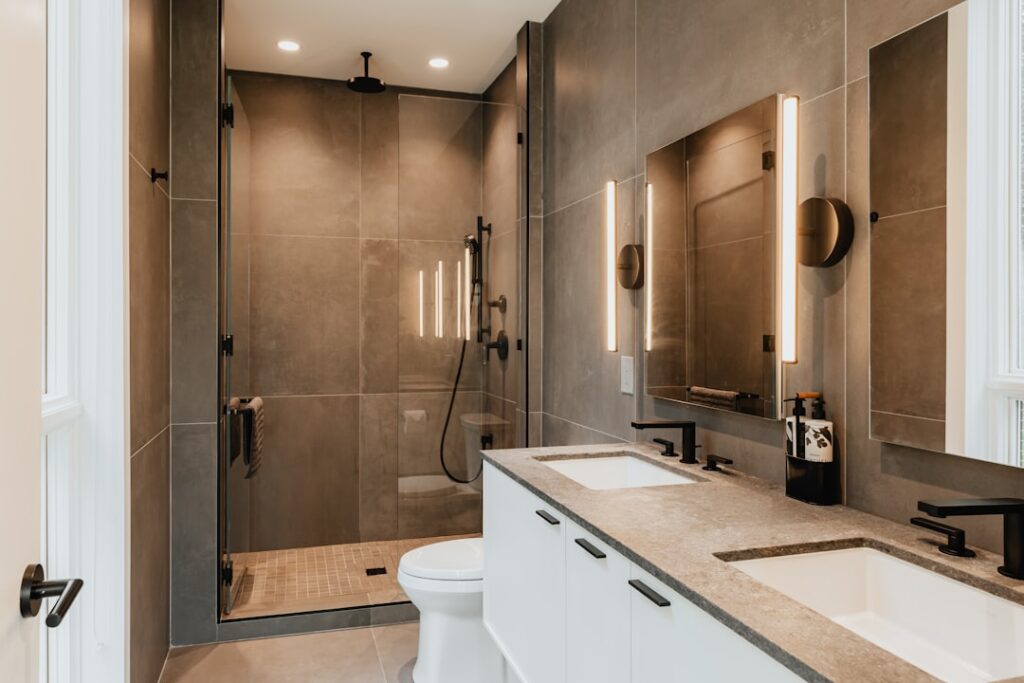
The reason designer walk in shower images look so much better than DIY attempts is rarely the tile choice — it is the underlying geometry, drainage, and waterproofing. A picture-perfect walk-in shower hides a Schluter Kerdi-Drain or a linear trench drain, slopes the floor at 1/4 inch per foot toward that drain, and uses large-format tile that reduces grout lines. This guide breaks down the design elements that make a walk-in shower photograph well and the real costs to replicate them.
Part of our Bathroom Remodeling & Flooring guide — explore the full guide →
Curbless vs Curbed Walk-In Showers
The single biggest visual difference between editorial showers and standard builder showers is the absence of a curb. A curbless walk-in shower keeps the floor plane continuous from the bathroom into the shower stall, which photographs as an uninterrupted line and reads as luxury.
The construction cost difference is significant. A curbless install requires either a sub-floor drop of 1.5 to 2 inches (often impossible in remodels) or a built-up bathroom floor with a transition slope. Expect $1,500 to $4,000 more for curbless construction over a traditional curbed install of the same size.
Linear Drains vs Center Drains
Linear drains positioned along one wall allow the entire shower floor to slope in a single direction at 1/4 inch per foot. This eliminates the four-way slope of a center drain (which requires small-format mosaic tile or hand-cut wedge tile in the floor).
A linear drain from Schluter Kerdi-Line, Infinity Drain, or QuickDrain runs $300 to $800 plus installation. The payoff is that you can use 24×48-inch large-format tile on the floor, slope in one direction, and produce that magazine-style continuous-tile look. Most builder showers use $40 center drains because they are cheap to install — that is exactly why they do not photograph well.
Wet Rooms and Doorless Designs
True wet rooms eliminate the shower enclosure entirely. The whole bathroom is waterproofed below the tile, and the shower area opens to the rest of the room with no door, curtain, or curb. Wet-room installations require comprehensive waterproofing — Schluter Kerdi membrane bonded with thin-set across every wall and floor surface in the room.
Doorless walk-in showers without full wet-room treatment use a half-wall or “splash wall” 4 to 5 feet long to contain water. The shower head must be positioned to spray away from the opening, and the floor slopes pull water toward a drain placed 3 to 4 feet inside the entry. Costs run $8,000 to $25,000 depending on size and finishes.
Tile Choices That Photograph Beautifully
The tile decisions that matter most for photography:
- Large-format porcelain (24×48 or 30×60 inches) minimizes grout lines on walls
- Floor tile under 4×4 inches if center drain, large format if linear drain
- Coordinated grout color — match grout to tile rather than contrasting
- Continuous tile from bathroom floor into shower for visual flow
- Wall niches with single full-slab back panels rather than cut pieces
Spanish and Italian porcelain in 24×48 sizes runs $5 to $15 per sq ft. Add 10% to 15% for waste because large tiles cut less efficiently. Schluter Ditra-Heat tile underlayment ($6 to $9 per sq ft) keeps shower floors warm and prevents cold-tile shock.
Glass Panels and Hardware
Frameless glass enclosures cost $1,500 to $4,500 installed for typical walk-in dimensions. 3/8-inch tempered glass works for most applications; 1/2-inch glass for spans over 36 inches or where structural rigidity matters.
Polished chrome reads classic, brushed nickel reads transitional, matte black reads modern. Brass and bronze finishes pair well with white tile and warm wood accents. Get hardware finish samples and lay them against the tile in good lighting before ordering — the difference between “champagne bronze” from two manufacturers can be jarring.
Built-In Niches and Benches
A well-designed shower niche reads as architectural rather than utilitarian. Place the niche 48 to 54 inches off the floor, centered on the shower wall opposite the head. Single rectangular niches measure 12 to 14 inches tall by 18 to 36 inches wide. Pre-made Schluter Kerdi-Board niches at $80 to $200 simplify construction.
Built-in benches at 17 to 19 inches off the floor (matching standard seating height) require structural framing and full waterproofing. Wall-hung floating benches from Wedi, Teak, or stone fabricators add the same function without the construction complexity. Floating benches photograph better because the floor under them reads as continuous.
Shower Heads That Create the Wow Factor
The shower head positioned overhead — sometimes called a rainfall or ceiling-mount head — produces the immersive spray that walk-in showers were designed for. Hansgrohe Raindance, Kohler Awaken, and Delta Stryke ceiling-mount heads run $350 to $1,200. Plan for the rough-in valve placement during framing — adding overhead supply later requires opening the ceiling.
Add a hand-held shower wand on a slide bar for cleaning and accessibility. Body sprays at three to six points along one wall produce the spa look in luxury installations but require dedicated mixing valves and significantly more flow than a single-head shower. Budget $2,500 to $8,000 for full multi-head shower systems.
Lighting Inside Walk-In Showers
Wet-rated recessed cans inside showers eliminate the shadows that ruin photography. Halo HLB6 wet-location LEDs at 600 to 800 lumens run $30 to $60 each. Plan one can per 16 to 20 sq ft of shower floor area — most walk-in showers need two to four cans.
For evening atmosphere, install LED strip lighting under the bench or behind a wall niche. Use IP65-rated waterproof strips from FluxTech or LED World at $25 to $60 per 16-foot reel. Wire on a separate dimmer from the main shower light and you control mood independently.
Waterproofing Done Right
The best-looking walk-in shower fails within five years if waterproofing is wrong. Use a topical waterproofing membrane — Schluter Kerdi, Wedi Subliner, or Laticrete Hydro Ban — over green board or cement board substrate. Tape and seal every seam, corner, and pipe penetration.
The pre-slope mortar bed must be installed before the waterproofing membrane and topped with a sloped final layer for tile. Skip this step and water pools beneath the tile, eventually rotting the subfloor. Hire experienced shower tilers for walk-in installations or expect to pay twice when amateur work fails.