A 2 post pergola throws away half the posts of a standard four-post structure by leaning on an existing wall or a cantilever design, and that single change opens up the space underneath. No posts in the middle of your patio, no legs to walk around, just a clean run of shade attached to the house or floating off two supports. It is my go-to when a client wants cover without cluttering a small deck.
Part of our Decks & Outdoor guide — explore the full guide →
Fewer posts means more engineering, though. A structure carrying its load on two legs has to handle the same wind and weight as a four-post unit with half the support. Get the ledger, the footings, and the beam sizing right and it is rock solid. Below is how the design works, where it shines, and how to build one.
What a 2-Post Pergola Actually Is
There are two common versions, and people use the term for both. The first is the wall-mounted or attached pergola: one side bolts to the house wall with a ledger board, and the outer edge rests on two posts. You get a full pergola with only two posts touching the ground because the house carries the back.
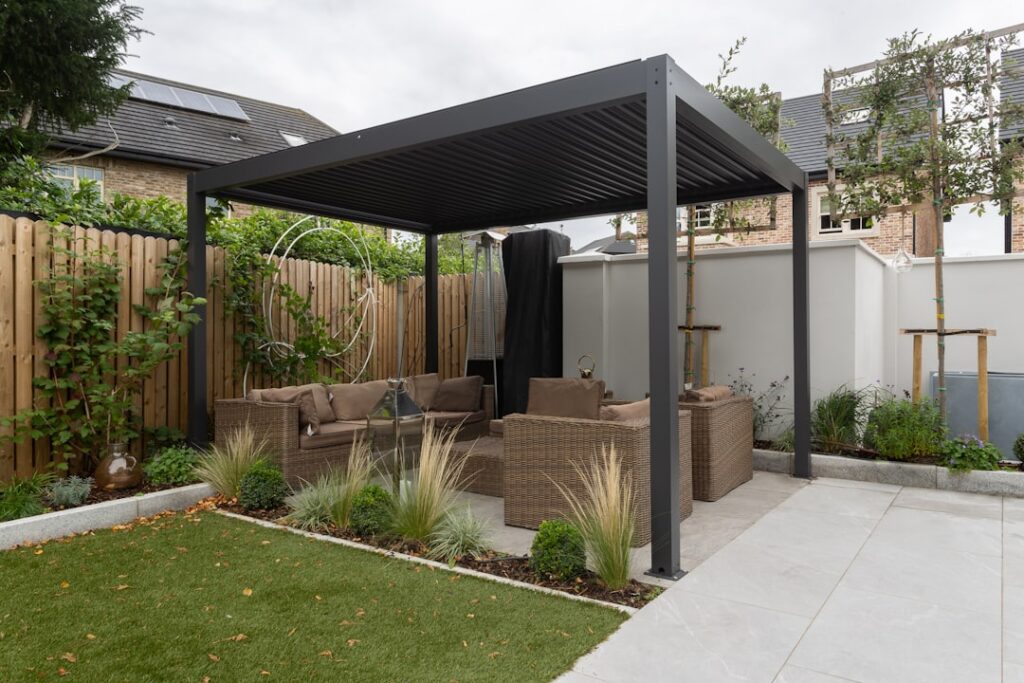
The second is the freestanding cantilever pergola: two posts sit in a line, usually offset toward one end, and the beams extend, or cantilever, past them to shade an area with no posts at all under the far side. Think of a large offset patio umbrella built from timber. Both deliver the open-underneath feel; they just borrow support differently.
Where a 2-Post Pergola Works Best
Attached versions are perfect over a back patio, a set of French doors, or a hot tub tucked against the house. Because the wall carries one edge, you keep the deck surface clear and the structure feels like an extension of the home.
Cantilever versions shine where you cannot or do not want to attach to the house, such as over a corner seating area, beside a pool where posts would crowd the deck, or in the middle of a yard as a floating shade island. The tradeoff is that a cantilever needs serious footings to resist the tipping force, so it costs more below grade than it looks like from above.
Post Size and Footings
Do not undersize the posts. For any pergola I use 6×6 pressure-treated posts, never 4×4. On a two-post structure the 6×6 is not optional, because each post carries roughly double the tributary load of a four-post design. The extra thickness also resists the twisting a cantilever puts on a post.
Footings are where a 2 post pergola lives or dies. Each post needs a concrete footing that extends below your local frost line, which ranges from about 12 inches in the mild South to 48 inches or deeper in northern states. Check your local code. Dig a footing 12 inches in diameter (or a 16-inch cube for a cantilever), set a cardboard tube form, and pour concrete. Embed a galvanized post base anchor rather than burying the wood, so the post stays off the wet concrete and lasts.
- Attached pergola: two footings below frost line, 10 to 12 inch diameter each.
- Cantilever pergola: two oversized footings, often 16 to 24 inches wide and deeper, to resist overturning. When in doubt, have an engineer size these.
Beam and Rafter Spans
Span is the distance a beam covers between supports without sagging. With only two posts, your beams may span farther and cantilever past the posts, so sizing matters more than on a four-post build.
As a working guide with pressure-treated or cedar lumber: doubled 2×8 beams handle spans up to about 8 feet, doubled 2×10 up to about 10 feet, and doubled 2×12 up to roughly 12 feet. Rafters of 2×6 on 16 to 24 inch centers span 8 to 10 feet comfortably. For a cantilever, limit the overhang past the post to no more than one-third of the backspan, so a beam supported over 9 feet can cantilever about 3 feet. Exceed that and the far end bounces and the near footing wants to lift.
Step-by-Step Install
- Plan and permit. Draw the footprint, confirm frost depth, and pull a permit. Most jurisdictions require one for a permanent pergola, especially an attached one.
- Mount the ledger (attached version). Bolt a pressure-treated ledger board to the house wall studs or rim joist with lag screws or structural screws, and flash it so water sheds away from the siding. This step is skipped on a cantilever.
- Set the footings. Dig below the frost line, form the holes, set post base anchors in fresh concrete, and check for level and correct spacing. Let concrete cure two to three days.
- Raise the posts. Bolt 6×6 posts into the base anchors, plumb them with a level in two directions, and brace temporarily with scrap lumber and stakes.
- Install the beams. Lift the doubled beams onto the posts (and onto the ledger for an attached build). Notch or use metal post-to-beam connectors. On a cantilever, position the beams so the overhang stays within the one-third rule.
- Add the rafters. Lay 2×6 rafters across the beams on 16 to 24 inch centers, notching them over the beam or tying with hurricane clips. Even spacing sets the shade pattern.
- Top slats and hardware. Add optional 2×2 top slats perpendicular to the rafters for denser shade. Tighten every connection with structural screws or through-bolts, not deck screws.
- Finish. Seal or stain cedar within a few weeks; let pressure-treated lumber dry a month before staining. Add a canopy or climbing vine for more shade.
Materials and Cost
A DIY 2 post pergola in the 10 by 12 foot range runs $1,200 to $3,000 in materials depending on species. Pressure-treated pine is cheapest; western red cedar costs more but resists rot and looks better. Figure roughly $15 to $30 per square foot in materials for a wood build, and $30 to $60 per square foot installed by a contractor.
- 6×6 posts, cedar: $60-$120 each
- Doubled 2×10 beams: $80-$160 per beam
- Concrete and anchors: $100-$250 total
- Rafters, slats, hardware: $300-$700
Aluminum kit versions cost more up front, often $3,000 to $6,000 for a two-post attached model, but skip the maintenance and won’t rot.
Design Tips and Add-Ons
Run rafters north-south to sweep shade across the space through the day, or east-west to block the harsh midday sun. Tighter rafter and slat spacing gives denser shade at the cost of more lumber. For real weather protection, add a retractable canopy between the rafters or a polycarbonate roof panel over the top.
Climbing plants soften a two-post frame beautifully. Wisteria (Zones 5-9) is spectacular but heavy, so build for the load. For a lighter choice, use climbing roses, star jasmine (Zones 8-10), or clematis (Zones 4-9) trained up the posts and across the rafters.
Attached vs Cantilever: Which to Choose
Torn between the two designs? Let the site decide. If you have a solid house wall or a substantial rim joist right where you want cover, the attached version is cheaper and simpler, because the wall carries an entire edge and you pour only two footings of ordinary size. It also ties the pergola visually to the house.
Choose the cantilever when attaching is impossible or ugly, such as over a detached patio, a pool deck where the house is far away, or a garden corner. Just budget for the bigger footings and accept the one-third overhang limit. A cantilever also lets you reposition the shade footprint without a post landing in a walkway, which is why I use it over seating areas where a leg in the wrong spot would ruin the layout. Both designs share the same rafters, beams, and finish work above the posts, so the choice really comes down to what is behind the structure and how deep you are willing to dig.
Pro Tips Before You Build
- Never skip the frost-line depth on footings. A shallow footing heaves in winter and racks the whole structure out of square.
- Flash the ledger board on an attached build. A leak here rots the house rim joist, a far worse problem than the pergola itself.
- Keep cantilever overhang to one-third of the backspan. Overhang greed causes bounce and lifted footings.
- Use structural screws or through-bolts at every connection. Deck screws shear under wind load.
- Brace posts until the beams tie them together. A freestanding two-post frame is unstable until the top is complete.
A 2 post pergola gives you architectural shade with an open, uncluttered floor, but it asks for honest engineering below grade and at the beams. Size the 6×6 posts, pour footings below the frost line, respect the span and cantilever limits, and you get a clean, long-lived structure that makes the space underneath the best seat in the yard.