Old attic insulation is often a hidden liability, harboring rodent droppings, mold, and decades of settled dust while quietly failing at its one job. Attic insulation removal and replacement clears out the compromised material and restores your home’s thermal envelope with fresh, high-performing insulation. Done properly, attic insulation removal and replacement improves air quality, cuts energy bills, and eliminates the musty smell that seeps into the living space below. This guide walks through the entire process.
- When Attic Insulation Needs Replacing
- Why Old Insulation Loses Effectiveness
- The Removal Process Step by Step
- Air Sealing Before You Insulate
- Choosing Replacement Insulation and R-Value
- Cost of Attic Insulation Removal and Replacement
- Safety and Cleanup Considerations
- Signs Your Attic Insulation Is Failing
- Frequently Asked Questions
When Attic Insulation Needs Replacing
Not every attic needs a full teardown. In many cases you can add new insulation on top of the old. But removal becomes necessary when the existing material is contaminated or degraded. Replace it when you find:
- Rodent or bird droppings, urine staining, and nesting material, which carry health risks and odor.
- Water damage or mold from a past roof leak, since wet insulation loses its R-value and grows spores.
- Vermiculite insulation, which may contain asbestos and requires professional testing.
- Compressed, matted batts that have lost their loft and no longer trap air effectively.
- Smoke or soot contamination after a fire.
If the insulation is simply thin but clean and dry, you can usually top it off rather than remove it, which is far cheaper.
Why Old Insulation Loses Effectiveness
Insulation works by trapping still air. Over 15 to 20 years, loose-fill cellulose and fiberglass settle and compress, reducing the depth and therefore the R-value. Moisture accelerates the decline; even a small roof leak can soak an area and flatten the material permanently. Pests compress it further as they tunnel through, and their waste degrades the fibers.
An attic that once had an R-38 rating may effectively perform at R-20 or lower after decades of settling and damage. Since heating and cooling account for roughly half of a typical energy bill, degraded attic insulation quietly drives up costs year after year.
The Removal Process Step by Step
Removing old insulation is dusty, hot, and physically demanding work. The professional process, which you can follow for DIY, goes like this:
- Assess and test: Identify the insulation type. If it might be vermiculite, stop and have it tested for asbestos before disturbing it.
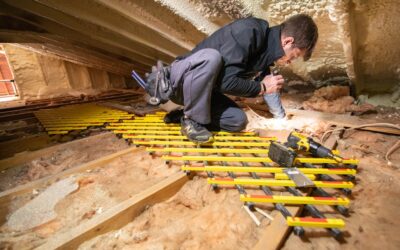
- Prep the space: Lay plywood across the joists for safe footing, set up work lighting, and seal off the attic access to keep dust out of the house.
- Gear up: Wear an N95 or better respirator, goggles, gloves, and a long-sleeved coverall.
- Remove loose-fill: A commercial insulation vacuum sucks blown-in cellulose or fiberglass into large disposal bags. Batts are rolled up and bagged by hand.
- Clean the deck: Vacuum residual debris, sanitize any droppings, and treat mold if present.
- Dispose properly: Bag and haul the material to an approved facility.
Renting an insulation vacuum runs about $150 to $250 per day, and the job for a typical attic takes one to two full days.
Air Sealing Before You Insulate
The single most valuable step, and one many homeowners skip, is air sealing the attic floor before adding new insulation. With the old material gone, the deck is exposed and every gap is visible. Seal around recessed lights with fire-rated covers, caulk the top plates of interior walls, foam around plumbing and wiring penetrations, and weatherstrip the attic hatch.
Air sealing stops the convective heat loss that insulation alone cannot address. A well-sealed attic can improve overall efficiency by 15 to 20 percent beyond the insulation upgrade itself. This is the best time to do it because you will never have better access.
Choosing Replacement Insulation and R-Value
The Department of Energy recommends attic insulation between R-38 and R-60 for most of the United States, with colder climates at the higher end. Your options:
- Blown-in fiberglass: Affordable and easy to install with a rented blower, around $1 to $1.50 per square foot. Resists moisture and does not settle as much as cellulose.
- Blown-in cellulose: Made from recycled paper, denser and better at blocking air, roughly $1.20 to $1.80 per square foot. Settles more over time.
- Fiberglass batts: Best for standard joist spacing and easy DIY, but leaves gaps if not cut precisely.
- Spray foam: The highest performance and best air seal, but expensive at $3 to $7 per square foot and best installed by professionals.
Blown-in materials are usually the best value for an open attic floor because they fill irregular cavities and reach into corners batts cannot.
Cost of Attic Insulation Removal and Replacement
For a typical 1,000 to 1,500 square foot attic, expect these figures:
- Removal only: $1 to $2 per square foot, or $1,000 to $3,000.
- New blown-in insulation: $1 to $2 per square foot installed.
- Air sealing: $350 to $750 as an add-on.
- Full removal plus replacement by a professional: $2,500 to $6,000 total.
DIY can cut costs significantly, but the labor is grueling and the dust exposure is real. Many homeowners choose to remove the old material themselves and hire out the blowing of new insulation, or vice versa.
Safety and Cleanup Considerations
Attic work carries genuine hazards. Always walk only on joists or plywood to avoid falling through the ceiling. Ventilate the space and take frequent breaks in summer, when attic temperatures can exceed 130°F. Keep your respirator on the entire time, since old fiberglass sheds irritating fibers and contaminated insulation carries pathogens. If you discover vermiculite or suspect asbestos, stop immediately and call a licensed abatement contractor.
Signs Your Attic Insulation Is Failing
Because the attic is out of sight, most homeowners never notice degraded insulation until the symptoms show up elsewhere in the house. Rising heating and cooling bills with no change in habits is one of the clearest signals. If the upstairs rooms feel noticeably hotter in summer or colder in winter than the rest of the house, heat is escaping through an underperforming attic.
Uneven temperatures between rooms, ice dams forming along the roof edge in winter, and drafts near ceiling fixtures all point to insulation and air-sealing problems. Ice dams in particular are a red flag: they form when heat leaking into the attic melts snow on the roof, which then refreezes at the cold eaves, forcing water back under the shingles. Fixing the attic’s insulation and air sealing is the real cure, not just clearing the ice.
Head up into the attic periodically and look for the obvious warning signs: matted or thin insulation, water stains on the underside of the roof deck, droppings, and daylight showing through gaps. A musty smell drifting down through the attic hatch often means moisture and possible mold. Catching these signs early lets you plan a removal and replacement before minor issues become expensive structural repairs.
Frequently Asked Questions
Do I always need to remove old insulation?
No. If the existing insulation is dry, clean, and free of pests, you can usually add new insulation on top. Removal is only necessary when the material is contaminated, wet, moldy, or contains vermiculite.
How long does attic insulation last?
Fiberglass and cellulose can last 20 to 30 years, but they settle and lose R-value over time. Water damage, pests, or compression can shorten their effective life considerably.
Can I remove attic insulation myself?
Yes, with proper protective gear and a rented insulation vacuum, but it is hot, dusty, and labor-intensive. Never disturb suspected asbestos-containing vermiculite yourself; that requires a licensed professional.
What R-value do I need in my attic?
Most U.S. homes benefit from R-38 to R-60. Colder northern climates should aim for the higher end, while milder southern zones can use less. Check the Department of Energy recommendation for your region.
Is air sealing really necessary?
Air sealing is one of the most cost-effective steps you can take. Sealing gaps before adding insulation stops air leaks that insulation alone cannot block, often improving efficiency by 15 to 20 percent.